Thanks for choosing n-Track Studio. We’re a small team of developers and musicians who have worked hard over the years to create a powerful, easy-to-use tool for recording, composing, and producing music. We’re proud of n-Track, and we hope it helps you bring your musical ideas to life.
If you have any feedback, suggestions, or spot a bug, please feel free to contact us - we’d love to hear from you. Enjoy making music with n-Track, and play on!
For a long time, recording music was out of reach for those without access to professional recording studios and expensive gear. High costs and limited equipment has confined many musicians to the world of second-rate equipment, discouraging their ambitions of realizing their true musical potential.
Once, this was typical, but today, things are changing. Forget private recording studios, costly equipment and high invoices: with n-Track Studio, you have a complete, professional-grade recording setup right at home - easily and affordably.
n-Track Studio is a digital audio multitrack recorder – you can also think of it as the creative powerhouse behind your music. It’s built to spark your next idea!
All you need is a soundcard, a microphone, some hard drive space, and a bit of imagination —there are no limits to what you can create with n-Track!
Let’s have a look at some of n-Track Studio’s standout features.
Easy and intuitive approach
To start a new song, just record the first track (usually the rhythm track). To record an audio track click the "Record" button. Once you've finished recording the track, click the "Stop" button. Can it be any simpler?
Powerful multitrack editing features
Add and record as many tracks as you wish. Edit tracks by time-stretching, looping, trimming, moving, reversing and crossfading audio and MIDI parts. Create arrangements in minutes, and have total control on your song's parts and overall structure.
Versatile routing and mixing
Group tracks, create Aux channels for send effects, route tracks to each other, or resample MIDI internally thanks to internal recording routing. Automating mixes allows for complex, evolving arrangements.
MIDI editing and control
Write or record MIDI using the built-in editors and controllers. Write and edit MIDI notes and velocity with the Piano Roll, play on-screen Drums and Keyboard controllers, or connect external MIDI controllers.
Live input processing allows you to use n-Track Studio as a multi-effect device for your instruments. You can connect an electric guitar to your computer, for example, then use n-Track Studio's effects as virtual guitar pedals. Effects include Reverbs, Echos and Delays, Compressors and EQ, Phaser and Flanger, Guitar Amp and Cabinet simulators, the VocalTune autotuning plugin, and more.
Lots of included sounds
Navigate built-in or third party virtual instruments with ease with n-Track's instrument browser. It makes adding virtual instruments a breeze, with no interruption to creativity. Get lots of free and premium sounds installed with a click with the Add-on Manager.
Beat creation and sequencing
You can easily create drum and musical loops using the widgets on audio and MIDI files, or using step sequencing. Play in your beat with external controllers, use the n-Track Drums drum machine plugin, or use the on-screen Drums controller.
Automation
In n-Track Studio, you can automate the envelopes for the volume, pan, send and return settings. This allows you to program fade-ins and fade-outs, crossfade between tracks, boost the volume of a track when there is a solo, and so on.
n-Track Studio brings cloud storage and music collaboration inside your DAW environment. The integrated Songtree app lets you make music with others online: get another musician into your project, or contribute to a song started by others. You can also freely store unlimited mixdowns on Songtree.
Visual control on your sound
Extra features include advanced EQing and Spectrum visualization, 2d and 3d sonograms, stereo field analysers and built-in instrument tuner. Control your sound's frequency content by clearly seeing what's going on.
Syncing
n-Track Studio can sync to other programs or external devices using SMPTE/MTC or MIDI Clock sync, acting either as master or slave. AVI, MPEG and Quicktime videos can be played in sync with the song in a dedicated video playback window. more...
Multiple Soundcards
n-Track supports multiple input and output soundcards, or more than one soundcard. This makes it possible to record more than one track at a time and to send the program's output to more than one stereo output. Each output channel has its own master effects section and master volume control.
Installing n-Track Studio
Minimum System Requirements
To run n-Track Studio, you need the following minimum configuration:
CPU: Pentium III 700CPU: Intel Core Duo
Memory:
512 MB RAM
Soundcard:
An audio device that accepts a mic or line input
Make sure you’ve got the latest versions of the drivers for all your hardware devices, especially the soundcard. Updating drivers is often the solution to many different problems. You can download updated drivers for your devices from the manufacturers' websites
Once done, double-click the downloaded file to start the installation.
You may have to accept the User Account Control prompt that asks you if you want to authorize the installation of the program
Follow the Setup instructions to install n-Track Studio into your computer
Launch the program by selecting the n-Track Studio icon in the Start menu.
You may have to accept to open the program from the Quarantine Manager prompt.
If you see the Quarantine Manager prompt, simply click 'Open' to continue the installation.
Double click the n-Track.pkg icon, and follow the Installation instructions to install n-Track Studio into your computer.
Launch the program by clicking the n-Track Studio icon in your Applications folder
Activating n-Track Studio
Once you purchased n-Track Studio, you can activate your version of the program to unlock all the features. To activate your copy, you must have the free evaluation version installed. If you still don't have it you can get it here, or see the download instructions.
Watch our video on Activating n-Track Studio for a walkthrough of the process.
Online Activation
All you need to do to activate your version of n-Track is to click on the Activation command found in the Help menu, and login with your n-Track credentials.
Navigate to Help/Activation from the top menu.
A dialog will open, asking for your ntrack.com account credentials.
Note that if you have not created one yourself, your n-Track account will be automatically created immediately after purchasing the software using your purchase email address, and you will find your login details in the purchase confirmation email you received.
If you can't remember your login password you can recover it here.
Important: If you have not received a confirmation email after you purchase n-Track Studio, PLEASE CHECK YOUR E-MAIL SPAM folder before contacting support.
Once you login, you'll see a list of the products that you have purchased and that are ready for activation. To activate a product, simply press the Activate button found next to it.
n-Track Studio will now be registered with the name and credentials you provided. Having a registered version of n-Track not only unlocks all the software's features but also gives you other benefits as a registered user.
Offline Activation
To activate n-Track running on a computer that cannot be connected to the internet you can use the Offline activation method.
We strongly recommend, when possible, using the Online activation method instead as the Offline method is more prone to errors. After the online activation, n-Track doesn't require an internet connection, so if you can temporarily connect the computer to the internet, you can use the online activation.
If you cannot connect the computer to the internet, not even for even a short time, to activate offline:
open the Help menu and click on the 'Activation' command while holding down the SHIFT key.
a dialog will open. You'll find an alphanumeric code in the first text-box. This is the device id that you must send us in order to receive your offline activation code.
to receive your activation code, simply login to your n-Track account on the ntrack.com website from any device with an internet connection, and click on 'My purchases'. Copy and paste the device id into the textbox at the bottom of the page, click 'Get activation code' and wait for your activation code to be returned.
once you receive your offline activation code, copy and paste it to the Offline activation code text box inside the n-Track application.
press the 'Activate' button, and wait for the response that will be displayed in the text box on the top of the window.
If something goes wrong and you see an error message, copy and paste the message in the content of an email with subject Offline activation Failed, and send the email to support@ntrack.com.
Deactivate or Uninstall
Uninstallation
Open Start Menu/Control Panel
Select "Add or remove programs"
Select n-Track Studio from the list of installed programs
Click on "Add/Remove"
Drag the n-Track icon from the Mac Applications folder into the Trash icon in the Dock
Deactivating and moving PCs
Depending on which edition of n-Track you have purchased you'll be able to activate the app on a certain number of PCs and/or Macs.
If you reach the maximum number of available activations, and want to install n-Track Studio on a new computer, you'll need to manually deactivate one of your copies on one of the PCs where you previously activated n-Track. To deactivate your copy please launch the app, select Help from the top menu, then select Activation. Uninstalling the software does not automatically deactivate your version. If you have already uninstalled n-Track on the computer where you want to deactivate, you can simply reinstall it, deactivate it (from the Help -> Activation menu) and then uninstall n-Track again.
Please remember to always deactivate n-Track on any computer that you dismiss, sell or before reinstalling the operating system.
Recording your first track
Working with n-Track Studio is easy. The first step is to check if the recording VU meter shows the input signal coming from your microphone or instrument. The VU meter is in the upper left section of the program screen, above the master volume control. If n-Track Studio is receiving an input signal, a green bar will appear in the VU meter. If it doesn’t, make sure that all the cables are connected correctly and that the soundcard is set to record from the correct sources. See setting the recording levels for more info.
Connect a recording source -- like a microphone -- to your soundcard's input jack. To start a new song, just click the "Record" button on the lower toolbar to record the first track (usually the rhythm track). Once you have finished recording, click the "Stop" button. The track you've just recorded will appear on the timeline as a waveform. Select it and adjust the volume and pan settings by moving the sliders on the mixer window (you can do so while listening to the track). Now you are ready to add a new track by clicking on the add track button. Make sure you are ready to play and click the "Record" button again. Alternatively, you can start the playback by pressing the "Play" button and then, during playback, clicking the "Record" button to start recording at the desired point (this is called "punch-in recording"). Tracks can contain more than one audio file, and you can drag and drop waveforms from one track to another. You can also adjust the waveform's offset inside a track by moving the small crosshair icon in the lower left corner of the waveform rectangle.
Once you have finished your song, save it as a .sng file using the Save As command from the File menu (File/Save As).
The .sng file that the program creates contains the audio files' names, the mixing settings, the volume envelopes and the effects settings. It does not contain the actual audio data, which will remain stored in the audio files as they were recorded. See types of files used by n-Track Studio for more info on the various file formats used by the program.
Now you may want to mix down all the recorded tracks into a single audio file using the mixdown command. Press Ctrl+R (Cmd+R on a Mac) to mix down the song, or select File/Mixdown Song.
Note on menu commands:
We will occasionally refer to commands available from the n-Track main menu bar as, for example, "Add Channel/Add New Blank Track/Audio." This means “click on the Add Channel sign on the main menu bar that appears in the upper part of the n-Track main window, click then on the Add New Blank Track in the popup menu that appears, and then click on the Audiocommand in the next popup menu.” Each "/" sign corresponds to a new popup menu that appears when you select an entry from the previous menu.
Single Track View and Song View
On mobile, you can work in Single Track View for focused editing, or in Song View for arranging and navigating the full project.
Open and Navigate Single Track View
From Song View, double-tap a part to open Single Track View.
Tap the menu to open track navigation and switch to another track quickly.
Edit and Mix in Single Track View
Edit musical content on the selected track (for example, update a drum part and adjust swing).
Use Solo to isolate a track such as lead vocal while making mix decisions.
Add and adjust effects (for example, reverb) directly on the focused track.
Return to Song View and Export
When the mix is ready, use Export Song from the project/export menu.
Switch back to Song View when you need full arrangement context.
Tip: Use Single Track View for precision work, then return to Song View when you need more than a single track, i.e when arranging song structure.
Step by step Tutorial
After you have successfully installed n-Track Studio, you can begin your first project with your new Digital Audio Multitrack Recorder. In this chapter, we will show you how to create a new song from scratch using just your computer, a microphone and n-Track Studio. Although the program is capable of recording two or more (depending on the audio hardware) tracks at the same time, for this tutorial we’ll assume that you’re going to record all the tracks by yourself, one at a time.
Finding initial inspiration
The process of making a song can be carried out in many different ways and following very different steps and criteria. You may already have a melody or a chord sequence in mind, or you may want to start from a beat or a simple instrumental loop and then build your song on top of that.
Although n-Track Studio will support whatever creative workflow you may prefer, it also provides some tools to quickly and effortlessly start laying down the foundations for a song. The Loop Browser, accessible by pressing the button on the toolbar, let’s you add instrumental and drum MIDI and audio loops, directly into your project. In the Loop Browser, selecting MIDI —> Quick Groove lets you add a drum track, a bass track or a bass+drums track directly into your project, ready for you to jam on or start building your song.
Although n-Track Studio will support whatever creative workflow you may prefer, it also provides some tools to quickly and effortlessly start laying down the foundations for a song. The Loop Browser, accessible by pressing the button on the toolbar, let’s you add instrumental and drum MIDI and audio loops, directly into your project. In the Loop Browser, selecting MIDI —> Quick Groove lets you add a drum track, a bass track or a bass+drums track directly into your project, ready for you to jam on or start building your song.
When you select the Quick Groove pattern you want to add from the Loop Browser, n-Track will automatically create a Step Sequencer track with the selected pattern already loaded and ready to play. You can choose from n-Track pattern presets or make your own. You can then edit the patterns,edit the patterns,edit the patterns, re-arrange them or create new ones.
Recording a Demo Song
Prepare your instruments, turn on your device, launch n-Track Studio, and connect the mic plug to the soundcard’s mic input connector.
Before you start recording, check if the program is receiving a signal from the microphone. Talk into the microphone and see if the program’s recording level VU meters move.
Prepare your instruments, turn on your device, launch n-Track Studio, and either use the internal microphone on your device, or plug in an external one with the relevant adapter.
Before you start recording, check if the program is receiving a signal from the microphone. Talk into the microphone and see if the program’s recording level VU meters move.
If they don’t, run the Windows volume control using n-Track Studio's Settings/Soundcard settings/Recording mixer controls menu command. You can also access this control through Windows: select Start Menu/Control Panel/Hardware and Sound/Manage Audio Devices.
If they don’t, run the Mac volume control using n-Track Studio's Settings/Soundcard settings/Recording mixer controls menu command. You can also access this control on a Mac: click the Apple menu, then select System Preferences/Sound.
If they don’t, go to Settings --> Input Settings and check the microphone input from 'Select Input' and check that the Mic Level is turned up.
Open the recording view (Options/Properties/Recording in Windows, then check that the mic in is the only input source selected, and that the level is sufficiently high.
While adjusting the mic input level, check the actual recording level using the n-Track recording VU meter. Sing or play the instrument the mic is going to record at the highest volume you think you will reach during the actual recording, and set the level so that, at the maximum volume, the VU meter will be in the higher red range.
Note:
If you exceed the maximum allowed recording level, the recording VU meter will show a CLIP sign, which means the recording level in that precise instant has been too high and the recorded sound will be distorted.
Since we’ve decided that we’re going to record one track at a time, and you’re recording directly from the mic, you’ll want to record mono tracks. To set the recording format to mono, click on the “Settings” button on the recording VU meter and select "Mono" (be sure that the vu-meter size enable you to see this icon, in case it don't, enlarge the vu-meter)
Since you’re recording your first track, there’s no particular need to use headphones, but you will need to use them for the following tracks to avoid feedback caused by the microphone capturing the signal coming out of the speakers.
Now that everything is set up, prepare yourself for recording and press the "Record" button on the lower n-Track toolbar. You’ll see the time indicator showing the recording time coloured in red. Complete the recording and click on the "Stop" button.
Let’s say that you were a little nervous about your first n-Track recording and the track didn’t come out right. No problem: just double-click the recorded waveform, then click the "Remove" icon in the popup window that opens. The program will ask you what you want to do with the recorded file. The safest option to select is "Recycle Bin." This sends the file to the system recycle bin, so that you’ll be able to retrieve it later if you realize that you erroneously removed a good file.
Let’s say that you were a little nervous about your first n-Track recording and the track didn’t come out right. No problem: just tap and hold the recorded waveform, then tap "Remove part" from the popup window that opens.
Then, let's assume you want to record the track again, and this time everything goes well. You listen to it by clicking on the playback button on the toolbar, and it sounds fine.
It is now a good time to save your work. By default, n-Track names the audio files that you record like this: “name_of_the_song_X.wav” (where X is a number). Since the default name of a project is “New song,” the WAV file you’ve just recorded will be named “New_song_1.wav”.
It's always a good thing to use a file name that is logically related to what the file is actually about, so we’ll now rename this file. Supposing that it is an acoustic guitar track, rename the file to "DemoSong_Ac_Guitar1.wav" using the Track/Rename-Copy wave file command. Type the new name into the "To" text box and click "OK." Notice that the name of the track, as shown in the upper part of the track’s mixer section, will not change: since a track can contain more than one file, the name of a track is not related to the name of its audio files. You can change a track name by right-clicking the track’s waveform in the timeline window, selecting "Properties" from the pop-up menu and typing a new name into the "Track name" box.
Save the whole project, using the Save as command from the File menu, to the file “DemoSong.sng”. The .sng project file will contain all the song settings, links to audio files, effects, etc., but not the actual audio data, which remains stored in the audio files that the .sng file points to, like the “DemoSong_Ac_Guitar1.wav” we previously recorded.
Let’s now record the second track. If you changed instruments, you’ll need to check the recording level again to be sure it’s correct. If you’re using headphones, you may also need to check if the audio being played back (i.e. the first track) is at a volume similar to that of the signal that you’re recording. This will allow you to play along with the recorded music while also hearing what you play through the headphones.
Setting up these levels properly may be a bit tricky with some soundcards: on certain soundcards, the recording level for the input source which is controlled by the slider in the recording view of the volume control/sound control panel, is not independent from the level of the input monitoring (the level in the playback view of the volume control/sound control panel). This means that you may not be able to move the mic monitor slider without altering the recording level. You can instead move the WAV out (playback) or master volume slider to match the playback volume to the volume of the microphone monitoring.
Once you’re ready, click at the point in the timeline at which you want to start recording the second track, then click the "Record" button. Record the audio for the second track, then click "Stop" when you're finished.
The most common problem at this stage is the so-called “bleeding” of the first track into the second track. If the soundcard mixer is not properly set up, the newly recorded track will re-record existing tracks, thus destroying the isolation between the tracks. To check if this is happening, just play back the tracks together and solo the second track by clicking on the S button on the track’s mixer section. If you still can hear the first track with the solo button pressed, your tracks are bleeding: see the Setting the recording levels section for instructions on how to solve this problem.
Re-Recording Portions of a Track
We’re ready for the third track: a couple of electric guitar solos, one in the middle of the song and one near the end. Record the third track as you did the other two.
Let’s say that the first guitar solo goes well, but the second doesn’t come out right. Since the first solo was OK, you don’t want to re-record the whole track, but you want to overdub the second solo.
Click on the button on the left side of track 3, then select Scarlett 6i6 (or the name of your input soundcard channel if your configuration is not the default).
Alternatively, you can click on the button on the recording VU meter, then select "Record to track 3" from the drop-down list.
Now click on the timeline at a point some seconds before the start of the 2nd solo, then click on the "Record" button. Once finished, you’ll notice that a new part appears on the timeline, just after the first solo audio file. In fact, when the program overdubs a track, it doesn’t modify the actual audio files: it just records another WAV file with the new material and adds it in the correct place in the timeline. This is called non-destructive overdubbing, as the original audio file is left unmodified.
The new recording is placed into a new Take; both the old and the new takes will appear stacked on top of each other. You can switch between the old and the new takes simply by clicking on the waveform of the take you want the track to play.
Since we were doing this just to check what had happened, we want to restore the parts exactly as they were after the overdub. To revert the song to the previous state, perform the edit --> undo function twice.
Now that the solos are OK, you may want to add a little EQ to the guitar track, and maybe also a bit of delay. Since other tracks may need to use this delay as well, put it on the first aux channel. Be sure that the aux channels are shown (click on the "select tracks to view" icon then "Show Aux channels")
Click the "Add send"button in the guitar track's mixer section. When you click this button, n-Track will add a new aux channel to the mixer and a send section at the bottom of the guitar track's mixer strip.
Right-click on the mixer window, then enable both the Show Master Channels and Show Aux Channels items. Right-click the mixer again, then enable the Horizontal Masters & Auxs item in the Layout submenu.
Move the mouse cursor over the black box underneath the Aux 1 mixer strip, then click the "+" sign. Double-click "n-Track" in the pop-up menu, then select Echo from the list of available effects.
The plug-in will now be applied on the first aux channel. To hear it applied to the 3rd track, you’ll need to send this track to the aux channel. Adjust the track send volume slider to vary the amount of signal sent from the track to the aux channel.
The Send mechanism is very flexible: any track or group channel can be sent to any other channel, allowing for complex and creative signal routing. To change the output of a channel’s send, click on the label at the bottom of the channel’s send section (the one that by default shows Aux 1 after the send is created).
Adding Compression
Let's assume that all went well and the tracks have been correctly recorded. Now you notice that the vocal track level is a bit too low in some places and too loud in others. More often than not, vocal tracks need a bit of compression. Use the n-Track Compressor plug-in that comes bundled with n-Track Studio to flatten out the vocal's dynamics, making the quiet parts louder and the loud sections quieter.
Software effects processing via plug-ins is one of the most powerful features of software-based multitrack recording in general and of n-Track in particular. Effects plug-ins can be added from the effects browser (choose "compressor").
Effects processing is always performed in real-time, so you can tweak the plug-in settings while listening to the result of the processing. Click on the drop-down preset list and choose a preset that is suited to the track (for example, “Soft knee compression”).
For detailed info on how to use the compressor, right-click on the plug-in’s logo and select Help from the popup menu.
Applying an Effect to Specific Parts of a Recording
Suppose you want an n-Track effect, like Echo, to be applied only to the final part of the second solo. We can obtain this using aux send (or return) automation:
Add a new aux channel by selecting the Add new Aux channel command from the Add Channel menu (you don’t need to do this if the song already has an aux channel).
Make sure "Show Aux channels" is selected from the track visibilty menu.
Click on the draw volume envelopes button on the track, then "Find parameter..." and select the Effect and Parameter to create an automation envelope for
Click to add nodes and drag the envelope to create your desired effect parameter automations.
Start the playback and listen to how the transition sounds (to start the playback at a certain point, double-click on the time axis). If it sounds too sharp, soften it by substituting the abrupt step in the volume envelope with a short fade-in. Click and drag the points on the volume envelope to shape it into a gentle curve.
Final Mix-Down, Compression, EQ and Reverb
All the tracks have now been recorded, so let’s do the final mixdown of the whole song. An almost mandatory step in the mixdown is to add compression to the whole mix by putting a Limiter plug-in on the master channel. Add the Limiter plug-in to the Master channel, then load the "Soft Limiter" preset and adjust the "Threshold," "Attack" and "Release" controls until your track sounds solid but not distorted.
A bit of EQ is also typically a good idea: add the Dynamic EQ plug-in to the Master channel, then click and drag its equalization points to shape the sound of the track.
Add a reverb effect to the vocal track; if you want to use the same reverb on both the lead vocal track and the back-up vocals, put the reverb on the 2nd aux channel, then send both the lead vocal and the back-up vocal track to the 2nd aux channel. In this way, the reverb plug-in will process a single signal made up of the two tracks. This will use much fewer system resources (e.g. CPU power) than putting a separate reverb on each track, and will also make the two vocal tracks blend together better.
Programming Volume Envelopes
The next step in mixing is to refine the volume of the tracks during the evolution of the song. The volumes of the tracks don’t need to be constant in n-Track Studio - you can draw their envelopes to adjust volumes at different points thoroughout the song.
Click on the volume button . You can now select which envelope to draw by choosing it from the Envelope options panel on the track left panel
Click on the pan icon in the lower toolbar, then 'Envelope Edit' mode.
You can now select which envelope to draw by choosing it from the Envelope options panel on the track left panel
or by adding an envelope track by clicking on the icon. Now you can design all of the track’s volume evolutions by clicking and dragging the envelope points.
Now you can design all of the track’s volume, pan and automation envelopes by clicking and dragging the envelope points.
We recorded an electric guitar solo track, and electric guitars are usually very noisy when they are not being played. You may want to remove the guitar buzz in the instants where the guitar is not playing.
Select the intervals to mute by holding down the Alt key (Command on a Mac) and dragging with the mouse on the track. Right click the selection and select 'Silence Selection' from the menu to mute these parts.
If the buzz is just at the start and at the end of the audio files, you can obtain the same result by moving the start and end of the waveform to where the guitar actually begins and ends playing. To do so, drag the little rectangles at the left and right of the waveform to the desired positions.
Fading out the Song
We’re now ready for the final fadeout. Select "Master volume" on the popup menu that appears when you click on the volume icon on the toolbar. Select the region where you want the fade to take place (typically the last few seconds of the song) by dragging with the mouse on the time axis, then click the fade out button on the toolbar (right click on the toolbar then "add/remove" to add the fade out button).
We’re now ready for the final fadeout. Ensure that the Master channel shows on the timeline by selecting it to be visible.
Once again, let's enable automation and, on the Master track, select the region where you want the fade to take place (typically the last few seconds of the song), Tap to add a starting point note, then tap again to add an end point for the fade out, and drag down.
Mixing Down to a Single Audio File
Now that everything sounds good, the last step is to mix down all the tracks to a single audio file. Select the "Mixdown Song" command from the File menu, then type in the destination filename and click "Save." Click "More Options" to set the audio encoding options. Selecting "Stereo", either "16 bit" or "24 bit", and either "44100" or "48000" for the sampling frequency are industry standards. If you plan to burn the song to an audio CD, make sure that you check the "Stereo" and "16 bit" options in the mixdown dialog box and select "44100" as the sampling frequency.
Click the "Start" button to save the mixdown. The mixdown process usually takes quite a bit less time than the actual duration of the song. If you want to hear how the mixdown audio file sounds, save your project (you should do this every time you make any important changes), then open a new project. Import the mixed-down audio file using the Track/Import audio file menu command. Listen to the track to hear how your mixdown sounds.
Now that everything sounds good, the last step is to mix down all the tracks to a single audio file. Select the "Export" icon in the lower toolbar, then "Export Song". Note that "Share to Songtree" uploads your track to our community of musicians - called Songtree - where you can get feedback and get remixes, find musical collaborations for your work.
Click "Export Song" to set the audio encoding options. Selecting "Wav" and either "16 bit" or "24 bit", are industry standards. You can also choose to Export the whole song, a track selection or a chosen loop interval
Click the "Save" button to save the mixdown. The mixdown process usually takes quite a bit less time than the actual duration of the song. If you want to hear how the mixdown audio file sounds, save your project (you should do this every time you make any important changes), then open a new project. Import the mixed-down audio file using the Import audio file menu command. Listen to the track to hear how your mixdown sounds.
Editing the Mixdown File
You may now need to cut unnecessary silent lead-in and lead-out parts in the mixdown audio file. Click on the button on the toolbar and select “Destructive audio editing." Select the part of the track you want to cut out, then click on the cut button on the toolbar.
Burning to CD
The last (optional) step is to burn the song to a CD-R. Open the CD burning dialog box using the View/CD Burning menu command. Import the mixdown audio file you just created, insert a blank CD and press the "Burn" button. You can also tell the program to mixdown and automatically burn the track to an audio CD by selecting the "Burn audio CD track" option in the mixdown dialog box.
Good luck with your next song!
Quick Start menu
When you launch n-Track, you have various options to quickly start working on your song:
Record audio: This option lets you instantly create a new, record-enabled audio track.
Compose midi: Adds a new instrument track and opens the piano-roll to start writing in some notes.
Create a beat: Opens up the step sequencer with a default kit loaded, so you can start creating a beat.
Add a groove from library: Lets you quickly add rhythmic tracks to your project by creating Step sequencer tracks for drums and bass template patterns.
Join a song online: Opens the integrated Songtree app, where you can find other musicians to collaborate with, or join a song started by others.
You’ll also have a list of your most recent projects for quick loading, or the option to browse your computer to look for a project to open.
Input/Output
Types of Files Used by n-Track Studio
n-Track Studio uses numerous types of files for different purposes:
Song File extension: .sng
Song files are n-Track Studio project files. They contain the song structure, the mixer settings, the effects used on each track, the volume envelopes, and so on. Song files don’t contain the actual audio data of the audio tracks: they instead refer to WAV or Aiff files that contain the audio data. To play back a song, you’ll need both the .sng file and the associated .wav files.
WAV and AIFF files extension: .wav, .w64, .aif, .aiff
WAV or AIFF files (commonly referred to as ‘audio files’ or ‘wave files’ in this guide) contain the audio data that makes up tracks’ audio signals. Each waveform that appears on the timeline window corresponds to an audio file (the full path of the file can be seen in the audio file’s properties dialog box that appears when you double-click on the waveform). A song can contain more than one instance of the same audio file. Audio files can have many formats. n-Track Studio supports stereo and mono audio files of any sampling frequency, with 16, 24 or 32-bit depth. n-Track also supports Wave64 files which allow for file sizes greater than 2 Gb.
Standard MIDI file extension: .mid
Standard MIDI files contain sequences of musical notes. The main difference from .wav files is that while .wav files contain a representation of an acoustic signal, MIDI files contain the sequence of the notes played on an instrument. For example, a MIDI track of a piano recording contains only the sequence of notes (described as note number, velocity with which the key was pressed, time at which it was pressed and duration of the note) played by the pianist. The corresponding .wav file contains the acoustic signal emitted by the piano. The difference between a .wav and a MIDI file is basically the same as between a recording of a concert and the concert’s sheet music. The .wav file obviously contains much more information than just the sequence of notes; for this reason, .wav files are typically much bigger than MIDI files. n-Track Studio can both import standard MID files into MIDI tracks and export the current song’s MIDI tracks to standard MIDI files.
Peak file extension: .npk
n-Track Studio creates peak files to speed up the displaying of audio files’ waveforms on the timeline. Normally, the program generates the .npk files during recording. These files are not critical, as the information in them is contained in the audio files they were created from. If you accidentally delete an .npk file, the program will recreate it the next time it has to display the associated audio file’s waveform.
Packed song file extension: .sgw
Packed song files are a special kind of song file. Like an .sng file, an .sgw file contains the structure of the song. A packed song file, however, also contains the audio data used for the song’s tracks. Thus, a .sgw file can be used to save and transfer a whole song as a single file, without having to worry about transferring the .wav files associated with the .sng file. Packed song files are mainly useful for archiving or transferring songs from one computer to another. When the program opens a .sgw file it still has to recreate the .sng and .wav files structure, so the .sgw format is not useful for saving songs while you’re actively working on them. The audio data contained in .sgw files can be either uncompressed or compressed.
MP3 and M4A audio files are compressed to drastically reduce the size of the file, while only marginally sacrificing the audio quality of the recording. MP3 files are typically a tenth or less of the size of uncompressed .wav files, and are widely used to transfer songs over the Internet. M4A is a newer format that reduces the file size by a factor of 2 compared to MP3 when keeping the same perceived audio quality. n-Track Studio can save a song’s mixdown to MP3 or M4A or convert existing .wav files to MP3 or M4A.
Windows Media Audio is a compressed audio file format similar to MP3, but WMA files are typically ½ or less of the size of MP3 files of comparable quality, and are thus more suited for transferring songs over the Internet. Unfortunately, .WMA is a Microsoft proprietary standard, is available mostly on Windows PCs, and is not currently nearly as popular as the MP3 file format.
Track Formats, Mono & Stereo Playback
Tracks can be either mono or stereo. On a stereo track, the pan slider will simply act as a balance control, while it will actually pan a mono track to the left or to the right.
Listening to a song in mono mode is often useful to ensure that the song is mono-compatible, i.e. that it will not sound bad when played on mono devices (old radios, mono televisions, etc.).
You can select the playback mode by clicking on the channel Stereo/Mono state button on the channel mixer stripe:
Stereo mode
Stereo to Mono mode
Left channel to Mono mode
Right channel to Mono mode
Packed Song Files (.sgw)
n-Track Studio normally saves projects into .sng files. An .sng file contains only the structure of the song, not the audio data, which is kept in separate .wav files (see File Types).
Saving a project as a packed song (using the .sgw extension) allows you to save all of the song data, including the audio data, into a single big file. This can be useful for transferring songs by email or for archiving them to CDs.
The .sgw format is not suited for everyday saving of projects, as n-Track will always need the .sng and .wav files before it will allow you to work (i.e. edit, playback and record) on the song. Each time you load an .sgw, the program will extract the tracks’ audio files and will let you save the song’s .sng file.
The audio data stored in an .sgw file can be either uncompressed (producing a perfect copy of the song) or compressed using Ogg Vorbis compression. When compressing, the file size drops significantly at the cost of losing some information on the audio data, with a consequent slight decay in sound quality (the amount of which can be selected using the compression slider in the Save .sgw file dialog box).
Mixing Down the Final Song
Once you have finished adding tracks and you have adjusted the volume and pan settings, you’ll want to mix down all the tracks to a single wav file. Select "Mixdown song" from the File menu and choose the desired options in the Box. This operation may take a while.
You can also select “Mixdown while playing,” and the program, after you enter the name of the file to mixdown to, will start the playback. You will hear the song played normally, but the playback data will also be saved to the mixed down file. In this way, you can adjust volume and pan settings, as well as add or remove effects, while the song is playing. The resulting mixed down file will exactly reflect what you hear during this “final mix down.” I it doesn't matter if the computer isn't fast enough and every now and then you hear some jumps in the music: the mixed down file will not contain these defects, as these jumps are caused by the computer not being able to furnish data to the soundcard in time for its playback. When it finally manages to have this data ready, it saves it to the mixed down file just after the previous good packet of data.
On slow machines, or when the number of tracks you’re using becomes high, it may be a good idea to mix down some or all of the tracks to one WAV file, and then proceed to record other tracks. In this way, you’ll be able to manage more tracks, and you won’t suffer from possible synchronization failures that may happen when the computer is too loaded by the high number of tracks.
Once the mixing down has finished, you may want to convert the WAV file to MP3, M4A or WMA format for distributing the song in a smaller file.
A tour of n-Track Studio
The start menu
At the first opening, n-Track shows the Start your song menu. Here you can choose among different templates that let you start your song quickly and easily.
The menu lets you choose between 6 ways of getting started:
Record audio: adds a blank armed audio track to your project to start easily recording your first take
Create a beat: opens the step-sequencer midi controller, with which you can create beats and grooves in an easily way
Instrument: Let’s you choose among different virtual instruments via the instrument browser
Use Loops: you can choose from various royalty-free audio and MIDI loops to get spark new ideas. You can filter and choose different genres and styles, as well as download more sample packs
Import audio file open an audio file from your device
Play drums opens the screen drum controller for you to play and record rhythms and beats.
To start your song from scratch, without using a template, just close the menu.
The Transport bar
The transport toolbar contains the transport control to navigate the song, play, start recording and using the playback loop function.
Record
Starts recording on the currently armed track(s).
Play
Starts playback.
Rewind
Sets the timeline cursor to zero. During play, restars playback from the project's start.
Loop timeline selection
If active, loops playback of the timeline selection. To using it you need to highlight a part by drawing with your fingers on the timeline axis, activate the loop functions and tap the play button to listen to the highlighted timeline selection. For more info about how using the loop timeline axis, please see our video tutorials.
The main Toolbar
The main toolbar is a scrollable area that contains the most important functions of n-Track Studio. This is your control panel. Here you’ll find all you need to compose your songs.
Song Browser
To save and organise your projects, or open exising ones go to the Song Browser. You can also access the settings menu from here.
Share
Opens a menu with the following options:
Share online: Uploads your song to the Songtree music collaboration community, and lets you share it via a link. You can optionally let others discover your song and collaborate on it.
Share Song by Email: Exports the final result (as an .m4a file) and lets you send it via email, ready to be played anywhere.*
Share on an external service : let's you upload your song to Soundcloud, iCloud or Dropbox account.*
* These features require an n-Track subscription or the Pro version of the app.
Redo
Re-performs the last action you cancelled via undo.
Undo
Undoes the last action you made.
Draw envelopes
Shows a menu where you can create and edit automations, scroll parts and enable flexible time
Loop Browser
Add royalty-free audio and MIDI loops to spark your next song idea. Filter styles, instruments – and download more sample packs.
Mixer
View or hide the mixer, where you can control levels, pan, effects and routing of each track in your project.
Song Comments
Add song notes or lyrics, which will be saved in the .sng file.
Track bar
The track bar contains the control commands of a specific track, like mute, solo, arm button, monitor live input button, pan, channel output, and channel insert effect panel.
Mute track
Silence the track.
Solo track
Mutes all other tracks.
Arm Button
Lets you choose the track's input and enables/disables it for recording.
Monitor Live Input
Lets you listen to the incoming signal through the selected output destination. Note: make sure you have headphones or your output volume is sufficiently low to avoid feedback.
Track volume level
Sets the track's level. This is the same as moving the track's mixer slider.
Track Pan slider
Sets the channel’s pan position (L/R positioning in the stereo field).
Channel output
Sets the channel’s output. Can be the master channel, an Aux or group channel or another track.
Channel insert effect panel
Displays the active insert effects for the selected channel. To add an effect simpy tap on it to open the effect browser.
The Time Status window
The time status window displays the project’s current time. Tap on it to choose the time display format and switch from 30fps to M:B:T
By tapping on "start" or "end" you can choose among different view and monitor your selection start, lenght or end.
Editing widgets and the Edit menu
In n-Track Studio you'll find two ways of accessing editing controls:
1. Waveform editing widgets
2. the Edit menu
1. Waveform editing widgets
You can edit a part via the waveform editing widgets.
Drag part
Tap and drag the top stripe on a part to move in up and down the timeline.
Part gain
Tap and drag vertically to set the part’s gain level.
Apply fade in/out
Tap and drag to fade in or out the part’s volume.
Trip part
Dragging will shorten or lengthen the audio or midi part. Lengthening the part to more than it’s full size will loop the part.
Loop part
Drag to loop the part.
Mute part
Mutes/unmutes the selected part.
2. The Edit menu
To open it, tap on a part's waveform
Copy
Copy the part to the clipboard.
Cut
Cuts the part and copies it to the clipboard.
Cut and slide left
If a selection is made on an audio part, it will cut what's inside the selection and move to the left what's on the right of the selection.
Paste
Pastes a part
Paste from Clipboard
Pastes a part from the clipboard.
Clipboard copy
Copies the selected part into the clipboard.
Splice
Split the part using the time axis bar or splice the current selection into a new part.
Properties
Opens the part properties and the transpose part tool.
Remove part
Deletes the single part.
Un-Group Parts
Separates grouped parts so they can be moved freely
Reset Speed
Resets the original speed of the part if you have altered it with the time stretching tool.
Open in
Lets you send the selected part to other devices or apps.
Clone track
Clones the selected track.
Minimize/Restore track
Minimizes the channel height, or expands it back to its previous height.
More
Opens additional options, like AI MixSplit and Beat Doctor
The Grid
The grid icon shows or hides the grid. By enabling the grid you'll be able to choose among different grid parameters (Measure, Beat, Eight, Sixteenth, 32nd, 64nd, 128th).
Enable snap to grid: If this option is checked, the selection and the parts offsets (when dragging with your finger) will snap to the nearest grid line.
Selecting tracks to view
In some cases, showing or hiding different kinds of tracks could be useful. You can set which track type will be visible or hidden on the timeline by tapping the select tracks to view icon
Show Groups: show tracks you grouped
Show Instruments: show Instruments tracks added to your project
Show Aux Channels: show Aux tracks added to your project
Show Master Channels: show the master channel of the project
The start menu
At the first opening, n-Track shows the Start your song menu. Here you can choose among different templates that let you start your song quickly and easily.
The menu lets you choose between 6 ways of getting started:
Record audio: adds a blank armed audio track to your project to start easily recording your first take
Create a beat: opens the step-sequencer midi controller, with which you can create beats and grooves in an easily way
Instrument: Let’s you choose among different virtual instruments via the instrument browser
Use Loops: you can choose from various royalty-free audio and MIDI loops to get spark new ideas. You can filter and choose different genres and styles, as well as download more sample packs
Import audio file open an audio file from your device
Play drums opens the screen drum controller for you to play and record rhythms and beats.
To start your song from scratch, without using a template, just close the menu.
The Transport bar
The transport toolbar contains the transport control to navigate the song, play, start recording and using the playback loop function.
Record
Starts recording on the currently armed track(s).
Play
Starts playback.
Rewind
Sets the timeline cursor to zero. During play, restars playback from the project's start.
Loop timeline selection
If active, loops playback of the timeline selection. To using it you need to highlight a part by drawing with your fingers on the timeline axis, activate the loop functions and tap the play button to listen to the highlighted timeline selection. For more info about how using the loop timeline axis, please see our video tutorials.
The main Toolbar
The main toolbar is a scrollable area that contains the most important functions of n-Track Studio. This is your control panel. Here you’ll find all you need to compose your songs.
Song Browser
To save and organise your projects, or open exising ones go to the Song Browser. You can also access the settings menu from here.
Share as Mp3: Exports the final results, ready to be played anywhere
Share as multitrack project: Backup or continue working with n-Track on other platforms (iOS, Windows, Mac)
Draw envelopes menu
Shows a menu where you can create and edit automations, scroll parts and enable flexible time
Redo
Re-performs the last action you cancelled via undo.
Undo
Undoes the last action you made.
Loop Browser
Add royalty-free audio and MIDI loops to spark your next song idea. Filter styles, instruments – and download more sample packs.
Mixer
View or hide the mixer, where you can control levels, pan, effects and routing of each track in your project.
Track bar
The track bar contains the control commands of a specific track, like mute, solo, arm button, monitor live input button, pan, channel output, and channel insert effect panel.
Mute track
Silence the track.
Solo track
Mutes all other tracks.
Arm Button
Lets you choose the track's input and enables/disables it for recording.
Live Echo Button
Lets you listen to the incoming signal through the selected output destination. Note: make sure you have headphones or your output volume is sufficiently low to avoid feedback.
Track volume level
Sets the track's level. This is the same as moving the track's mixer slider.
Track Pan slider
Sets the channel’s pan position (L/R positioning in the stereo field).
Channel output
Sets the channel’s output. Can be the master channel, an Aux or group channel or another track.
Channel insert effect panel
Displays the active insert effects for the selected channel. To add an effect simpy tap on it to open the effect browser.
The Time Status window
The time status window displays the project’s current time. Tap on it to choose the time display format and switch from 30fps to M:B:T
Editing widgets and the Edit menu
In n-Track Studio you'll find two ways of accessing editing controls:
1. Waveform editing widgets
2. the Edit menu
1. Waveform editing widgets
You can edit a part via the waveform editing widgets.
Drag part
Tap and drag the top stripe on a part to move in up and down the timeline.
Part gain
Tap and drag vertically to set the part’s gain level.
Apply fade in/out
Tap and drag to fade in or out the part’s volume.
Trim part
Dragging will shorten or lengthen the audio or midi part. Lengthening the part to more than it’s full size will loop the part.
Loop part
Drag to loop the part.
Mute part
Mutes/unmutes the selected part.
2. The Edit menu
To open the edit menu, long-press on the wavesform of a part
Copy selection
Copy the part.
Cut selection
Cuts the part and copies it.
Cut and slide left
If a selection is made on an audio part, it will cut what's inside the selection and move to the left what's on the right of the selection.
Paste
Pastes a part.
Splice
Split the part using the time axis bar or slice the current selection into a new part.
Inverse playback
Plays in reverse.
Split stereo track
Splits into two separated mono tracks for each stereo channel.
Properties
Opens the part properties and the transpose part tool.
Remove track
Deletes the track.
Process
Use AI MixSplit, bounce to a single wave file or consolidate into a single part.
Remove part
Deletes the single part.
Lock part offset and size
Locks the part offset and the size.
Un-Group Parts
Separates grouped parts so they can be moved freely
Mute part
Mutes a single part.
Open in
Lets you send the selected part to other devices or apps.
Clone tracks
Duplicates the track exactly.
Minimize/Restore track
Minimizes or restore the channel height, or expands it back to its previous height.
The Grid
The grid icon shows or hides the grid. By enabling the grid you'll be able to choose among different grid parameters (Measure, Beat, Eight, Sixteenth, 32nd, 64nd, 128th).
Enable snap to grid: If this option is checked, the selection and the parts offsets (when dragging with your finger) will snap to the nearest grid line.
Selecting tracks to view
In some cases, showing or hiding different kinds of tracks could be useful. You can set which track type will be visible or hidden on the timeline by tapping the select tracks to view icon
Show Groups: show tracks you grouped
Show Instruments: show Instruments tracks added to your project
Show Aux Channels: show Aux tracks added to your project
Show Master Channels: show the master channel of the project
Recording basics
Recording your first audio track: Add, Arm, Record
Let’s say we want to record an audio track. First of all, what we need to do is tap the add a blank track icon then choose “add an audio track” to add a new, blank audio track.
Before starting to record, we need to check the audio track is “armed”. This means it has an input channel assigned and is enabled for recording.
To arm a track, tap on the arm icon. Here you can choose the input channel from which n-Track should record sound.
If the project is blank, you can automatically start recording by pressing the record button on the transport bar. This action adds a blank armed audio track and starts recording from your built-in microphone.
Note
n-Track will normally record from the device builtin microphone, from the headset mic (if a headset is connected) or from an external mic.
At this point, simply pick up your instrument and push the record button to start recording your first audio track.
To stop the recording, simply tap the record button again.
Now tap the rewind button or move the yellow timeline cursor to the position you want to start playback and push the play button to listen your creation.
If you want to focus on a section, and listen to a single part of your take repeatedly, then you need to use the Loop timeline selection.
To use it, you need to highlight an area by drawing with your fingers on the timeline axis, activate the loop function and tap the play button. n-Track will now restart playback from the beginning of our selection as soon as the cursor reaches its end.
Prefer to watch a video?
Watch a Video tutorial on how to record your first audio track.
Mic input level
If when you record an audio track you notice that the recording level is too low, you can try adjusting the mic input level. You can notice that the recording level is low by looking at the recorded track's level meter, or by looking at the recorded waveform. The more the waveform resembles a flat line the lower the recording level. Unfortunately Android doesn't currently allow setting the mic recording volume. There are a few recording presets available that depending on the device may change the mic recording level (while also possibly changing other processing options on the mic signal such as equalization and limiting). Try switching between the available options for the Mic/input level preset setting in the Settings box.
If when you record an audio track you notice that the recording level is too low, you can try adjusting the mic input level. You can notice that the recording level is low by looking at the recorded track's level meter, or by looking at the recorded waveform. The more the waveform resembles a flat line the lower the recording level. Go to Settings --> Input Settings to set preferred mic & levels.
Recording latency settings
On Android when you overdub tracks n-Track needs to perform what is called latency compensation. This is needed because of the way the audio flows through the Android operating system. Audio buffering (i.e. the length of the blocks of audio data that are passed between the app and the hardware audio device) is not totally under the control of the app that is doing the recording, so the app doesn't know exactly how to align the recording relative to the existing tracks.
To overcome this issue n-Track includes a latency calibration mechanism. The app will prompt you to calibrate the latency when you first try to record.
You can always repeat the latency calibration by selecting the latency calibration button in the Settings box.
When you perform the latency calibration make sure you are in a quiet room, you disconnect any headphones and external USB audio devices or adapters, and that you turn the volume of the device all the way up. The app will emit a short burst of sound while recording the mic input, and will then try to align the original with the recorded burst.
Manually synching a recorded track to the existing song tracks:
Long press on the recorded waveform
Select Properties from the popup menu
Scroll down and tap on the Adjust latency setting
Rotate the knob and set a positive milliseconds value if you hear that the recorded track is early, dial a negative value if the recorded track is late
Tap the rewind button and listen to the song to check the sync
Repeat the process until you find that the sync is good
We recommend changing the Adjust latency knob in 10 ms increments
An alternative to the Adjust latency setting is to zoom very close to the beginning of the waveform, then drag the waveform left or right to adjust the sync. You need to zoom because the precision of dragging the waveform increases as you zoom in.
You may enable the grid (with the grid button in the upper left) and check that the visual peaks of the waveform align to the grid lines
If you want to permanently disable automatic latency compensation and always adjust the sync manually:
tap on "Set manually" when n-Track asks again to set the latency (you can always change this later in the Settings)
enter "1" as the latency compensation value to disable automatic latency compensation
after recording each track perform the manual sync adjustment above
Bluetooth headsets or speakers add a considerable amount of latency. While it works great for listening to music, using Bluetooth for multitrack audio recording or for playing live instruments is not recommended because of the added latency. Use a wired headphones when available - wired headphones do not add any latency.
Audio latency varies considerably between devices. We collect anonimous statistics from the Latency Calibration inside the app in the Android Latency Top Chart
Some effect plugins such as Convolverb, Pitch Shift, Denoiser and Compressor/Limiter/Noise Gate (with lookahead enabled) add a significant audio latency, and are consequently recommended to be used on a song only when you don't plan to record new tracks or play live. When a plugin has latency, to keep the other tracks in sync n-Track effectively adds latency to all the other tracks, which works perfectly for playback, but when recording the latency makes keeping the sync between the recorded and existing tracks more difficult, and also makes it difficult playing live synthesized instruments (i.e. keyboards and drums). Bypassing or removing the plugins that adds latency will remove the latency from the whole song.
Input to output latency
When you use instrument plugins (such as the sampled instrument sounds built into n-Track such as Piano, Drums etc.) or when you monitor with headphones the audio coming into the mic, you may hear a short delay between the time when you press a key on the on-screen keyboard or drum pad and when you hear the sound. This is caused by the fact that audio moves between the app, the operating system and the hardware audio device in chunks of data called audio buffers. The smaller the audio buffers and the lower their number the smaller will the delay be. You can adjust the size and number of audio buffers in Settings. If you decrease too much the size and/or number of buffers you may notice clicking sounds during playback or live monitoring. This happens when the buffers are so small that the device can't keep up and some short bursts of silence (dropouts) interrupt the audio. You should try to use the minimum possible buffering that doesn't generate clicks.
Not all Android devices and versions of Android allow for the same latency performance. n-Track will say whether the device is capable of low latency performance in the settings box. When the device supports "pro" or "semi-pro" latency performance you may check the Enable low-latency audio option that sets the device's preferred buffer size that triggers the device's lowest possible latency. On Android 8.1 or later you can select the AAudio audio device drivers for audio input and output. These new device drivers are more modern that OpenSLES (supported since the beginning of Android) and should allow for slightly better latency performance.
The lower input to output latency you can set the less problems with recording latency you'll have.
Input to output latency can be made very small when using compatible external USB audio devices.
How to record a track over another one (overdub)
Let’s say we want to record something over the first track. All we need is to add a new blank audio track and arm it, then we can start recording.
So, again, tap the Add a blank track icon and choose "Add an audio track”.
If the track is not armed, tap over the arm button and select the right input channel.
Since you want to record a second track over the first audio track, you need to be able to hear the first and the second track together during recording, but you want only the second track to be recorded, so make sure the first track is unarmed.
To listen to what you’re recording as you play it, you can tap the Monitor live input button , which will let you listen to the incoming signal through the selected output destination. Make sure you plug in your headphones and then push the “Monitor live input” button to start listening to the incoming signal. You can now record as you hear what your mike is capturing.
Importing a base track to record over
Let’s say you want to upload a base track, backing track or instrumental, and then record your voice or instrument over it.
All you need to do is tap the add track icon and select “Import audio file”, then select the file you want to import into n-Track.
n-Track will create a new audio track with the imported audio file, so we can now record over it. To record something over the imported track, just add and arm a second audio track, then start recording.
n-Track can import audio files with one of the following formats:
mp3
m4a
mid
wav
aif
flac
opus
Adding effects and editing audio parts
If we’re satisfied with our performance, but we want to enhance or get creative with the sound, we can add an effect.
Let’s say we want to add a reverb to a vocal recording. Just use your fingers to zoom into the time-axis view, until you see the add effect panel.
Click on “ADD EFX" and choose among the integrated effects available in n-Track Studio.
The Grid and the Metronome
It’s common to record songs by following a click track or metronome, and then use the grid to align our recordings to the song’s tempo.
You can select the bpm of your song by tapping the Metronome icon and selecting the bpm you need.
To activate the metronome, switch it on. You’ll now hear the metronome both during playback and recording.
To turn it off, just open the metronome and switch it back off.
Enable 'PRE-ROLL' to hear a bar of click before recording, so that you can get yourself ready. This one bar of pre-roll can be increased up to 10 bars, using the 'Pre-roll measures' slider.
You can adjust the sound of the metronome from the 'SOUND' box, and it's volume from the slider. There is also the option to adjust the beats and division (for example if you need to record outside of 4/4).
The grid function can be useful during editing, and in general when you need a reliable tempo reference while working on your song. You can enable the grid by tapping on the “grid icon” .
You can set the grid time resolution by tapping the grid settings window (see the picture below).
As you can see there’s also a "Enable snap to grid" checkbox. If this is enabled, when we move audio and MIDI regions their start position will be quantized to the closest grid value.
This can be useful if we’re creating more electronic or loop based music. If you uncheck this box, but leave the grid on, then you’ll be free to move regions in any point of the timeline, and still use the grid as a useful tempo reference.
Using virtual instruments
Adding virtual instruments
To add a new virtual instrument, just push the “Add a blank track” button and select “Add an instrument”. This will create a MIDI track and an Instrument track automatically assigned to the MIDI track created.
MIDI tracks will contain the sequence of MIDI notes, as well as other MIDI parameters, such as velocity. Instrument channels, instead, are where the actual audio from the MIDI notes is generated. Multiple MIDI tracks can send their output to a single instrument channel.
The creation of a MIDI track will open up the instrument browser, that lets you choose the virtual instrument you want to control via MIDI.
To change the MIDI track instrument, simply tap the track’s output slot.
To immediately control our virtual instrument, tap the keyboard icon and start playing it with your fingers, or open the piano roll by tapping the icon. and start writing midi notes via the piano roll's tools.
The Instrument browser
The instrument browser lets you choose the instrument you want to play via MIDI. It will popup when creating instrument tracks, or when you tap on a MIDI track’s output slot, so you can easily choose a new instrument or switch the sound on an already created instrument track.
The browser is organized in three sections:
External instruments: Here you’ll find all supported third-party virtual instrument plugins available on your system.
n-Track instruments: In this section, you’ll find a list of n-Track’s built-in instruments. Instruments and patches which show the download icon require an additional download, which you can launch via the Add-on manager.
MIDI outputs: shows the available hardware MIDI outputs, as well as already created instrument channels which you can send MIDI to, allowing you to route a new MIDI track to an instrument you already created.
When you select an instrument from the instrument browser, n-Track will create a new instrument channel with the instrument loaded up, and assign it to a MIDI track.
If this is the first time you open the instrument browser, you may need to download additional instrument packs in order to have more choice than the few built-in sounds. Selecting the sound will bring up the Add-on manager, where we can download content.
The Add-on Manager
The Add-on manager lets you download free and premium instruments, sounds and drumkits available for use in n-Track.
Here you can download free and premium instruments, sounds and drumkits available for use in n-Track, which will be automatically once downloaded.
To download a sound, just tap on “Get". The sounds will then be downloaded and automatically installed. Once installed, you'll be able to play and record the instrument, and load it directly from the instrument browser.
Loading custom SoundFonts (.sf2)
Besides using the sounds that come with n-Track, you can also use third party sf2 files.
To add a soundfont file:
Select Add new instrument channel
Scroll down the left column and select Add custom soundfont
Browse to the location of the sf2 file (you may have to press the up arrow a few times to get to the root of the device storage)
Once you've selected the sf2 file, if it contains more than one sound, you will need to use the Program and Channel setting in the track properties view to switch between the available sounds. Channel is typically set to 1 for melodic instruments and 10 for percussive sounds. To open the track properties view, long press on the track, then select Properties from the popup menu. Then scroll down to reveal the Program and Channel settings.
Saving and Exporting
Saving projects
Saving a project means your project and all of its settings will be saved in a format you can open exclusively in n-Track (the .sng format).
A project will save automatically when you tap the Song Browser icon . You can then re-open your project at any time by selecting the song from the Song Browser.
Note
If you want to save all the project’s settings and all of the project’s files and assets, you can choose to save the project as a “compressed Song” (sgw) file. Saving all project assets together with the project would allow you, for instance, to open the project with all of its audio tracks in a different device running n-Track Studio.
Exporting songs
Exporting, or ‘mixing down’ a track means that all the tracks of your project will be bounced down to a single audio file, in the format you specify, like mp3, wav, and so on.
Once mixed down, your song will be playable anywhere, but please note that exporting track, as well as other features, are limited in the free version. To export songs, you need to either pay for an n-Track subscription, or activate the full version, both of which you can do directly from the app.
The free version allows exporting the song but adds a short audio add at the beginning of the exported track.
Although the free version limits exporting to audio files, you can freely upload the track without audio ads to Songtree, the free music collaboration platform, and then share it via a link.
To export your track, tap the "share" icon and choose Mp3 or Wav as the same format, then press “Ok”. If you selected Mp3 the app will also ask you to set the tradeoff between audio quality and file size (i.e. bit rate).
Make music with other musicians with Songtree
What is Songtree?
Songtree is a free online service that allows to collaborate with other musicians in building songs online. Songtree is developed by the same team behind n-Track.
When someone uploads a song to Songtree, it becomes available for others to contribute to and build upon. Each contribution added by users creates a new version of the song, while the original song remains un-affected. As more people add their contribution, a 'tree' of songs starts to take shape, with each contribution branching out from the original song.
Check out Songtree. The app allows you to record your performances directly from your device, as well as letting you interact with other musicians via comments, likes, invites etc.
Songtree is fully integrated inside n-Track Studio, so that you can overdub other Songtree users songs without leaving n-Track.
Musical Collaboration inside n-Track Studio
If your computer is connected to the internet, you can upload, download, share and interact with musicians from all over the world directly from n-Track Studio.
Say you need an extra musician to play on your song and you just don't know or can't find any, you can upload your song to Songtree directly from your n-Track project, and find one online!
At the same time, there may be many other musicians out there that may need your contribution to their music. Search for songs by genre or instrument, find the ones you like the most and add your part using all the tools available whithin n-Track Studio. If you'll add positive contributions that others will love, you'll quickly build new fans, and your reputation and status whithin the Songtree community will grow rapidly.
To start using Songtree whithin n-Track Studio, simply click on the button on the main toolbar.
Exploring the Songtree Community
When you launch Songtree, you'll see a list of songs uploaded by users. You can play and explore the latest or top-rated ones, follow and connect with the artists that created them or take full advantage of Songtree's social features, such as likes, shares and comments.
By clicking on a song, you can view the song's tree, made up of all the contributions linked to the song in question. You can easily see which artists took part in a particular song, see how the collaboration process evolved, and decide at what point of the tree you wish to add your own contribution.
Next to each song you'll find the button, which lets you import the song to n-Track for overdubbing.
Uploading a song to Songtree
To upload a song to Songtree from n-Track Studio, open Songtree by clicking on the button, and then click the Upload button on the Songtree interface. You will be asked to provide a name for the song, as well as other information about it, such as its genre, tempo or key. Once you fill up the upload form and press Upload, your song will be available on Songtree. To see all of your Songtree uploads, simply click on the my Songs button.
Note:
When you upload a song, n-Track will first mixdown the project you are working on and then upload it to Songtree as a single file.
Overdubbing a Song on Songtree
Once you found a song you wish to overdub, simply click on the button. n-Track will create a new track for you on which the song will be placed.
You can now start adding your contribution to the song using all of n-Track's features. Once you're done, and you wish to upload the song back to Songtree, simply hit the Upload button. Songtree will automatically detect which track you are recording over, and add your contribution to the song's tree automatically once upload is complete.
You can edit the imported song as you work with it, buf if you delete it entirely n-Track will remove the track altogether.
Follow Your Songs as they Grow
Songtree will notify you when others overdub, like or comment on one of your songs, as well as when another artists is following you, or when you receive an invitation to overdub a song. You can invite any Songtree user to overdub a song, whether created by you or not. So if you know the perfect musician for contributing to a song, you may invite them even if the song is not yours.
The fun thing about Songtree is to see how a musical idea can take many different directions depending on the artists' choices.
Working with Audio
In previous chapters, we saw how to add and arm an audio track, how to record instruments or vocals, and how to upload a base track, or backing track, and record over it. We also talked about editing parts and adding effects.
In the following sections we’ll give you some tips to obtain a better sound from your recordings because in fact, although we’re working on a mobile app, all we need is minimal extra hardware and a little extra knowledge to make our recordings sound clear and professional.
This chapter contains information regarding the most common tasks that need to be performed when recording or mixing songs using n-Track Studio. Understanding these tasks (with particular regard to the interaction with the soundcard’s mixer) is strongly recommended in order to be able to use the program properly. To make your work with n-Track Studio as effective as possible, please take the time to read this chapter.
Recording
Setting the Recording Levels
The first step in recording with the computer is learning how to set up the soundcard's recording software. Most soundcards contain a simple mixer circuit, through which the soundcard is able to select, among its many inputs and outputs, the signal(s) to record from and the signal(s) to send to the output. Before starting a recording, connect your audio source (microphone, guitar, mixer, etc.) to a soundcard input (usually marked "Line in" or "Microphone in").
Windows 8 and later:
To adjust the audio devices settings, open the Windows Control Panel via Start Menu/Control Panel. Select Hardware and Sound, then click on Manage Audio Devices. Audio inputs (i.e. recording sources) appear in the Recording tab of the dialog box; outputs appear in the Playback tab.
Make sure that the recording source to which you have connected your audio source is activated (i.e. the checkbox below the source’s level slider is checked).
Note:
With some audio devices, the monitoring of the input signal is not available in hardware and is performed in software by Windows. When this is the case, the monitored signal has a slight delay, and enabling the "Listen to this device" option may interfere with n-Track's ability to use exclusive mode audio drivers (Asio, WDM/WaveRT, Wasapi). It may be preferable to leave this option disabled and use n-Track's own live input processing to monitor the input signal
Mac OS X:
Configure the level of the recording sources in the System Preferences → Sound panel. You can select which of the available inputs (i.e. line in or mic) is the default recording device, and set the level of the device by moving the Input Volume slider. The device you select for sound input is the device that is used by n-Track when the Mac Default Recording Device input device is selected in the Settings → Audio Devices box.
Some advanced audio level settings can be configured in the Applications → Utilities → Audio MIDI Setup application. Some audio input devices allow monitoring of the input signal by enabling the Thru checkbox.
Note:
Some audio devices (e.g. an analog mixer) don't have the hardware capability to allow monitoring of the input signal, i.e. to listen to your voice in the headphones while you sing into the mic. If this is the case, you can instead use n-Track's own live input processing to monitor the input signal.
Turn off all unused recording sources to reduce the overall noise level and improve the quality of the recording. Adjust the selected recording source’s recording level slider, watching n-Track’s recording meters until you obtain a good signal level without clipping.
You are now ready to start your Recording!
Note that hearing a signal coming from a soundcard input doesn’t necessarily mean that the soundcard is recording that signal: for example, most soundcards can be configured so that you can record the signal coming from the line input while monitoring (i.e. hearing audio from the soundcard’s output) the signal coming from the microphone input. You can set which signal to monitor from the Playback view/tab of the Volume Control/Sound Control Panel, while the signal from which to record is selected from the Recording view/tab.
Note:
Some soundcards/audio interfaces can’t be controlled by the Windows Volume Control or Sound Control Panel. This usually happens with professional and semi-professional devices such as the M-Audio Delta, Audiophile, etc. This is because the device has many options that don’t fit into the general-purpose Volume Control/Sound Control Panel scheme. The audio device options, levels, routing, etc. can be set in the device’s own proprietary control panel, which is usually found in the Start Menu/Control Panel folder. Each particular device has its own set of controls and configuration, so please refer to the device’s user guide for details on how to use the control panel.
Signal Levels & Clipping
Unlike in analog audio, where the recording level is somewhat flexible, in digital audio, the audio recording level must always be lower than the maximum possible level, usually indicated as 0.0 dB. Levels are measured from the maximum level downward. For example, -90 dB is almost perfect silence, -60 dB is barely audible and -6 dB is a very strong signal. 0 dB is the maximum, full-scale, signal level.
When the signal level goes above 0 dB, the signal is abruptly cut or "clipped," resulting in a very noticeable distortion called clipping. Unlike analog distortion, digital clipping is very unpleasant and should be avoided as much as possible.
For this reason, it's better for the signal to be a bit lower than the ideal level. If you use 15 of the 16 bits (i.e. use only half of the amplitude, peaking at -6 dB) you will probably not hear the difference (and you surely will not hear it if you use 23 bits out of 24), while if you sample a signal with an amplitude two times the maximum (+6 dB) you will probably hear bad clipping distortion.
The above is not true of the audio signals that flow within n-Track itself. It is true only for the signals that come from the soundcard (i.e. recording) and go out to the soundcard (i.e. playback output).
The signals inside n-Track's virtual mixer are floating point audio signals, which support levels far above 0 dB. Signals within the n-Track virtual mixer can reach very high levels without causing distortion, so you don’t have to worry that, for example, an effect is boosting the level of a track excessively.
The only thing that matters is that the overall master audio level, as shown in the master channel level meter or in the Playback meter window (View/ Playback VU meter menu command) is below 0 dB.
You can, for example, boost a track's volume so that the track level is +30 dB, as long as you reduce the master output volume (in this case, to -30 dB) so that the overall level is below 0 dB.
Soft Clipping
n-Track includes a soft clipping function, which tries to minimize the negative effects of digital clipping by automatically reducing the level of the signal when clipping is detected, and then gradually restoring the volume back to its original setting when clipping is no longer occurring.
While this works rather well, and avoids clipping distortion until the level is extremely high, soft clipping does modify the audio signal when reducing its level. This is much like what would happen if you had your hand on a stereo’s volume knob and adjusted the volume of a song very rapidly during playback to try to smooth out the loudest parts and boost the quietest parts.
Soft clipping can be disabled in the Clip sub-menu of the playback VU meter’s right-click menu.
Audio Devices Selection Dialog Box
The Audio Devices dialog box allows you to select which soundcards/audio interfaces the program uses for recording and playback. The dialog box can be opened with the Settings/Audio devices menu command. Learn more about selecting audio devices in the Audio devices tutorial video (Windows).
To select multiple devices, click on the entries in the devices list holding the Shift or Ctrl key (on a Mac, hold the Cmd key).
When clicking on an entry in the devices list, the entry will highlight and a number will appear to its left. The number indicates the order in which the program treats the devices. For example, using two recording devices, the 1st device’s level meters will be the leftmost ones in the level meters window. For output devices, the 1st device will be the device to which each track is sent by default.
To send a track to a device other than the 1st, select the output device in the Track Properties dialog box that appears when you double-click on the track.
Audio Driver Standards
n-Track can access a soundcard using several methods:
Wasapi -
Wasapi is the current Windows official standard for low latency audio. Wasapi can theoretically achieve low latency in both shared (i.e. multiple apps accessing the audio device) and exclusive mode. Exclusive mode is however recommended for pro-audio.
WaveRT - WaveRT is an audio driver
format that’s specifically designed to enable audio applications to operate with very low latency. WaveRT achieves a reduction in CPU usage at low buffering settings by basically "getting out of the way" after the playback and recording has been set up and letting n-Track talk directly to the audio hardware without intervention by the driver. This translates to more efficient streaming at low latencies.
WaveRT drivers are currently available for a small number of audio devices, including many motherboard audio interfaces such as the Realtek ALC882M and C-Media 8738/8768.
WDM - Introduced on Windows 98SE and supported by later
versions of Windows, WDM is comparable to Asio in terms of achievable latencies. Depending on your particular soundcard/audio interface, it might be best to use WDM, WaveRT or Asio drivers.
MME - All soundcards have MME drivers. This is the oldest driver
standard and, although very reliable, it doesn’t allow you to work with low latencies and is consequently not suited for live input processing and playing instrument plug-ins live.
ASIO - Many semi-professional and professional soundcards have
Asio drivers, which allow for latencies similar to those of WDM drivers.
CoreAudio - The audio device driver standard on macOS. CoreAudio allows for potentially very low latency audio even when multiple apps are accessing an audio device.
Using WDM, WaveRT, Wasapi, CoreAudio or Asio drivers usually allows a much lower latency than other types of drivers, and makes it feasible to use the program for live input processing of a musical instrument played in real-time (for example, to use a distortion plug-in to play an electric guitar without an amplifier and process its sound within n-Track).
Selecting a driver in the Audio Devices dialog box will typically enable all of the soundcard’s channels. You can limit the number of channels that you want to use in the Soundcard settings -> Advanced dialog box.
When using Asio, the playback and recording buffers size and number is decided by the soundcard’s driver. Changing the settings in the n-Track Buffering settings dialog box will have no effect, as the program will immediately restore the settings required by the Asio driver. Many soundcards have a control panel that lets you change the buffering settings; you can open this panel by clicking "Asio settings" in the dialog box that appears when you click on a VU meter's "Settings" button, then clicking "Asio Control Panel."
Windows Default Playback/Recording device is an alias for the device currently selected in the Control Panel/Sound-Multimedia applet as the preferred recording or playback device.
Suppose, for example that you have 2 soundcards, “X Audio” and “Y Technologies”, and the preferred audio playback audio device set in the Control Panel/Multimedia applet is “X Audio”. The content of the playback devices list will look something like this:
X Audio →MME driver for X Audio card
WDM: X Audio →WDM driver for X Audio card
Y Technologies →MME driver for Y Technologies card
X Audio ASIO driver Technologies →Asio driver for X Audio driver
WAV Mapper→Alias for “X Audio”
In this example, the Y Technologies card doesn’t have an Asio driver.
The Advanced button in the Audio Devices dialog box opens the Advanced audio settings dialog box, which lets you adjust specific settings. The default settings should work well for most users.
Recording More than One Track at a Time
n-Track supports simultaneous recording of multiple audio tracks. You can, for example, record the vocals and guitar simultaneously to two separate tracks, or even record a full band with each instrument being recorded to a separate track.
Most standard soundcards/audio devices typically have one mono mic input and one stereo line input, which can’t be used simultaneously; in this case, the maximum number of simultaneous tracks that can be recorded is 2. Dedicated multichannel audio recording hardware can have from 4 to 16 or more inputs.
Analog audio inputs are typically either one of two kinds:
A Mic or instrument input has a very weak electrical signal that is generated by a vibrating electromagnetic sensor (e.g. a mic) or by a piezo-electric device (e.g. a guitar pickup). The signal is so weak that it has to be greatly amplified by a pre-amplifier circuit before it can be fed into an analog to digital converter inside the audio interface. The quality of the amplification is quite critical and the resulting recorded sound typically depends more on the quality of the preamplifier than the rest of the audio device circuits.
A line level signal has an high and standardized electrical level and doesn't need to be pre-amplified. The signal can be fed directly to the audio device's analog to digital converter.
Audio devices specifically built for audio recording usually have two or more analog inputs. On each one you can connect either a mic, an electric or electro-acoustic guitar or bass or line level instrument (such as a keyboard synth or electric piano). Often each input has a line vs instrument switch.
If your audio device is a generic model, not specifically designed for audio or music recording (such as the audio devices built into the vast majority of laptop and desktop PCs) you can still record two instruments playing together, although you'll need to connect one instrument to the left channel and the other to the right channel of the soundcard’s stereo line input connector. You may need a splitter cable to combine the two mono inputs into a single stereo line input.
To setup the recording of two tracks simultaneously:
Add two blank audio tracks (use twice the Add channel -> Add new blank track -> Audio menu command)
Click the rec-arm circular button on the left side of the 1st track you just added. You can then choose which input channel to record by clicking the first dropdown menu below the record button on each track.
Click the rec-arm circular button on the left side of the 2nd track, and select the 'Right' input
Click the main Rec button in the lower toolbar to start a test recording, and check that each track receives the signal from the correct input
If your device supports recording from 4 or more inputs, you can repeat the steps above to record as many separate track as you need and is allowed by the audio device
Recording Using Take Lanes
When you re-record over an existing track, n-Track automatically creates a new Take for each recording attempt. Takes are a sort of “‘sub-track”; a track can contain multiple takes, and for each track you can tell n-Track to play one particular take, play audio from different takes for different sections of the track (i.e. play this chorus from take 2 and that verse from take 3), or even play all of the takes simultaneously (which can get pretty loud pretty fast!).
Say you have recorded a track and then recorded a new take on the same track. By default, the track will look like this:
When a track has more than one take, the track will be vertically split into lanes that show all of the takes available for a portion of a track stacked on top of each other.
The fun part comes when you want the track to play a portion of one take and the rest from another take:
To do this:
Click on the "show takes" icon at the bottom left of the track bar
Press the “S” key (or select the Edit/Splice menu command) if you want to split a track.
Now simply click on the takes that you want to play during the highlighted section and click play.
When a portion of a track has more than one take available, you can switch between takes by clicking on the take that you want to play during that portion of the track. In the screenshot, above the original take (Guitar.wav) plays for the whole length of the track except for the central part, in which the portion of take 2 (Lead1.wav) plays instead. Disabled takes will appear in a different color (purple in the screenshot above) from the take that is actually being played.
To switch between Take Lanes and the old way of showing and playing a single take per track, right-click a track, then open the Takes sub-menu of the menu that pops up and select “Merge Takes/Hide Lanes” or “Keep takes Separate.” You can also press the “L” key to cycle between views.
The Takes pop-up menu has also commands to move parts between takes, clone takes, and split a track with multiple takes into multiple tracks with one take each (which is handy when you want more control over the takes selection, as for comping).
Count-in, Punch-In and Multiple Takes Recording
After carefully listening to a solo you’ve just recorded, you decide that you’re still not satisfied, and you want to try recording it again. Click on the “Undo” button to send the audio file to the recycle bin. If you are not sure if you want to keep it, save an “alternate” version of the song before trying to re-record it, so that if you don’t manage to record another solo as good as the original one, you can always revert to the saved song.
After a couple of attempts, you start to get tired of having to use the mouse to start, stop, undo and restart the recording. Fortunately, you can have n-Track do this automatically for you using the punch-in function.
To activate the count-in, click the button on the main transport bar. When count-in is active and press rec (or also play if Count-in on playback is active) the playback starts one or more measures (as set with the Set count-in measures setting) before the playback start offset in the song.
You can also select if there should be a metronome click on the count-in before song playback from [Metronome on count-in].
Each punch-in take is recorded to a new take on the same track. The time at which the start and the end of the recording will occur is determined by the current selection. By default, n-Track shows takes on top of each other, allowing you to select bits from different takes by simply clicking on the take sections (see Take Lanes). If you find this confusing, and you prefer to view one take at a time, right-click on the track and select “Takes/Keep takes separate” from the popup menu. You can now switch between the takes by right-clicking on the track and selecting the desired take from the Takes popup sub-menu.
To configure the punch-in settings, Shift+Click on the button. The Metronome Settings box will appear, with the punch-in settings in the bottom left, which contain the Count-in and Punch-in options.
If Enable punch-in recording is active, and count-in is disabled, you can start the recording at any position before the selection, the playback will start immediately while the recording will start at the start of the selection and finish at the end of the selection. When punch-in is active n-Track will record a single take only.
Recording multiple takes: if the loop button in the main transport toolbar is active, and a selection is active on the upper time axis, the recording process will automatically restart when the cursor reaches the loop end time. The recording will continue to loop and accumulate takes until you click the “Stop” button. This can be useful, for example, when you want to record a difficult solo and you need to try it a few times. Using this option allows you to play continuously without having to manually stop the recording, remove the bad recording from the song and start again. Count-in can be enabled for multiple takes recording, in that case on each loop iteration the playback will start the set number of count-in measures before the selection start. If the Enable punch-in recording option is selected only one take will be recorded.
Voice/Level-Activated Recording
The Voice/Level activated recording command in the Transport menu opens a box that lets you record only when the input channels have a level above a given threshold.
The feature is useful when doing very long recordings (for example, church services or audio surveillance) and you want to avoid recording long stretches of silence to save disk space and to simplify the subsequent editing and playback of the recordings.
The Voice/Level activated recording dialog box lets you set a Threshold level above which recording will occur, and the Hold time for which the program will keep recording when the signal goes below the threshold level. Use this hold time setting to avoid very frequent stops and restarts of the recording when the signal oscillates near the threshold level.
Editing
n-Track Studio supports 2 different editing modes:
Destructive audio editing:
In this editing mode, the program behaves like an audio editor. This editing mode is called destructive because the files are actually modified.
Non-destructive audio editing:
In non-destructive editing mode, n-Track performs copy, cut & paste operation using references to audio files, rather than modifying the files themselves. You can also use this editing mode to create loops (to append the pasted part at the exact end of the current track, hold the Shift key when pasting).
To change the current editing mode, click on the editing mode icon on the toolbar (which will show one of the icons above) and select the desired editing mode from the drop-down menu.
n-Track can perform basic audio editing functions, including cutting, copying, pasting, and inserting parts of audio files. To execute these operations, you must first select a part of an audiofile inside a track on which you wish to perform an operation.
Make sure that the arrow icon is selected on the toolbar and that the destructive audio editing button on the toolbar is enabled.
Holding down the left button, drag with the mouse on the desired audio file waveform to select a part of it. Alternatively, you can drag on the time axis at the top or bottom part of the timeline window. You’ll see the selection highlight as you drag. If you drag on the time axis, all the tracks will appear to be selected, but the audio editing operations will have effect only on the audio file that has the white border around its waveform.
Once the selection is made, click on the toolbar icon corresponding to the desired operation. Many operations will have no effect if the selection extends outside of the limits of the audio file, so make sure that the selected area is entirely within the audio file.
All destructive audio editing functions are undoable. When n-Track executes a destructive operation, it saves the data in temporary audio files to allow for multi-level undoing.
One useful destructive editing operation is to extract a part of a bigger audio file and place it in a separate track. To do this, select the desired part of the audio file, click on the “Copy” button and then click the “Paste” button while holding the Shift key. This will make the program create a new audio file containing the copied data. It will place the new audio at the exact offset that the copied audio had, so you can, for example, use this function to keep only the good part of a long recording take, deleting the original audio file, or to repeat a vocal part in multiple tracks offset by a small amount to create a choir effect.
Another useful trick is to silence parts of audio files. You can do this by selecting the part and clicking on the “X” button on the toolbar. If you hold the Ctrl key (or the Cmd key on a Mac), the operation will be destructive: the selected part of the file will be physically silenced. If you don’t hold Ctrl or Cmd, the volume envelope will be altered to mute the selected part of the track: to view the effect of this operation, switch to the volume drawing view by clicking on the “Volume” icon on the toolbar.
Very strange and cool effects can be obtained by reversing an audio recording. You can reverse the current selection using the Edit/Special/Reverse playback menu command.
For more sophisticated operations on audio files, n-Track can launch a user-specified (through the Settings/Preferences/Paths dialog box) external audio editor on the selected track. To launch the external editor, right-click a waveform and select “Launch external wave editor.”
Non-Destructive Audio Editing
In non-destructive audio editing mode, the cut, copy and paste function will never modify the audio files themselves. Non-destructive mode only modifies the parts that refer to the audio files.
Cutting a selection will have the effect of splitting the selected part into two pieces and shrinking them so that the selected range of the part’s audio file is no longer included in the song.
If the copy command is applied when the temporal selection is empty, the entire active part (the part you last clicked on) will be placed in the clipboard. To make the temporal selection empty, simply click on a part without moving the mouse.
Pasting a previously copied (or cut) selection will create a new part that exactly corresponds to the clipboard selection. If the paste command is executed when the current selection is not empty, the selection will be filled with the clipboard part, while if no selection is active, a new part will be created in a new track.
Editing shortcuts:
Shift+Ctrl+V: holding the Shift key while pressing Ctrl and V will append the part currently in the clipboard (i.e. the part which has been previously copied or cut) at the exact end of the current track (see looping audio files). On a Mac, use Shift+Cmd+V for this shortcut.
Shift+Ctrl+X: cuts out the selected section of the track or whole song, shifting the remaining portion of the song to the left. This shortcut is useful when cutting out the silence at the beginning of a song. Mac users can run this shortcut by pressing Shift+Cmd+X.
Other non-destructive operations are accessed through the Edit menu:
Splice: detach the current selection from the rest of the audio files; a reference to a audio file is cut into 2 or 3 pieces. The Splice command actually works in two modes:
When a track selection exists (i.e. a portion of one or more tracks is highlighted), the splice command works on the current selection. It doesn't look at the position of the vertical playback cursor; i.e., if you select a portion of a track by dragging with the mouse over the waveform, then single-click on a different position in the timeline axis, the Splice command will be applied to the selection you dragged on the waveform, not at the point at which the cursor is positioned. The selection will be transformed into a new part, thus creating 3 parts from the original part.
When no track selection exists (for example, if you press Ctrl+0 or Cmd+0 to clear all selections) the Splice command will be applied at the timeline cursor position, and it will split the current part into two parts, one before and one after the cursor position.
Splice in N parts: Creates N concatenated parts out of the selected part. Setting this command to “5,” for example, splices the selection into five equal portions.
Merge: Rejoins two parts that have been previously spliced.
Audio files are made up of a series of samples. Each digital sample is simply a value between -1 and 1. The sampling rate at which an audio file is recorded represents the number of samples that the audio file contains in each second of recording. When you look at a waveform, you can’t usually discern each sample, as, even in short waveforms, the number of samples is very high, and they are “blurred” together to form the waveform representation that you see on the n-Track timeline.
If, however, you zoom into the X axis by repeatedly clicking the button on the toolbar (or by rotating the mouse wheel forward while holding the Ctrl or Cmd key), at a certain point, you’ll start to see a series of dots appearing on top of the waveform, as shown in this screenshot.
The dots represent the individual samples that make up the audio file. You can drag a dot vertically with the mouse to adjust the sample value.
The ability to edit individual samples can be useful for correcting DC offset problems in recordings and for harmonizing editing points. If, for example, you place two audio files next to each other and, during playback, you hear a short click corresponding to the point where the two audio files are attached, you might be able to eliminate the click by editing the samples near the connection point to make the transition visually smooth. An alternative method is to overlap the two audio files slightly and cross-fade the two.
Note that abrupt changes between close samples do not usually appear in real recordings. Manual edits of individual samples that result in abrupt changes in the sample value (the screenshot above shows such an abrupt change) results in very high-frequency noise bursts that can be very annoying and hurt your ears.
Normalization
Normalization is the process of amplifying an audio signal so that its maximum amplitude matches a specified level. Normalization can be useful, for example, when preparing an audio file for burning a CD. Setting the maximum level of all CD tracks to 0 dB assures that no clipping occurs and that the playback level of all tracks is similar (assuming that all the tracks have been processed with similar compression and limiting settings).
Note:
Normalizing a WAV file will not improve its signal to noise ratio. If the recording level used was too low, amplifying the signal will also amplify noise.
To normalize a waveform, open the Edit menu and select “Normalize.” Configure the options in the Normalize dialog box to control the normalization; to expand the controls, click the “More Options” button.
Normalize to:
sets the maximum level that the signal will assume after normalization
Scan:
scans the file to extract the current maximum level
Channels:
selects which channel to apply the normalization to. If the normalization is applied to both channels, the amplifying factor will be chosen so that the channel which has the highest peak will reach the requested level. For example, normalizing to 0 dB with a stereo file whose left channel peaks at –3 dB and whose right channel peaks at –2 dB will produce a file in which the left and right channels peak at –1 and 0 dB, respectively. This option only appears when a stereo waveform is selected.
Apply to:
Selection:
processes the selected portion of the audio file
If the “stereo” and/or “32-bit” options are checked, and if only a portion of the WAV file is present in the song (i.e. the left and right edges have been dragged to shrink the part), the processing will also be applied to the excluded parts.
Snap Selection Edges To 0
Selecting good cut and paste points is crucial to obtaining natural-sounding edits of audio files. The Snap to 0 option is designed to help the selection of such points: the instances in which the waveform crosses the 0 level are often the best places at which to cut an audio file. Enable Snap to 0 in the Edit menu.
You can adjust the Snap to 0 settings by opening Settings/Preferences/Options and clicking the “Snap to 0 settings” button:
Snap when crossing 0 with [Negative/Positive/Any] slope:
the program can detect the slope of the crossing of the 0 level. It's usually good to use a positive or negative slope; this way, when a segment of audio is pasted into another, the slope of the resulting waveform at the insertion point will be sufficiently smooth. This reduces the appearance of clicks at edit points.
Scan at most [x] samples:
sets the number of samples that the program will scan when searching for the 0 crossing.
Assume DC component:
sets the signal level that the program will consider as 0. This option is useful if the file you're working on has a DC component: the snapping will be made relative to the DC value specified rather than relative to 0. The level must be entered as a real number between 0 and 1 (e.g. “0.23”).
Crossfading
Crossfading creates a smooth transition between two separate audio files. n-Track performs crossfades in real time during the playback of a song.
This operation is non-destructive because the original audio files are not modified.
To apply a crossfade, drag one edge of a waveform so that it overlaps another waveform by the desired amount (the crossfade time). As you drag, you will see the crossfade volume envelope shape appear in the space at the intersection of the two waveforms.
You can disable the crossfading of a audio file in the Crossfade sub-menu of the popup menu that appears when you right-click on the crossfade area at the intersection of the waveforms. Select “More” from the popup menu to customize the length and shape of the crossfade volume envelope.
Looping Audio Files
To loop an audio file in n-Track Studio, do the following:
Insert the audio file you want to loop using the Track/Insert audio file menu command
Make sure you’re in non-destructive editing mode (click on the editing mode button on the toolbar)
Press Ctrl+C (or select Edit/Copy). On a Mac, press Cmd+C.
Hold down the Shift key and press Ctrl+V (Cmd+C on a Mac)
This will insert the same audio file again. When the Shift key is pressed and held, the program automatically puts the new reference to the audio file in the same track as the copied part with the offset equal to the former end of the track, so that there will be no gap in the playback. Continue pressing Shift+Ctrl+V (or Shift+Cmd+V on a Mac) until the audio file is repeated as many times as you wish.
You can also use this technique to create more complex loops. For example, if you want to create a drum track and you have two audio files, one for the normal bar and one for a break, you could paste the normal bar 3 times, the break bar 1 time, then copy and paste the whole sequence several times to make a long drum loop.
Save/Recall Selections
The Save/Recall selections window allows you to save and recall the selections used for editing on the timeline window. Saving and recalling selections is a method complementary to using markers to define edit points. Access this window by going to 'view'/'save/recall selections'. Use the timeline selection to select a part.
Add:
Save the current selection
Delete:
Delete the selection highlighted in the list of selections
Merge:
Merge the selections highlighted in the list of selections together
Apply:
Recall the highlighted selection
Close:
Close the window
Regions
n-Track allows you to define regions within audio files. To define a new region, highlight the section of the audio file that you want to be included in the region by dragging with the mouse on the timeline window, then right-click and select “Create audio file region” in the pop-up menu.
You can find the list of all the loaded audio files regions in the View/audio files regions dialog box. Add a part made of a selected region to an existing or new track by dragging the desired region from the regions list dialog box to the timeline window.
The information on an audio file’s regions is saved in the audio file itself, in a format compatible with most Windows audio file editors.
Insert part at 0:
Add the selected region to the beginning of a new track
Insert part at original offset:
Add the selected region to a new track starting at its original offset position
Delete region:
Delete the selected region
Show regions in waveforms:
Check this option if you want the regions to be shown in the waveforms representing the song’s audio files in the timeline window
Close:
Close the window
Using Beat Doctor
Let's say you just recorded that perfect drum take you want to use in your project, but a couple of drum hits are slightly off-timing. One way to fix this would be to manually edit the recording by slicing the audio region and dragging it to it's desired position, re-aligning it to the project's tempo. Although this is a valid solution, it may get time consuming on very long tracks or when there are many mistakes. n-Track's Beat Doctor provides the tools to quickly and easily fix the timing of your drums, percussion and other rhythmic recordings without having to manually edit the regions.
To use Beat Doctor, right-click on the region you wish to apply it to, and navigate to the Beat doctor menu.
Here you'll find the Detect command, which opens the Beat Doctor settings panel. Beat Doctor works using transient detection. Transients are areas in your audio in which the energy reaches a much higher level over a very short span of time, a behaviour typical of impulsive or percussive sounds. The Beat Doctor panel allows you to specify preferences for detecting transients, as well as choose what actions you would like to perform on them once detected.
On the left of the panel you'll find the detection mode checkboxes. These let you choose the detection algorythm. For most cases dealing with rhythmic recordings, keep the Time detection option checked.
Just below the detection mode you'll find a list of presets that you can choose from to optimize Beat Doctor's performace depending on the type of audio you want to analyze. For example, if your recording has a lot of background noise, you may choose the With background sounds option in the presets menu. The presets will modify Beat Doctor's advanced settings to better analyze your audio. To customize the behaviour yourself, simply open the More options panel.
Once Beat Doctor detects transients on the region, n-Track will add markers at each transient position. On the right of the panel you'll find a list of actions that Beat Doctor can perform for you after the detection.
Splice to beats
This option tells n-Track to slice the audio region at every transient position found in the audio.
Quantize after splice
Select this option if you wish for n-Track to quantize the regions after having sliced them. The regions will snap to the closest grid position, defined in your grid settings.
Fill gap after quantize
If you check this option, n-Track will fill the remaining space left between the quantized regions with what was detected right before or right after the transient. This can be useful to avoid gaps of silence to be left beteen a beat and the next.
These actions are also accesible through the Beat doctor menu, found by right-clicking on an audio region. Another action you'll find at the bottom of the menu is the Apply markers to audio file command. This will write marker position information into the audio's actual .wav file, allowing you to save tempo information along with the audio file.
Change Audio Tempo Without Changing Pitch
You can change the playback speed or tempo of a recorded song in n-Track without altering its pitch. This is useful when you want to match an imported audio track to your project’s tempo or experiment with different BPM values while keeping the original key intact.
Adjusting the Speed of an Imported Audio Track
For audio tracks that don’t have tempo information (BPM) set, follow these steps:
Select the audio part you want to adjust in the timeline.
Click the “i” button in the upper toolbar to open the Channel Properties panel.
Scroll down to the Musical Info section, where you’ll find BPM and Key fields.
Enter the original BPM of the recorded audio.
Press Apply to confirm.
Ensure the option Part Speed follows song BPM is selected.
Return to the main timeline and set a new tempo for your song.
The audio part will now automatically sync with the project tempo - changing speed without affecting pitch.
Tip: If the audio doesn’t follow the tempo after changing BPM, double-check that the Part Speed follows song bpm option is enabled in the part properties.
Audio Effects and Signal Processing
Types of Effects
Realtime audio effects can be used from within the program in a number of ways:
Insert effects process the signal before it’s fed to the main mix. Up to 25 effects can be applied to each track. To apply a new insert effect to a track, click the “+” icon in the track’s inserts effects list in the mixer window, then select the effect from the window that pops up.
Aux channel effects allow you to send the signals from multiple tracks to one channel, then apply one set of effects to the mixed signals. After processing the signal, the aux channel feeds it to the main mix. This kind of effects processing is extremely useful for certain kind of effects, especially reverbs and delays. Instead of applying a reverb to several tracks using insert effects, you can put a reverb on an aux channel, then use the send control of each track in combination with the aux return control to adjust the amount of reverb applied to the track. To add an effect to an aux channel, click the “+” icon on the channel’s effects list in the master mixer window. Select an effect from the drop-down menu. Each track signal can be sent to an aux channel using the track's send controls, located below the list of inserts effects on the mixer window.
An Aux channel differs from a Group channel in that the Aux is usually sending a bit of the track's signal 'on the side' to the aux (maintaining unchanged the track current output), while with a Group channel you normally send the whole of the track to the group setting the group as the track's output.
Use send automation (drawing the send evolution in the timeline) to apply effects to certain parts of a track, instead of applying them to the whole track, or to vary the amount of an effect during the course of a song.
At the end of the signal path, the master channel effects process the signal resulting from the mixing of all the tracks and aux channels (if needed, you exclude aux channels from the master channel effects; see aux channels settings). The master channel effects chain typically includes an EQ plug-in, as well as a compressor and/or a limiter, which allows you to obtain a good volume impression without clipping.
Effects can be arranged in any combination, and one single effect type can be repeated several times for a single track (for example, you can add two separate echoes with different delay times to a track). To change the parameters of a particular effect on a track, open the effects dialog box and select the desired effect in the track list box. The effect dialog box will appear and you will be able to make the desired changes. You can alter the order in which the effects are applied using the up and down arrow buttons.
When using effects, be aware that the program calculates them while the song is being played back, so the load on the computer processor increases quite heavily. On the other hand, effects are non-destructive, meaning that the track that the program processes isn’t really modified. This allows you to experiment without having to worry about ruining the audio files and, more importantly, without having to wait for an audio editor to process the whole track.
You can make effect processing permanent by destructively processing a track with its current track effects.
n-Track Studio allows the computer to be used as a multi-effect device. This feature allows you to connect an electric guitar, for example, to your computer, then use the program’s effects as virtual guitar pedals.
To enable Live Input Processing:
Click the Live button on the main playback/record toolbar.
Add a blank audio track, click on the small Record button in the track's section of the left timeline bar, select the input you want to receive audio from, then make sure that the Monitor Live Input button next to the small record button is active. You should now see the track's level meter move according to the input signal.
Note:
n-Track includes the simple n-Track nEfx Tube Amplifier plug-in which can be used as a guitar amplifier simulator to play live guitar through n-Track. Just hook your electric guitar to your audio device and set n-Track in Live mode. Much more elaborate 3rd party Guitar amplifier plugins can be found on the Internet
When in live input processing mode, the program will record from the selected soundcard input(s), feed the recorded signal into the main mixer, running it through any enabled effects, then output the resulting signal to the active output soundcard(s).
If the buffer sizes are sufficiently low, the input to output latency will be low enough for the processing to appear to the ear as if it’s done instantly. This enables applying effects to an instrument while playing it through the computer. You can, for example, add a delay or reverb to an electric guitar, or add reverb to vocals.
Live input processing also works during song playback and recording. This may be useful for monitoring the tracks being recorded. Vocal tracks, for example, are often processed with compressors and reverbs. Normally one would record the track dry (without any effects), then apply the effects. The drawback with this way of recording is that, during the recording, the performer doesn’t hear how his or her voice will sound when processed with the effects. Using live input processing, you can add the desired effects before recording the vocal, then record the track with live processing enabled so that the program processes the voice with the effects and mixes it with the other tracks in the song.
You may notice a small sound delay when using live input processing. This is due to the audio buffering in the soundcard. Carefully adjusting the buffer settings in the buffering settings dialog box is fundamentally important for obtaining the lowest possible input-to-output intrinsic delay.
Turning the buffering knob to the left will decrease the total buffering, thus allowing for a smaller delay: if the buffering is insufficient, a slight distortion (actually a fast repetition of clicks) will be hearable.
To make the intrinsic delay less annoying, only listen to your instrument through the output of the computer. For example, when playing an electric guitar, connect the amplifier output using its line-out jack, then mute its speaker output (by plugging a headphone adapter into the headphone connector, for example).
If the intrinsic delay is so high that you can’t manage to play while hearing the delayed sound, adjust your setup so that you hear your instrument output from both the computer speakers and from the instrument amplifier speakers (if applicable), even if some effects, such as EQ or compression, lose their usefulness.
The minimum delay of a system doesn’t depend much on the computer speed, but mostly on the soundcard’s driver design: the best results are typically obtained when using Asio, Wasapi, WDM or WaveRT (Windows) or CoreAudio (Mac) soundcard drivers. When input to output latency (the sum of the input latency and the output latency) falls below 10 milliseconds, the delay becomes un-hearable to most people.
n-Track Studio supports VST 2.x and 3.x standard plug-ins.
You can apply a VST effect to a track by right-clicking on the track and selecting Effects from the pop-up menu. Each track or channel’s mixer stripe contains a black list box that lists the plug-ins currently applied to the channel.
The property window for each plug-in contains the bypass checkbox, the CPU time indicator (which shows the percentage of the total program time used by the plug-in) and the preamp/postamp controls. These controls allow you to adjust the level of the signal arriving to the effect so that no distortion is introduced and that the signal level is kept sufficiently high.
If you don’t need these adjustments, keep these controls in their central position (an “off” label will appear below them) so that the program doesn’t waste CPU time applying inaudible amplification. To quickly turn off one of these controls, right-click it and choose “Center.”
VST 2.x plug-ins must be stored in a single folder on the hard disk. You can specify the path to this folder in the Preferences/Paths dialog box. The location of VST 3.x plug-ins is standardized, so you shouldn’t typically need to worry about the VST 3.x plug-ins location: the plug-ins’ installers should take care of that.
DirectX Plug-Ins (Windows)
n-Track Studio supports the DirectX standard plug-in architecture.
Some DirectX plug-ins will refuse to work with mono tracks, reporting an error when you chose them from the list. If you need to work with one of these plug-ins, you can either use it only on stereo tracks, or check the option for “expand mono tracks to stereo” in the Preferences/General dialog box. This will also greatly enhance the result of some effects, in particular reverbs.
The property window for each plug-in contains the bypass checkbox, the CPU time indicator (which shows the percentage of the total program time used by the plug-in) and the preamp/postamp controls. These controls allow you to adjust the level of the signal arriving to the effect so that no distortion is introduced and that the signal level is kept sufficiently high.
If you don’t need these adjustments, keep these controls in their central position (an “off” label will appear below them) so that the program doesn’t waste CPU time applying inaudible amplification. To quickly turn off one of these controls, right-click it and choose “Center.”
The effects list may contain some entries that aren't actual filters, but are in fact Windows internal codecs. Typically, if you choose one of them, a pop-up dialog will appear saying "Filter doesn't support property pages.”
n-Track Studio supports the Apple AU (Audio-Unit) plug-in standard.
Your Mac comes with many Apple AU plug-ins, including Reverb and Compression units, and the default MIDI output on Mac is the Apple AUi DLS instrument, which provides General MIDI instruments sounds.
Effects That Work with n-Track Studio
You can find links to shareware and freeware VST, DirectX and AU effects plug-in on the n-Track Studio website.
Freezing
Effects processing can sometimes overload the CPU (the computer’s “brain”), especially when working with complex projects or when the computer is not very fast, resulting in annoying clicks or pops while playing the song. One way to overcome this problem is to Freeze channels that are being processed by CPU intensive plug-ins. When you freeze a channel, n-Track creates a temporary WAV file with the channel’s audio data, including any effects plug-in processing. During subsequent playbacks, instead of processing the channel with the plug-ins, n-Track simply reads the temporary WAV file you created when you froze the channel.
To freeze a track, select Track/Freeze-->'Freeze/UnFreeze track'. When a channel is frozen, the effects are bypassed, and changing an effect’s parameters wont’ have any effect until you de-freeze the channel by selecting Track/Freeze-->'Freeze/UnFreeze track'. If you de-freeze a channel and want to freeze it again, you have two options: either repeat the regular freeze procedure just like you did the first time, or use the Re-Freeze command, which instructs n-Track to simply re-use the temporary WAV file created during the earlier freeze. Re-freeze is instantaneous, although it won’t reflect any changes in effects parameters done after the original Freeze.
Freezing is also available on instrument channels: if a VST or DX instrument is starting to use too much CPU, you can simply freeze the channel, and the MIDI tracks sent to the instrument will be frozen too. You’ll still be able to hear new MIDI tracks sent to the frozen instrument or MIDI notes coming from an external MIDI keyboard.
The Bounce command consolidates tracks made of multiple audio files into a track with a single audio file. To bounce a track, right-click it, then select “Freeze/Bounce” and “Bounce to single wave file.”
The Bounce and Process track command in the Freeze/Bounce submenu consolidates the track into a single audio file, and also gives you the option to permanently apply track effects, EQ, and volume envelopes. It also gives the option to create a audio file that starts at the beginning of the song for easier exporting of tracks to 3rd-party programs (see Tips below).
Tips:
Hold down the Ctrl key (Cmd on a Mac) while running the Bounce command to bounce all the tracks in the song.
When you launch the Bounce and Process track command, the Bounce Options dialog box will appear. Select Bounce from beginning of song and click on Bounce all tracks. This will bounce all the song’s tracks so that you’ll be able to easily import the tracks into a new song, automatically keeping them in sync with each other. This command is also useful for preparing the tracks for exporting the song to 3rd-party multitrack editing programs.
n-Track Studio can host ReWire-compatible third party software such as Propellerhead Rebirth, Reason, Ableton Live, Virtual Sampler and more. A ReWire-compatible slave program will automatically send its signal into the corresponding n-Track ReWire channel(s). You’ll then be able to process the signal with plug-ins, send it to aux channels, group channels etc. ReWire software will sync to n-Track’s timing, and the transport controls (play, rewind, etc.) on the ReWired software will work together with n-Track. Starting the playback from a Rebirth window, for example, will also start the n-Track song’s playback.
To add a ReWire channel, select Add Channel/Add Rewire Device. Select a program from the list. A window with the available channels will appear. A ReWire program can have two or more channels; by default, n-Track activates the first two channels. Other channels can be activated “on the fly” during playback. Once you’ve added the ReWire channel, you can load the ReWire application and test if its signal is correctly being routed through n-Track.
Once you’ve finished your work, close the ReWire application first, then n-Track. Closing the programs in the reverse order may cause stability problems.
ReWire technology is developed by Propellerhead Software AB
Side-chaining is a mechanism by which an effect plug-in can process the signal of an audio track based on the characteristics of the signal of a different track. A typical use of side-chaining is when the dynamics (i.e. compression) of a bass track is altered based on the dynamics of a kick drum track, or when a radio speaker talks over music being played, with the music automatically decreasing in volume when the speaker talks (“ducking”).
A plug-in needs to have explicit support for side chaining: for example, many compressor/limiter plug-ins have a switch that lets them use a sidechain or external input as a key signal.
nEfx Compressor, included in n-Track, supports sidechain input.Third party compressor plug-ins that have support for side-chaining include DensitymkII (free), Voxengo Crunchessor, and FabFilter Pro-C (available as VST3).
To use side-chaining with n-Track:
Add a plug-in that supports side-chaining to the controlled track. This is the track you want to alter (the bass track, for example).
Click on the output label in the mixer stripe of the track that you want to use as the side-chain (the controller track, which is often the kick drum track).
Select Add new send from the pop-up menu.
Click on the send output label of the send that you’ve just created. The output selection pop-up menu should list the side-chain input of the plug-in in the controlled track. Select this menu entry.
Set the option in the side-chain plug-in to activate the side-chain input, if required by the plug-in. n-Track's nEfx Compressor enables sidechain automatically when a sidechain input is connected. It allows monitoring the sidechain input toggling the Output/Sidechain button.
If you only want to use the controller track for the side-chain source, without actually hearing any audio from the track, send the track’s main output to the plugin’s side-chain input instead of using a send output.
Aux Channels and Settings
To send a track to an aux channel:
Click on the output label in the mixer stripe of the track that you want to send to the aux channel.
Select Add new send from the output pop-up menu.
Click on the send output label (in the mixer stripe) of the send that you’ve just created.
The output selection pop-up menu should list the available aux channels (Aux channel 1 will be automatically created if it was not previously present in the song). The newly created aux channel should appear in the Master Mixer window (View/Mixer/Master mixer menu command). The aux return section for the aux channel you just created should appear at the bottom of the master channel’s mixer stripe in the Master Mixer window. The default setting for the aux return slider is –Inf; you’ll need to turn the return slider up to hear the aux channel.
The track’s send volume is set by default at 0 dB; you can adjust the send level to control the amount of the track’s signal that is being sent to the aux channel. If, for example, the aux channel contains a reverb effect, the send slider will effectively control the amount of reverb that is applied to the track.
The signal sent to aux channels can be taken from three different points in a track’s or group channel’s signal path. Each send can be pre-inserts, pre-fader, or post-fader. The type of each send can be set with the send mode button just above the send pan control in the track’s mixer stripe.
Pre-fader send:
when a send is pre-fader, the signal sent to the aux channel is not influenced by the track's fader settings (volume and pan). Pre-fader sends may be useful when using an aux channel as a sub-mix, i.e. to group tracks and control their volume and pan using the aux's return setting. If a send is pre-fader and the track's volume is set to –Inf, the track's volume will be set exclusively by the send and return controls.
Pre-inserts send:
when a send is pre-insert, the track’s signal is sent to the aux channel prior to it being processed by the track’s insert effects and before the track’s volume and pan settings are applied.
Post-fader send:
Iwhen a send is post-fader, the track’s signal is sent to the aux channel after it has been processed by the track’s insert effects and after the track’s volume and pan settings have been applied.
The signal returning from an aux channel to a master channel can be inserted into the mix in four different ways:
Pre-master channel effects & pre master volume:
the signal returned from the aux channel is processed with the master channel effects and the master volume setting is used to control the return’s level.
Post-master channel effects & post master volume:
the signal returned from the aux channel is not processed with the master channel effects and the master volume setting is not used to control the return level.
Pre-master channel effects & post master volume:
the signal returned from the aux channel is processed with the master channel effects but the master volume setting is not used to control the return’s level.
Post-master channel effects & pre master volume:
the signal returned from the aux channel is not processed with the master channel effects but the master volume setting is used to control the return’s level.
You can use from 0 to 32 aux channels. The higher the number of aux channels, the more system resources will be used. It's advisable to use only the minimum number of aux channels that you need.
It’s often useful to adjust the settings of a group of tracks at the same time. Having to change the same setting for many tracks may be tedious; instead, send a group of tracks to a dedicated group channel. Create a group channel by selecting Group/Add Group Channel in the Output to drop-down list in the track’s Properties dialog box. When the group channel is created, a new channel strip appears on the mixer window. More than one track can be sent to a group channel, so that when you adjust the setting of the group channel, all of the group’s tracks are influenced.
A group channel can have its own effects, can send its signal to aux channels and can have automated volume and pan just like a regular track. Group channels can in turn be sent to other group channels, allowing you to organize the song in a hierarchy of groups and allowing for great flexibility in the routing of signals.
Destructive Processing
Effects, volume and pan envelopes can be applied destructively to a track’s audio files. Normally, effects are calculated by the program in real-time during the song’s playback. In many cases, however, it may be better to apply effects in a permanent manner. For example, sometimes using too many effects may cause the computer to run out of resources: applying the effects destructively can free up CP. In other cases, it may be necessary to apply different effects to certain parts of a track (this can also be accomplished in real-time using aux channels send/return automation).
Note:
If the file format is being changed (the stereo and/or 32-bit options are checked) and if only a portion of the WAV file is present in the song (i.e. the left and right file edges have been dragged to shrink the part) the processing will also be applied to the excluded parts.
In some situations, it may also be useful to apply volume or pan changes to a audio file in a permanent manner. This typically is needed when mastering a audio file resulting from the mixdown of a song (for example, to apply the final fade out).
To apply destructive effects or envelope processing to a track, select Edit/Apply track effects/envelopes. Select the desired options from the box that pops up:
Apply:
Volume envelope: apply the track’s volume envelope to the selected audio file
Pan envelope: apply the track’s pan envelope to the selected audio file
Effects: apply the track’s effects to the selected audio file
Apply to:
Selection: process the selected portion of the audio file
n-Track’s track EQ lets you use up to 20 bands of parametric EQ. Each audio track has 3 EQ knobs on the mixer window. The knobs control the 3 EQ bands’ boost/cut amounts. The three bands are, by default, set as low-shelving, band boost/cut and high-shelving filters, respectively, but each band filter type, frequency and bandwidth can be customized in the EQ properties dialog box.
Even though the mixer has only three knobs, more EQ bands can be added or deleted in the EQ properties window using the “add band” and “delete band” buttons. Click the button on a track to open its EQ properties window.
The EQ window also has a built-in spectrum analyzer and automatic instrument tuner that can be activated or deactivated by right-clicking on the frequency response graph. Click the “Show/Hide all EQ Controls” button in the EQ properties window to reveal the EQ parameters:
Track selection: Choose the track you want to analyze.
Band selection: Choose the band to which you want to change the parameters.
Band type/eq type selection: Set presetted eq/band type.
Slope/Band width: Adjust the width of the currently selected band.
Band frequency: Adjust the frequency of the currently selected band.
Band Gain: Adjust how much the current band boosts or cuts the signal.
Spectrum Analyzer
The spectrum analyzer examines the signal at the output of the EQ and calculates the power of each frequency contained in the signal’s spectrum. The results of the analysis are drawn in the graph. The analysis of the signal is performed using the FFT method. The size of the FFT window, the size of the FFT and number of samples after which each new analysis is performed can be adjusted in the pop-up menu that appears when you right-click on the EQ. You don’t really need to understand what these parameters mean to use the spectrum analyzer; however, here’s a quick explanation:
Window size: the window size is the length of the block of signal that is analyzed. The longer the window, the more accurate the analysis. More accuracy means that the signal’s frequencies will be shown with more detail; groups of frequencies close to each other will be shown as a single frequency band when a short window is used, but will be shown as distinct bands as the window length is increased. The disadvantage of using a long window is that the spectrum will show all the signals in the analyzed block, and if the block is too big, you may get two subsequent signals that you wanted to be shown separately into a single spectrum.
If, for example, you want to see the spectrum of a sequence of notes played on a guitar, and you set the window length to a number of samples that approximately equals 1 second, if the guitar player plays 3 notes during 1 second, the spectrum of the corresponding signal block will show the frequency bands corresponding to all the three notes that have been played on that second. If some bands overlap, one note may be or contain a harmonic component (an integer multiple) of another, and you’ll only see the sum of the three notes’ spectrums. If a ~0.3 second window is used instead, you’ll see three spectrums, each showing the spectrum of a single note played on the guitar.
A longer window also means that the screen is updated less frequently. This can be overcome by setting the ‘computer FFT every X samples’ parameter to a size less than the window’s. This, in turn, means more analysis per second, and thus the CPU will be used more intensely.
FFT size: the size of the FFT must be at least the size of the window. A longer size for the FFT basically implies a smoother graphical representation of the spectrum in the graph, but the accuracy of resolving adjacent frequency bands will not improve unless the window size is also increased.
Compute every # samples: if the window size is large, it may be useful to set this parameter to a size smaller than the window size. When this is done, the program will analyze the signal at a frequency higher than that set by the window size (which implies that a same portion of the signal will be analyzed more than once). More analysis per unit of time imposes a greater stress on the CPU.
Window type: without getting too technical, the choice of the type of the window used is a tradeoff between the smoothness of the spectrum and the ability to resolve (show as separate) small peaks in the frequency spectrum. The rectangular window is the best for the latter requirement, while the Blackman window provides the smoothest spectrum.
Automatic Tuner
You can enable or disable the tuner by right-clicking on the frequency response window. The tuner analyzes the signal at the output of the EQ and shows how close the signal’s main frequency component is to the frequency of a musical note. The closest note is automatically selected so that, for example, when tuning a guitar, you don’t have to manually tell the tuner which string is being tuned.
When the note is close but not exactly equal to the note’s frequency, the percentage of the difference in frequency will be shown, allowing you to adjust the instrument (typically a guitar) to tune it to the desired note.
The accuracy of the tuner is typically so high that it’s likely that you won’t be able to reliably tune the instrument to the exact note frequency. With a guitar, the tuner detects even small detuning due to the bending of the guitar’s neck caused by the weight of the hand resting on top of it. This doesn’t mean that the instrument is not in tune, as the human hear won’t typically notice a very small detuning, and a musical instrument is usually built to be heard by a human ear and not by an electronic tuner!
n-Track Signal Path
The View/Signal Path menu command opens the signal path window, which shows the flow of the audio signal inside the audio engine.
The signal path view is interactive. You can:
drag a track’s output from one output to another
bypass sends
bypass effects
open tracks or plug-ins context menus by right-clicking on the plug-in box
Mastering
Mastering is the last step in the production of a song. Once the song has been mixed down to a single audio file, the file may be loaded again to apply the master processing (typically EQ and Compression) to produce the final audio file to be used for burning a CD.
When mixing down a song, if you plan to process the resulting audio file (which is often advisable), you may want to do the mixdown with 32-bits resolution, so as to assure the minimum degradation of the sound quality due to the repeated processing (even when using 16-bit audio files, the sound quality degradation caused by a few processing steps is very hard to notice. When using 32-bit audio files, you may feel free to process the same file tens of times without any noticeable loss of quality).
n-Track Studio can use dither and noise shaping when converting signals from the program’s internal format (32-bit) into 16- or 24-bit format. This conversion takes place at the very end of the signal chain, when the signal is prepared for the output to a soundcard or for writing to a WAV file, for example during the mixdown.
The dithering process consists of adding a very small and calibrated amount of noise to the signal before converting it to a less accurate representation. This can increase the dynamic range of the resulting signal, allowing it to represent signals even smaller than a given format’s theoretical maximum resolution. This process also reduces the effects of the non-linear distortion inherent to the quantization process, which can result in the generation of harmonics that are often annoying to the human ear.
The drawback of the dithering process is that a small quantity of noise is added to the original signal. The amount of noise added is controlled by the Preferences/Options/Dither Depth parameter. This parameter is expressed in bits, which are referred to the current output format. For example when converting to 16 bits, 1 bit unit is 1/(2^16) of the full scale, while when converting to 24-bits, 1 bit is 1/(2^24) of the full scale.
The noise introduced by dithering can be reduced using the noise shaping technique, which moves the dither noise to a region of the frequency spectrum where the human hear is less sensitive (the high frequencies).
The noise shaping process should typically be applied only when preparing a WAV file to be used for creating a CD track, when no other processing is to be applied to the file. The benefits of the noise shaping process are in fact somewhat delicate, and can be completely voided by additional processing.
Connecting your external sound card
As far as specific models go, you can choose among many different solutions in many different price ranges to fit your specific budget and needs.
To connect your external sound card, just plug it to your device using the interface’s connector cable.
Once plugged in, n-Track will detect your device automatically. You’re now ready to record. Just make sure that the recording input is set to the soundcard input you wish to record. You can do this via the arm button, as we saw in previous lessons.
Important
If your soundcard hasn't been automatically recognized by n-Track Studio, please use this form and let us know.
n-Track Studio supports external USB audio devices. n-Track can accesses USB audio devices directly using its own custom USB driver, or can use Android standard USB driver. While the Android USB audio driver is getting better with newer versions of Android, the n-Track driver bypasses the Android audio system so it typically allows for lower latency. The custom n-Track USB audio driver may however not work on all Android devices + USB devices combinations.
As far as specific models go, you can choose among many different solutions in many different price ranges to fit your specific budget and needs.
To connect your external sound card, just plug it to your device using the interface’s connector cable.
Once plugged in, n-Track will detect your device automatically. You’re now ready to record. Just make sure that the recording input is set to the soundcard input you wish to record. You can do this via the arm button, as we saw in previous lessons.
Enabling USB Audio
Launch n-Track, then connect the USB audio device to the Android device.
A prompt should appear asking if you want to use the Android or the n-Track USB driver.
If the USB device isn't recognized or the audio doesn't work correctly please see this USB troubleshooting guide
Connecting the USB device
If the USB device has an USB-C connector you'll only need an USB-C to USB-C cable. If the USB device has the classic USB-A connector you'll need a cable with a microUSB or USB-C male connector and a female regular USB connector.
Some USB devices work well with the Android device power. Some other devices need more power and can only work when connected using either a powered USB hub or a splitter cable.
The splitter cable is very inexpensive and can be easily found for example on Amazon or Ebay, searching for "OTG splitter".
Another option is to use a powered USB HUB.
microUSB OTG cable
microUSB OTG splitter cable
Using multichannel audio devices
When using multichannel USB audio devices you can record as many audio channels as the audio device allows.
After connecting a multichannel USB device n-Track will by default start using only 2 inputs and 2 outputs. To use more channels change the Max Inputs and Max Outputs settings in the Audio Settings box.
Note that not all devices might be able to handle many input and/or output channels. The more channels you enable the more workload the device must handle. If when you increase the number of channels you hear that the audio starts clicking try to increase the buffering settings in the Audio settings box. See the USB compatibility chart below with notes on recommended buffering settings for specific audio devices.
24 bit recording
n-Track automatically detects wether the audio device in use has 24 bit recording capabilities. If that's the case the recorded audio files that n-Track generate will use the 24 bit audio format.
24 bit recording currently works only on external USB audio devices, the Android built-in audio device is 16 bits only.
Working with Inter-App audio
n-Track supports Apple Inter-app audio system, available on iOS 7 and later. Like Audiobus Inter-app audio allows using 3rd party apps as plug-ins to generate or process audio. n-Track Studio 3.1 allows using inter-app instrument and generator apps, that will act as audio sources and MIDI synths, generating audio which is then received and further processed inside n-Track.
When using an inter-app instrument, note that unlike with Audiobus you don't have to record the output of the instrument to a track, you can simply keep it as an instrument, which will receive MIDI notes from n-Track and convert them to an audio signal. When you're finished working on the song you can just mixdown the song and the audio from the inter-app instrument will automatically be included in the mixdown.
n-Track Studio 3.2 and later also allows using inter-app effects, you can just a 3rd party app as an effect to any track, group, instrument or master channel. Version 3.2 also allows using n-Track as a plug-in inter-app inside 3rd party host apps, n-Track can act as instrument, generator and effect.
Using an analog adapter cable
A cable such as the one in the picture below is very inexpensive. Simply connect the male connector to the Android device and a mic to one female connector and a set of headphones to the other.
Recording sources
Many modern Android devices have good quality mics, so if you plan to only record vocals or acoustic instruments, one simple option is to just use the Android device builtin mic. To do that you just have to connect a standard set of headphones (the ones you use to listen to music, not the ones you use to talk on the phone) and n-Track will automatically recording from the device built-in mic while sending audio to the headphones. If you instead connect a phone headset the app will record from the headset mic, which may not always be what you want as the quality of that mic may not be very good.
If you want to record electric instruments or want to use an external high quality microphone, you have two options:
Use an adapter cable to connect a mic or instrument
This is the cheapest option and can be useful to record instruments (electric guitar, keyboards etc.). You may get good results connecting an external microphone but you won't be able to connect an high quality condenser mic which requires a phantom power source. Another adapter would be required for that. Disadvantages of using this approach include: you are still using the Android device builtin mic preamplifier, which is designed for voice calls and may not produce great sounding vocal tracks, and may not be compatible with all mics (depending on the mic impedence); you're still using Android software audio stack, which depending on the version of Android adds a more or less noticeable audio latency.
Connect an USB audio device
This is the approach that guarantees the best possible audio quality and lowest latency. The audio quality will be of course dependent on the USB audio device you use, but there are cheap audio devices on the market that guarantee quite good audio recording quality. An advantage of this method is that when using external USB audio devices n-Track bypasses Android software audio stack and talks directly to the USB audio device using our custom USB audio driver. This allows working with very small audio latency. The main drawback of this approach is that not all USB audio devices and Android devices combinations are supported by n-Track, so we advise to test the USB device first or purchase a device that you can return if not compatible.
Routing tracks
In some scenarios, you may wish to control a track’s routing options, meaning the input and especially the output destination of the track’s signal. This may be useful when, for instance, you want to group various tracks together to control their overall level or eq. Or, you may wish to record the output of various tracks into a new audio track, or perhaps send the signal from various tracks to an effect.
You can control each track’s input/o utput settings via the mixer. This is where you can decide to route a track to another. For example, apply a send effect. Send effects, as opposed to insert effects - which affect the entirety of the track’s signal - allow you, for instance, to have a single reverb effect and send different amounts of your tracks to it.
For example, let’s apply a reverb to an audio track, first as an insert effect, then as a send effect.
To apply a reverb as an insert effect, all you need to do is pick the effect from the track’s effects panel. This will let you choose an effect to apply, which will affect the entire signal (or better, the amount set by the dry and wet parameters) before passing it to the output.
You can also add effects using sends. A send allows you to send a track’s signal to an auxiliary track, which will be the host of the insert effect. This allows you to send different tracks to the same effect in different amounts, controlled by the send amount knob.
To add a send effect, open the mixer.
Then tap the add effect button or tap this little window and choose "add new send".
To add a send effect, open the mixer.
Then tap the add effect button or tap this little window and choose "add new send".
As you can see, a new Aux track was automatically added to your project. Now all we need to do is add an effect on Auxiliary track. To do this, just tap the "add effect" panel of the Aux track and choose an effect. We’ll give the reverb 100% wet and 0% dry signal, since the dry component will be coming from our original track, and the auxiliary track will only provide the signal with the effect applied.
We can now control the reverb amount using track one’s send knob.
Mixing a song
When you mix a song, you’re usually looking to make every element in your song be heard clearly and fit well with the other elements, both as far as level and frequency content are concerned.
You can control each track’s level via the mixer sliders. For instance, if our bass is too quiet compared to the drums and guitars we could bring up it’s level.
Another thing to consider is the frequency content of the elements in the mix. Although this depends on the genre of music we're working on, on our artistic intentions, our taste and so on, it’s generally considered a good practice to make sure that various sounds in your mix don’t clutter a particular frequency band. For instance, we want the main bass frequencies in our song to come from the bass guitar, rather than the guitar
First of all open the mixer view and tap the EQ icon of the channel we want to modify, then start modify frequencies. We might then choose to apply a high pass filter to the guitar to carve out room for the bass frequencies to stand out without interference from other low-end frequencies coming from the guitar, resulting in a clearer mix, in which we can actually hear all the individual elements more clearly.
Working with MIDI
Introduction to MIDI
MIDI is a system used to represent musical information. In its simplest form it represents a sequence of notes that make up a track or song.
When you press a key on a MIDI keyboard n-Track will receive a MIDI event representing the note that was pressed and the velocity with which it was pressed. When you release the key a new event will be sent describing the release event.
Unlike audio files and tracks, MIDI events and MIDI tracks have no sound by themselves. They are normally used to generate sound through a MIDI synth, which creates an audio signal for each MIDI event it receives.
There are two fundamental ways to generate sound from an n-Track MIDI track:
Sending the track to an instrument plug-in: an instrument plugin is a software plug-in hosted inside n-Track, which acts as a software MIDI synth, generating an audio signal in response to MIDI events received from MIDI tracks or live MIDI playback on a physical or screen keyboard. n-Track includes a few built-in instrument plug-ins such as n-Track Sampler, n-Track Drums and n-Track Strings. You can find lots of 3rd party instrument plug-ins for any instrument sound you might image. Just try googling for “VST instrument”.
When you save (mixdown) your song to a single audio file the audio from the MIDI tracks sent to instrument plug-ins is automatically included.
Playing live through an instrument plugin requires a low audio buffering/latency setting (on Windows this requires using Asio, WDM/WaveRT or Wasapi audio drivers). Read more in the Instruments Plug-Ins section
Sending the track to a physical MIDI output: hardware MIDI synths can be connected to PC and tablets using a physical MIDI or USB cable. Windows only - On Windows there is a built-in software synth that appears to n-Track as a physical MIDI device, usually named Microsoft GS Wavetable Synth. This works in a way similar to an instrument plug-in, in that the audio signal is generated by a software component, but in this case the software component is not hosted inside n-Track but is a part of the operating system. This has the drawback that the audio signal generated from the MIDI notes does not enter the n-Track audio engine, it is mixed with the n-Track’s main output by Windows. This creates a series of problems including:
Unlike when using instrument plug-ins, when you want to mixdown the song to a single audio file (mp3 or wav) the signal from the MIDI tracks sent to the Microsoft MIDI synth is not included in the mixdown, you need to convert the MIDI tracks to an audio tracks first, basically recording the audio device’s output while a MIDI track is playing back into the audio device’s input.
When playing live through the Microsoft MIDI synth you can hear a small latency between the time you press a key and when you hear the sound of the key. Unfortunately this latency can’t be eliminated and makes live playing difficult if not impossible
Because of these reasons we recommend using instrument plug-ins instead of the Microsoft MIDI synth. n-Track 7.1 and later includes the n-Track Sampler instrument that has all the General MIDI standard sounds and can safely replace the Microsoft MIDI synth.
Recording MIDI Tracks
To record a MIDI track, first make sure that the MIDI instrument you want to record from is connected either by USB - or to your MIDI input device (typically a soundcard’s MIDI connector). Then select the MIDI input device in the Settings/MIDI devices dialog box.
Next add an 'Instrument' track, and select a virtual instrument from the instrument browser.
Then make sure your MIDI keyboard is selected in the input dialog box.
Sometimes it is useful to record more than one MIDI track at a time, as when transferring MIDI tracks from a MIDI keyboard. You can record multiple MIDI tracks at once using the following procedure: create an empty track for each track that you want to record (Add Channel/Instrument track), then, for each track, change the “all channels/all devices” setting in the MIDI track's properties dialog box to the channel from which you want to record the track.
When you overdub (record over) an instrument track, you can set whether n-Track will replace existing notes with the newly recorded notes, or if it should just add the new notes to the existing, changing the Remove previous notes when overdubbing option in the input selection popup menu that appears clicking on the input button on the track left side.
Piano Roll Editing
The Piano Roll is the main editor for creating and editing MIDI parts in n-Track Studio. It displays MIDI notes and other MIDI events such as velocity, pitch bend, sustain, volume, and pan. Notes appear as horizontal rectangles whose vertical position determines pitch, while their length represents duration.
Opening the Piano Roll
To open the Piano Roll for an existing part, double-tap on an instrument or MIDI part in the timeline.
To open the Piano Roll for an existing part, double-click on an instrument or MIDI part in the timeline.
To start a new part, add a new instrument track. The Piano Roll opens automatically.
Adding, Editing, and Deleting Notes
Note events appear as rectangles, whose color intensity is proportional to the note intensity (velocity).
Single tap on an empty spot to add a note.
Double tap an existing note to delete it.
Long-press on a note to open the Edit menu (with options such as Quantize, Select all, Cut, Copy, Paste, Delete).
Right-click on a note to open the Edit menu (with options such as Quantize, Select all, Cut, Copy, Paste, Delete).
The note you most recently tapped is highlighted and shows a circle handle on its right edge - drag this circle to adjust the note’s length.
The note you most recently tapped is highlighted - drag either edge to adjust the note’s length.
Once you set a note’s length, all newly added notes will use the same length until you change it again.
Selecting and Moving Notes
Long-press on an empty area to draw a selection box and select multiple notes.
Click-and-drag on an empty area to draw a selection box and select multiple notes.
Alternatively, use the Select all command to select all notes
Selected notes can be moved by dragging, either horizontally (to change timing) or vertically (to change pitch).
Multiple selected notes can be moved, copied, or resized together.
Use Cut, Copy, and Paste on selected notes or on a selected time range (by dragging on the time axis) - this is especially useful for repeating MIDI drum patterns.
Grid and Quantization
The start of each newly added note is snapped to the active grid subdivision when the grid is enabled.
Use the Grid menu to set the subdivision (e.g. Bar/Measure, Beat, 1/8, 1/16, etc.).
Choose Quantize from the edit menu to snap existing notes to the selected grid subdivision.
Navigation
Drag with one finger on an empty area to pan the Piano Roll view horizontally or vertically.
Pinch with two fingers to zoom in and out.
Working with Multiple Tracks
The Piano Roll can display notes from a single track or from all MIDI tracks in the song:
By default, the Piano Roll opens in track mode, showing and editing notes from the currently selected track.
Use the button in the top-right corner to switch between Song mode and Track mode.
In Song mode, notes from all MIDI tracks are visible, but you still edit only the currently selected track.
Use the track list on the right to switch which track is being edited (click/tap the track number) or to toggle the visibility of each track’s notes (click/tap the rectangle to the right of the track number).
Instrument Selection
Next to the Grid menu you’ll find the box showing the instrument currently used to play the notes:
Click or tap the instrument box to open the Instrument Browser.
Audition and select different instruments for the active MIDI track.
Velocity and MIDI Event Editing
Tap the Events Draw button (lower right) to open the lower Piano Roll panel where you can draw note velocities and other MIDI controller data.
Velocity represents how strongly a note is played - higher velocity usually means a louder or brighter note, similar to how acoustic piano hammers strike the strings with different force.
By default the panel shows note velocities as vertical bars below each note.
Drag across the panel to draw an envelope that affects the velocities of multiple notes at once.
Tap the top of a single vertical velocity bar to adjust the velocity of an individual note.
Click or tap the MIDI Event Settings button to choose which type of event the panel displays and edits (e.g. Velocity, Pitch Bend, Sustain, Volume, Pan, Mod Wheel).
Manual Editing and Properties
For precise control right mouse click a MIDI note and choose Properties, from which you can manually edit pitch, timing, velocity, and other parameters.
Tip: Editing note velocities and using subtle timing variations can help make MIDI parts feel more human and expressive.
The Piano Roll is a versatile tool for composing, editing, and refining MIDI tracks. Whether you’re drawing in drum grooves, adjusting note lengths and velocities, or working across multiple tracks, it gives you precise control over your MIDI performances.
MIDI Envelopes in the Piano Roll
n-Track supports two types of envelopes inside the Piano Roll:
Global Envelopes, which affect the whole MIDI part, and
Per-note Envelopes, which affect only the currently selected note.
This makes it easy to draw dynamics, shape modulation, and control expression directly in the editor.
For example, you can create a strong pitch bend only on the final chord while leaving the rest unchanged.
Adding and Editing Nodes
Shift + Click to add a node exactly where you want it.
Select a MIDI note to switch to Per-note Envelopes.
Choose a MIDI controller, then add and move nodes as needed.
Right-click and choose Delete nodes to remove selected points.
Envelope Shapes
Each node can use different interpolation shapes, including
Linear, Smooth Start, Smooth End, and waveform-based options such as Sine.
This allows anything from subtle transitions to rhythmic modulation curves.
Resetting Automation
To restore the default envelope behavior, right-click and select
Flatten automation.
Supported MIDI Controllers
MIDI envelopes work across all standard controllers, including
Pitch Bend, Expression, Volume, Pan, and
Modulation, plus additional MIDI CC targets.
Tip: Use Global Envelopes for broad part-level movement, then refine musical details with Per-note Envelopes.
Creating a MIDI Drums Track
Create a new blank MIDI track by adding an Instrument track. From the Instrument Browser, go to 'Drums & Percussion', then selected a drum pack and a kit preset.
Open the piano roll. The left side of the piano roll window usually shows a vertical piano keyboard. This is often useful when composing or editing tracks of melodic instruments. Drum instruments are different from the usual MIDI instruments, however, because each “note” of a Drum channel corresponds to a different percussive instrument (for example D4 is a high tom, D3 an acoustic snare, etc.) When editing a drum part, it is often useful to have the names of each drum instrument appear in the piano roll window.
Right-clicking on the left part of the piano roll window opens a dialog box in which you can select how the notes are drawn. If “Show piano” is selected, a vertical piano will be drawn.
If any other entry is selected, the program will write each note name as set in the MIDI instrument definition. Instrument definitions can be edited in the dialog box that opens clicking on the 'Instruments' button in a MIDI track's properties dialog box, then on 'Edit'. The name of a note can be modified by double-clicking on its name while holding the Ctrl or Mac Cmd key.
Select the note button on the toolbar:
Click the arrow button on the toolbar:
Select the desired area you want to copy. Once you have finished your selection, simply click the copy button. If you prefer, you can use the keyboard shortcut Ctrl+C (on a Mac, Cmd+C)
Now choose the offset to which you want to copy your pattern selection and press the paste button. As you can see, your selection has been copied to the offset you wanted. This procedure is particularly useful if you want to create drum tracks in which you must often manage repeating measures.
Instead of manually pasting the same beat multiple times, you can let the program automatically replicate the selection you’re pasting by holding the Shift key when you click on the “Paste” button or by pressing Ctrl+Shift+V (Cmd+Shift+V on a Mac).
Playing MIDI Instruments
About instrument Plug-Ins
Instrument plugins are VST, CLAP or AU plug-ins that accept MIDI data as input and can be used as MIDI synths. Using an instrument MIDI synth has many advantages:
The synthesized signal is mixed as a regular audio track, so it can processed with effects, sent to aux channels, etc.
The synchronization is (unlike that of MIDI devices) sample-accurate, so the audio and MIDI tracks will always be perfectly synced
Since all the MIDI output can be sent to one or more instrument plugin, the program doesn’t even need a soundcard with MIDI capabilities. The quality of the MIDI tracks depends exclusively on the quality of the instrument synths.
Select the desired VST, CLAP or AU instrument to use from Add Instrument menu to select the instrument you prefer via instrument browser .
Open a MIDI track’s Track properties dialog box. The Output port drop down box should now contain, besides the regular MIDI output port, an entry for the VST, CLAP or AU instrument plug-in.
Both the instrument plug-in’s audio channel track and the MIDI track’s volumes and pan settings can influence the signal.
Loading instrument plug-ins
The instrument browser lets you choose the instrument you want to play via MIDI. It will popup when creating instrument tracks - or when you click on a MIDI track’s output slot - so you can easily choose a new instrument or switch the sound on an already created instrument track. The browser is organized in three sections:
External instruments: Here you’ll find all supported third-party virtual instrument plugins available on your system.
n-Track instruments: In this section, you’ll find a list of n-Track’s built-in instruments. Instruments and patches which show the icon require an additional download, which you can launch via the Add-on manager.
MIDI outputs: shows the available hardware MIDI outputs, as well as already created instrument channels which you can send MIDI to, allowing you to route a new MIDI track to an instrument you already created.
When you select an instrument from the instrument browser, n-Track will create a new instrument channel with the instrument loaded up, and assign it to a MIDI track. To start writing MIDI, just click on the icon to open the piano roll window.
In this example, ‘Piano’ was chosen as a virtual instrument, as you can see from the MIDI output slot. If you have MIDI controller plugged in, make sure this is selected as MIDI input in the I slot, or that the default All channels, all devices is selected.
To change instrument, simply click on the output slot, which will re-open the instrument browser.
The Add-on Manager
The Add-on manager lets you download free and premium instruments, audio & MIDI loops, and drumkits - all available for use in n-Track.
In the Add-on Manager you'll find:
Free instruments: A collection of virtual instruments, loops, MIDI and drums that are free to use for n-Track users. Just create an acccount / login, then download them and start using. Clicking on the ‘Get’ button will automatically download and install a sound pack - the instruments will then be available in the instrument browser and the loops in the loop browser.
Suite instruments: a selection of the sound packs and instruments require Suite edition (or Suite+) to be purchased. You can purchase or subscribe to Suite+ from ntrack.com or, on mobile, within the n-Track Studio app itself.
Playing Live Through an Instrument Plug-In
Instrument plug-ins can be used to play a MIDI instrument live (i.e. let the instrument plugin output the notes you play on a MIDI keyboard in real time). To enable live playing through an instrument plug-in, turn on live input processing mode by clicking the Live button on the toolbar. Set the Echo Mode in the Settings/MIDI devices dialog box to either ‘auto’ or ‘manual’ (if the echo mode is set to manual, you’ll have to select the desired instrument plug-ins in the output drop-down box). Press a note on the MIDI keyboard to hear it play through the synth plug-in.
The delay between the time that a note is pressed on the MIDI keyboard and the time you actually hear the note played is called latency, and is caused by playback buffering. With soundcards with Wasapi, WDM, WaveRT or Asio drivers, the buffering can be usually made small enough so that the latency is not noticeable. Playback buffering can be adjusted in the Buffering settings dialog box.
Once you’ve added a new blank midi track and selected an instrument from the instrument browser, then you need to play it.
n-Track lest you do this in various differents ways.
One way is using the built-in virtual keyboard, that you can play immediately, via touch gestures on your device.
To open the virtual keyboard, just tap the “keyboard” icon on the track bar and start playing.
The screen keyboard presents different controllers in order to simulate an actual real keyboard:
Expand keyboard view
Lets you expand the keyboard view or duplicate it and playing with two keyboard.
Keyboard scrolling icon
Lets you scroll the keyboard octaves..
Sustain
Tap this icon while playing notes to sustain them.
Sustain lock
Locks the sustain virtual pedal.
Hold notes
Holds notes during play.
Hold last notes
Holds the last note played.
Settings
Opens the screen keyboard settings.
Once you’ve added a new blank midi track and selected an instrument from the instrument browser, then you need to play it.
n-Track lest you do this in various differents ways.
One way is using the built-in virtual keyboard, that you can play immediately, via touch gestures on your device.
To open the virtual keyboard, just tap the “keyboard” icon on the track bar and start playing.
The screen keyboard presents different controllers in order to simulate an actual real keyboard:
Keyboard scrolling icon
Lets you scroll the keyboard octaves..
Sustain
Tap this icon while playing notes to sustain them.
Sustain lock
Locks the sustain virtual pedal.
Hold notes
Holds notes during play.
Hold last notes
Holds the last note played.
Create Ghost Part
The Ghost Part feature can be used on Instrument tracks to create a cloned copy of an existing MIDI part. A Ghost Part stays continuously synchronized with the original: any edits made to the original part are automatically reflected in all of its Ghost Parts.
How to Create a Ghost Part
To utilize the Ghost Part feature:
Add an Instrument Part to your track.
Compose a MIDI part, or drag a MIDI loop from the Loop Browser.
Right-click the MIDI part and select Create Ghost Part from the menu.
Long-tap the MIDI part to open the Edit Menu. Scroll down and select "More", then Create Ghost Part from the second menu.
Modify the original MIDI part - the Ghost Part will automatically remain in sync with all changes.
Tip: Use Ghost Parts to repeat sections across your song while keeping editing centralized. Any edits to the original MIDI part instantly propagate to all its Ghost Parts.
Screen MIDI Keyboard
The n-Track Screen Keyboard has three different views to suit various playing and practice styles.
Chromatic View: the default mode showing all notes
Simple Keyboard View: displays only notes in the selected scale
Scale Filter View: shows all keys but greys out any notes that don't belong to the selected scale
Simple Keyboard View
The Simple Keyboard mode is particularly useful as it ensures that every note you play is in the selected key, helping simplify performance and avoid wrong notes.
How to Use:
Open the Screen Keyboard. By default, it opens in Chromatic View.
Tap the Simple Keyboard icon to switch views.
Select a Key (e.g. E).
Select a Scale Type (e.g. Pentatonic Minor or Major Pentatonic).
You can move up or down the keyboard range using the octave toggle icon as usual.
From the 'Other' category, you can choose from a wide variety of scale types - for example, Whole Tone.
Note: If you switch instruments, the Simple Keyboard retains your current key and scale settings.
Scale Filter View
The Scale Filter view displays all keys, but visually greys out any notes that don't belong to the currently selected scale. This makes it easier to recognize valid notes and avoid out-of-scale mistakes.
How to Use:
Open the Screen Keyboard and switch to Scale Filter mode.
By default, the key is set to C Major. Out-of-scale notes (e.g. black keys) are shown greyed out.
Change the Key (e.g. F) and Scale (e.g. Blues) as needed.
Play using your mouse or typing keyboard. Only in-scale notes appear highlighted.
You can enable the 'Play keys not in scale' option to allow playing all keys while keeping out of scale notes visually greyed out. This is useful for practice, improvisation, or exploring non-diatonic tones.
Using Scale Filter with an External MIDI Keyboard
The Scale Filter mode also works with external MIDI keyboards. It highlights which notes belong to the selected scale, making it a helpful practice and learning tool.
Example:
Select D Major as the key.
Play chords or melodies on your connected MIDI keyboard.
The screen keyboard will show which notes are in the scale (highlighted) and which are not (greyed out).
This makes it easy to visually confirm that the notes you're playing fit the current key and scale.
Using the screen drum controller
Another built-in controller is the drumkit controller.
Some drum or percussive virtual instruments loaded from the instrument browser will call up this kind of controller, more appropriate for playing these kind of sounds.
To open the drum controller, simply tap the “drums icon” . You can now play the kit’s elements by using your fingers. You should notice that in this "acoustic" view, some kit elements trigger different sounds depending on the area you hit.
There is also a more "electronic" layout, which features drum ‘pads’, similar to those you would find on a hardware controller or drum machine.
To change the instrument we’re controlling, simply tap the instrument name on the top center of the screen.
Step Sequencer
Introduction
The step sequencer lets you compose rhythms and songs using smaller pieces - called patterns - as the building blocks for more complex scores.
To open the step sequencer window click on the button in n-Track’s toolbar, or double-click on a step-sequencer track in the timeline.
The quickest way to get started with the step-sequencer is creating a drum&bass groove track. See Finding initial inspiration
To create a new step sequencer track click on “Add new empty track → Step-Sequencer” from the “Channel” menu.
Freerun and Playlist modes
Each step sequencer track can operate in one of two modes:
In freerun mode the currently displayed pattern will be played indefinitely in loop. This mode is useful for testing ideas, practicing, jamming and live performing.
In playlist mode you can assemble a customized sequence of patterns. This is especially useful for composing songs with different sections (eg: verses, choruses, fills).
You can switch between the two modes at any moment, using the mode selector.
Select the destination instrument
The step sequencer track outputs midi notes to any MIDI-capable instrument and plugin. You can select the destination from the step sequencer track’s mixer stripe, or from the track’s side panel.
Creating a free-running pattern
While in freerun mode, create a new pattern in the pattern roster, clicking on the button. The pattern roster contains all the available patterns for the track, you can think of it as a toolbox filled with rhythms ready to be used.
After creating several patterns in the roster, you can switch among them clicking on the desired one. If the song is playing, you will immediately hear the new pattern right after selecting it.
Adding notes to a pattern
To add notes to the currently selected pattern, click on a cell in the pattern’s note grid. The cell will light up and the corresponding note will play when the progress cursor crosses it.
The note for the cell’s row is indicated in the note list, on the left side of the grid.
Click on the note’s button and drag the mouse vertically to modify its velocity. The button’s light will dim reflecting the velocity level.
Click on an active cell to deactivate it.
Creating a playlist
Switch to playlist mode: from now on, patterns in the roster will not be played when you create or select one of them. Only patterns added to the playlist will play in sequence.
To add a pattern to the playlist, click on the button while the desired pattern is selected, or drag the desired pattern from the roster to the playlist.
You can arrange the patterns’ ordering in the playlist at any moment, dragging them where desired.
When playback is activated, the playlist will be reproduced, following the main song time position.
To remove a pattern from the playlist, select it and click the button. The removed pattern will still be available in the roster for reuse.
Setup pattern properties
The main settings display shows the most important properties of the selected pattern
Pattern: shows the pattern’s name. Click on the name to modify it
Steps: shows the number of time steps for the selected pattern. Click on the arrows to change it
Step Length: indicates the time distance between each step, and the base duration of each step (the duration can be modified for each step independently, see [Notes duration]. The length is expressed in musical notation
Track: indicates the track you are working on. Click to select a different track.
Bpm: indicates the play speed in BPM. This is a global setting (not specific to the pattern), mirroring the one in the main toolbar.
A pattern with 16 steps of 1/8 duration each will last the same as a 32-step pattern with 1/16 long steps
Tip:
If you want more control on the position in times of the notes, select a smaller step length
Permanently delete a pattern
To permanently delete a pattern, click on the button while the pattern is selected. When a pattern is removed from the roster, it will be permanently removed from the playlist as well, if present there.
Clone a pattern
Clicking on the button, the currently selected pattern is copied and a new identical pattern is added to the roster. This is useful to start working on a new pattern that is a variation of a previous one. The modifications performed on the new pattern will not affect the original one.
Notes duration
By default, each note has the same length as the time separation between note-on events. (see: Step Length).
If you need a note to be played for a longer or shorter time, adjust step length by dragging the right hand side of a step. Dragging right will increase step duration, dragging left will shorten step duration.
Tip
Making a note longer than the step length easily allows for overlapping notes arpeggios
A few things to keep in mind:
The duration of the note is proportional to the step length
The selected duration will affect all the cells belonging to the same column
lengthening or shortening a step will not affect the position in time of the following step
Customize notes list
Each pattern’s note grid can have a customized number of rows, each one representing a pitch value. To add or remove rows from the pitch list, click on the buttons.
You can transpose the note list - and thus the pattern - clicking on the buttons, and you can even set a custom note for each row, clicking on the button and selecting the note from the resulting menu. From the same menu you can select one of the alternate namings available for the note list
You can also load specific scales in the midi list, to ease the composition process. Just click on the scale button, and select a major, minor or other type of scale in the desired key from the menu. Click on Advanced to fully control all aspects of the scale generation.
Pattern color
To change the color of a pattern, right-click on it in the roster and select the desired color from the Color sub-menu.
Export/Import playlists and patterns
To export all the step-sequencer playlist to a file, right-click on any pattern in the playlist and select “Export Step-Sequencer playlist”, then select a name and a destination for the saved file.
This can be useful if you want to reuse the same patterns in another channel of the same song or in another song. To do this, right-click on the destination playlist, select “Import Step-Sequencer playlist” and select a previously exported “.nspl” playlist file.
Please note that all patterns already present in the track’s playlist and roster will be replaced by the imported ones!
You can also export a single pattern or an entire playlist to a MIDI file for use in a MIDI track or in an external MIDI sequencer. To do that, right-click on a pattern in the playlist and select:
"Export pattern to MIDI file", to save a single pattern (also available when right-clicking on a pattern in the roster)
"Export playlist to MIDI file", to save the entire playlist.
Then select a name and a location for the destination MIDI file.
Select a pattern using a MIDI device
You can associate each pattern in the roster with a MIDI message, to quickly select it in realtime using a MIDI controller. This is especially useful in freerun mode, to switch the playing pattern while jamming or performing.
To assign a MIDI event to a patter, right-click on it in the roster, and select an option from the "Associate to MIDI control submenu. You can even use n-Track's MIDI learn ability to perform the association."
Step sequencer track properties
The step-sequencer track can be considered a special type MIDI track. For this reason, a step-sequencer track’s properties are the same as a MIDI track's properties.
A great tool to write midi sequences or create rhythms is the step sequencer. The step sequencer lets you compose rhythms and songs using smaller pieces - called patterns - as the building blocks for more complex scores.
To open the step sequencer, click “add blank track” and then “add step sequencer track”.
We can see the step seq in full screen by clicking this icon
Now, write your sequence, and then hit play.
We can add or remove steps from our sequence with the "add step" button or "delete step" button .
Select the destination instrument
Now lets enable the pattern view by tapping this icon
Each step sequencer track can operate in one of two modes:
In freerun mode the currently displayed pattern will be played indefinitely in loop. This mode is useful for testing ideas, practicing, jamming and live performing.
In playlist mode you can assemble a customized sequence of patterns. This is especially useful for composing songs with different sections (eg: verses, choruses, fills).
You can switch between the two modes at any moment, using the mode selector.
Creating a free-running pattern
While in freerun mode, create a new pattern in the pattern roster, tapping on the add button
The pattern roster contains all the available patterns for the track, you can think of it as a toolbox filled with rhythms ready to be used.
After creating several patterns in the roster, you can switch among them clicking on the desired one. If the song is playing, you will immediately hear the new pattern right after selecting it.
Adding notes to a pattern
To add notes to the currently selected pattern, tap on a cell in the pattern’s note grid. The cell will light up and the corresponding note will play when the progress cursor crosses it.
The note for the cell’s row is indicated in the note list, on the left side of the grid.
Tap on the note’s button and drag vertically to modify its velocity. The button’s light will dim reflecting the velocity level.
Creating a playlist
Switch to playlist mode: from now on, patterns in the roster will not be played when you create or select one of them. Only patterns added to the playlist will play in sequence.
To add a pattern to the playlist, click on the button while the desired pattern is selected, or drag the desired pattern from the roster to the playlist.
You can arrange the patterns’ ordering in the playlist at any moment, dragging them where desired.
When playback is activated, the playlist will be reproduced, following the main song time position.
To remove a pattern from the playlist, select it and click the button. The removed pattern will still be available in the roster for reuse.
Setup pattern properties
The main settings display shows the most important properties of the selected pattern
Pattern
Shows the pattern’s name. Click on the name to modify it.
Steps
Shows the number of time steps for the selected pattern. Click on the arrows to change it.
Step Length
Indicates the time distance between each step, and the base duration of each step (the duration can be modified for each step independently, see [Notes duration]. The length is expressed in musical notation.
Track
Indicates the track you are working on. Click to select a different track.
Bpm
Indicates the play speed in BPM. This is a global setting (not specific to the pattern), mirroring the one in the main toolbar.
Tip
A pattern with 16 steps of 1/8 duration each will last the same as a 32-step pattern with 1/16 long steps. If you want more control on the position in times of the notes, try selecting a smaller step length.
Permanently deleting a pattern
To permanently delete a pattern, click on the button while the pattern is selected. When a pattern is removed from the roster, it will be permanently removed from the playlist as well, if present there.
Cloning a pattern
Clicking on the button, the currently selected pattern is copied and a new identical pattern is added to the roster. This is useful to start working on a new pattern that is a variation of a previous one. The modifications performed on the new pattern will not affect the original one.
Notes duration
By default, each note has the same length as the time separation between note-on events.
If you need a note to be played for a longer or shorter time, modify the duration value in the note duration row.
Tip
Making a note longer than the step length easily allows for overlapping notes arpeggios.
A few things to keep in mind:
The duration of the note is proportional to the step length
The selected duration will affect all the cells belonging to the same column
lengthening or shortening a step will not affect the position in time of the following step
Customizing notes list
Each pattern’s note grid can have a customized number of rows, each one representing a pitch value. To add or remove rows from the pitch list, click on the buttons.
You can transpose the note list - and thus the pattern - clicking on the buttons, and you can even set a custom note for each row, clicking on the button and selecting the note from the resulting menu.
From the same menu you can select one of the alternate namings available for the note list.
You can also load specific scales in the midi list, to ease the composition process. Just click on the scale button, and select a major, minor or other type of scale in the desired key from the menu. Click on Advanced to fully control all aspects of the scale generation.
Pattern color
To change the color of a pattern, right-click on it in the roster and select the desired color from the Color sub-menu.
A great tool to write midi sequences or create rhythms is the step sequencer. The step sequencer lets you compose rhythms and songs using smaller pieces - called patterns - as the building blocks for more complex scores.
To open the step sequencer, click “add blank track” , and then “add step sequencer track”.
We can see the step seq in full screen by clicking this icon
Now, write your sequence, and then hit play.
We can add or remove steps from our sequence with the "add step" button or "delete step" button .
Select the destination instrument
Now lets enable the pattern view by tapping this icon
Each step sequencer track can operate in one of two modes:
In freerun mode the currently displayed pattern will be played indefinitely in loop. This mode is useful for testing ideas, practicing, jamming and live performing.
In playlist mode you can assemble a customized sequence of patterns. This is especially useful for composing songs with different sections (eg: verses, choruses, fills).
You can switch between the two modes at any moment, using the mode selector.
Creating a free-running pattern
While in freerun mode, create a new pattern in the pattern roster, tapping on the add button
The pattern roster contains all the available patterns for the track, you can think of it as a toolbox filled with rhythms ready to be used.
After creating several patterns in the roster, you can switch among them clicking on the desired one. If the song is playing, you will immediately hear the new pattern right after selecting it.
Adding notes to a pattern
To add notes to the currently selected pattern, tap on a cell in the pattern’s note grid. The cell will light up and the corresponding note will play when the progress cursor crosses it.
The note for the cell’s row is indicated in the note list, on the left side of the grid.
Tap on the note’s button and drag vertically to modify its velocity. The button’s light will dim reflecting the velocity level.
Creating a playlist
Switch to playlist mode: from now on, patterns in the roster will not be played when you create or select one of them. Only patterns added to the playlist will play in sequence.
To add a pattern to the playlist, click on the button while the desired pattern is selected, or drag the desired pattern from the roster to the playlist.
You can arrange the patterns’ ordering in the playlist at any moment, dragging them where desired.
When playback is activated, the playlist will be reproduced, following the main song time position.
To remove a pattern from the playlist, select it and click the button. The removed pattern will still be available in the roster for reuse.
Setup pattern properties
The main settings display shows the most important properties of the selected pattern
Pattern
Shows the pattern’s name. Click on the name to modify it.
Steps
Shows the number of time steps for the selected pattern. Click on the arrows to change it.
Step Length
Indicates the time distance between each step, and the base duration of each step (the duration can be modified for each step independently, see [Notes duration]. The length is expressed in musical notation.
Track
Indicates the track you are working on. Click to select a different track.
Bpm
Indicates the play speed in BPM. This is a global setting (not specific to the pattern), mirroring the one in the main toolbar.
Tip
A pattern with 16 steps of 1/8 duration each will last the same as a 32-step pattern with 1/16 long steps. If you want more control on the position in times of the notes, try selecting a smaller step length.
Permanently deleting a pattern
To permanently delete a pattern, click on the button while the pattern is selected. When a pattern is removed from the roster, it will be permanently removed from the playlist as well, if present there.
Cloning a pattern
Clicking on the button, the currently selected pattern is copied and a new identical pattern is added to the roster. This is useful to start working on a new pattern that is a variation of a previous one. The modifications performed on the new pattern will not affect the original one.
Notes duration
By default, each note has the same length as the time separation between note-on events.
If you need a note to be played for a longer or shorter time, modify the duration value in the note duration row.
Tip
Making a note longer than the step length easily allows for overlapping notes arpeggios.
A few things to keep in mind:
The duration of the note is proportional to the step length
The selected duration will affect all the cells belonging to the same column
lengthening or shortening a step will not affect the position in time of the following step
Customizing notes list
Each pattern’s note grid can have a customized number of rows, each one representing a pitch value. To add or remove rows from the pitch list, click on the buttons.
You can transpose the note list - and thus the pattern - clicking on the buttons, and you can even set a custom note for each row, clicking on the button and selecting the note from the resulting menu.
From the same menu you can select one of the alternate namings available for the note list.
You can also load specific scales in the midi list, to ease the composition process. Just click on the scale button, and select a major, minor or other type of scale in the desired key from the menu. Click on Advanced to fully control all aspects of the scale generation.
Pattern color
To change the color of a pattern, right-click on it in the roster and select the desired color from the Color sub-menu.
Connecting an external midi keyboard
If you prefer the feel of an actual keyboard, you might prefer to play an external MIDI controller.
If you’re using a more common USB connection, all you need to do is connect it to your device and n-Track should automatically recognize it.
To connect a bluetooth keyboard (or bluetooth headphones), you need to first pair it to your device. You can do this in your device settings/bluetooth by selecting your keyboard. Once paired to your device, when you launch n-Track the app should detect your keyboard and ask you whether you want to use it.
If you prefer the feel of an actual keyboard, you might prefer to play an external MIDI controller.
If you’re using a more common USB connection, all you need to do is connect it to your device and n-Track should automatically recognize it.
Using AU instruments in n-Track
If you have third-party instruments you wish to use in n-Track, you’ll find these in the ‘external instruments’ tab in the instrument browser. As you'll see n-Track will automatically detect all AudioUnits, including instruments in the newest AudioUnit3 format, and made them available for immediate use.
Once selected n-Track opens the instrument and the keyboard in this nice sort of splitted view, so it’s really easy to control your external audio unit without interrupting your workflow.
Using audiobus to connect to other musical apps
Let’s have a look at how to connect n-Track to other musical apps via Audiobus.
First of all, open AudioBus. Once open, select the instrument you want to play from the ‘input’ slot and pick one, for example the iMini synth. Once audiobus loaded the instrument, tap on its icon to launch it.
As you can see, apps loaded via audiobus show a little menu on the right of the screen, from which we can return to audiobus with just a click.
Now load n-Track Studio in the audiobus ‘output’ slot.
Now, let’s get back to n-Track. If there isn’t one, add a blank audio track, then assign the ‘iMini’, or whatever audiobus input, as the input of the track. Now let’s go back to audiobus, and open the iMini interface.
As you can see, the audiobus menu on the right now shows n-Track’s transport controls. To record audio from the iMini, simply select ‘record’, then play something.
By switching back to n-Track, we can see that the audio coming out of the iMini is being recorded into our newly created audio track.
Using n-Track Sampler
n-Track Sampler is a fully customizable sampler: both for pre-built instruments from the instrument browser, and for custom sounds. You can import and create sounds in the n-Track Sampler, and then work with a whole host of in-built editing parameters and effects to completely reimagine sounds and design your own custom set of instruments.
There are 4 sampler variations: Melodic, Drum, Slicer and Multilayer, each tailored to a specific method of using samples. Between them you can compose your own melodies, beats, textures and really hone your sound.
Locating the Samplers
The sampler types can be selected in the instrument browser under ‘My instruments’ -> ‘Create new instruments’.
Getting Started with the Melodic Sampler
Drag samples or one-shots from the loop browser into the sampler and start playing.
Drag another sample into the melodic sampler to update the sound.
The sampler will automatically recognize if a loop has root note information and will use it to pitch the sample correctly. If the sample has no root note information it can be set with this control. Changing the root note can also transpose the sample.
Change the range of notes that the sample will cover by dragging the yellow range control on top of the keyboard. When a sound is dragged the default range is 2 octaves but can easily be extended using the range control.
Recording in the sampler
The rec button lets us quickly record our own samples. It’s surprising how easy it is to record something that can work as a playable instrument.
Use the fade controls at the beginning and end of the sample to soften the attack and release of the sample, while the proper ADSR envelope that controls how the sample volume is modulated as a note is pressed, held and then released can also be edited.
Additional controls
The pitch knob can be used to alter the pitch.
Use the reverse command to invert the playback direction of the sample to create interesting effects.
Play, Edit, Parameters views
The sampler view has three pages. Enter the edit page with the pencil icon; the keyboard icon goes to Play mode, where more n-Track or 3rd party effects can be added, as well as the arpeggiator.
The ‘Sliders’ icon shows the parameters page to get into the nitty gritty details of the sampler. Press the XY button to view all the available parameter pages.
Getting Started with the Drum Sampler
Selecting ‘Drum Sampler’ from My Instruments, sounds can be dropped onto the pads to build custom drum kits.
Toggle between the Pad and Keyboard views using the Pad icon, located above the Sampler keyboard.
Mute groups
One interesting feature of the drum sampler is the Mute group. Sometimes it's useful to have a sample stop another sample from playing. A classic example is the closed and open hi-hat. The open hi-hat usually has a long ringing sound, and when the drummer releases the pedal the hi-hat stops ringing. This can be accomplished by assigning the closed and open hi-hat to the same mute group. When a sample in say mute group 1 starts playing, it will stop any other sample belonging to the same mute group.
Playing Screen Drums with Sampler
To play drums on the screen, switch to the full screen-drums view.
Slicer
Import a sample to get an automatically sliced version of the sample mapped to the sampler keyboard.
Slice by Grid
Choose how to slice the sample to the keys by selecting the Slicer dropdown and, using the ‘Slice by’ Grid setting, choose a subdivision and tempo.
Slice by Transient
‘Slice by’ transient can be selected, as well as control detection sensitivity and the style – from percussive to melodic.
Add and remove sliced regions
After the slicer has performed the automatic slicing, the individual sliced regions can always be adjusted manually. It's also possble to add and remove sliced regions.
Multilayer Sampler
With the Multilayer Sampler you can add multiple samples (‘layers’) on a single note. These layers can be individually edited to create more dynamic and complex instruments. The multilayer sampler is included in the Extended and Suite editions of n-Track Studio.
'Upgrade a Sampler type to Multilayer'
You can turn or ‘upgrade’ a track with any of the other sampler types into a multilayer sampler track, by selecting the Multilayer sampler in the instrument browser. Note that this doesn’t work the other way around: if you have a track that already has the Multilayer sampler and select for example the Melodic sampler, you’ll get an empty Melodic sampler. So you can always start building your instrument from one of the more intuitive and easy samplers, and then upgrade to the Multilayer sampler when you want to get more options and freedom to build your instrument.
Working with layers
Import a sample, and enable the “new layer” icon, so that when a second sample is dropped onto the selected note it will be added to the note, without replacing the existing sample.
Scroll between the layers using the dropdown menu and listen to a layer individually by activating the ‘S’ solo button then playing the associated note.
Each layer can be tuned by assigning the root key or, for quick adjustments, using the pitch knob.
Importing a sampler with the new layer icon deselected will replace all of the layers in the multilayer sampler. If we happen to do this by mistake we can always undo and return to the previous state.
Trigger samples by velocity
Sometimes you may want to have a note always play multiple samples, while sometimes you may want to have a sample play only when you press the note in a “soft” way (i.e. with low velocity) and another sample play only when the note is pressed hard. This can be accomplished by having two (or more) layers assigned to the same note with velocity ranges that don’t overlap. One layer can, for example, have the range 0 to 50% and another 51% to 100%. So when the key is pressed with a lower velocity it triggers one samples, and when the key is pressed with a higher velocity it triggers another sample. Note that on the screen keyboard the strength/velocity of hitting a key can be simulated by tapping on the upper (soft) or lower (hard) part of the key.
Duplicate layers
A layer can be duplicated with the ‘Clone sample’ icon. The duplicate will be added to the multilayer dropdown. Once a sample is duplicated its settings can be changed independently from the original layer.
Delete layers
A sampler layer can be removed by clicking the trash icon.
Loop Modes
Select the Loop mode icon to adjust the current sample loop mode.
"One Shot" mode
“One Shot” is the default setting and plays the full waveform to completion.
"Loop" mode
With the ‘Loop’ mode selected we can select loop points that we want to assign to the sample. The sample cycles between the loop points until the key is released. Note that is the sample clicks when cycling between the set loop points, there is a fade function that can be utilized to prevent this, or to create creative crossfades between the start and end of a sample.
"Loop until release" mode
“Loop until release” works similarly to the "Loop" mode, with the difference that when the key is released, the sample stops looping and continues to play beyond the loop end point to the end of the imported sample.
Resampling Mode
This menu sets the resampling algorithm used to change the pitch of a sample to match the key that is pressed on the keyboard. Let’s review the options:
Speed follows pitch
When ‘Speed follows pitch’ is selected the speed of the sample increases or decreases together with the pitch. This makes higher pitched sounds play shorter than lower pitched ones. It works very well for solo instruments but may not be appropriate for chords because the various keys of the low and high pitches will have different speeds and may sound out of phase.
Maintain original speed
‘Maintain original speed’ is the default setting and keeps the sample length consistent across the assigned key range.
Preserve transients
‘Preserve transients’ maintains the sample speed regardless of the pitch. It may often sound better than ‘maintain original speed’, although setting up the sample after dragging may take some more time as the sampler processes the various pitches in the range.
Preserve formants
‘Preserve formants’ is similar to ‘preserve transients’ but also keeps the characteristic frequency components of the sample, keeping an instrument or vocal sample sounding as it was produced by the same instrument but at a different pitch, as opposed to sounding like it was played by a different instrument or singer. For example this mode avoids the classic ‘chipmunk’ effect when pitching vocal samples higher.
Saving custom instruments
When we’re happy with a custom instrument, we can save it as a preset using the save icon in the upper toolbar.
The instrument can be easily recalled from the Instrument Browser, under ‘My Instruments’.
Custom Sound Import
We can edit the existing sound, record a new sound or import our own custom sound in different views.
The edit menu let’s us Rec, Import or Edit sounds in Pianoroll, Step Sequencer, Screen Drums and Pad view. Super useful for catching inspiration on the go, or refining sounds back in the studio.
MIDI Learn with Hardware Controllers
You can use MIDI learn to quickly and easily set up your MIDI controller to control various elements of the app.
You can use a physical controller, such as a keyboard with faders or a control surface with knobs and buttons, to make controlling stuff that happens inside n-Track faster and more immediate.
You can use physical faders and knobs to control effects parameters, track volumes and pans, and buttons to start and stop playback, rewind
etc.
Examples of controllers are the Akai Mini, Korg NanoKontrol and Behringer X Touch.
Connecting the MIDI device
To use MIDI learn in n-Track Studio, you will need to have a MIDI controller connected to your device and selected as an input in n-Track.
On iOS and Android, the device will automatically connect. Android you may also get a screen asking if you'd like to choose the n-Track or Android USB driver to connect the device. We recommend trying both. With the device connected, we can go ahead and use the controller.
On Windows, Mac and Linux, you can check the controller is connected by going to the Settings menu and selecting ‘MIDI Devices’. When a controller is connected, a dialog box will appear asking if you want to use it.
Pressing yes, the MIDI device will be connected.
From here, you can select your MIDI controller as an input device.
Associating MIDI events to screen controls
First choose the button, knob or slider that you want to control.
And on iOS we can long press the button that we want to control. And we'll see the MIDI learn option. On Android, we'll long press on the button we want to control and we'll see MIDI Learn. On desktop right-click on the screen control and select "MIDI learn" from the menu that pops up.
A ‘Learning’ box will appear: press a key or button, move a knob, or strike a pad on your MIDI controller.
Once n-Track receives the corresponding MIDI event, the object on the screen will be controlled by your MIDI controller.
Controlling Plugin Parameters
Let’s look at how you can use MIDI learn to control plugin parameters.
Let's add an effect to our track.
When using an n-Track built-in effect, we can right-click or long-press on any parameter and select MIDI learn.
Choosing MIDI Learn button on the drive control, we'll see the 'Waiting for MIDI event' pop up box.
Sometimes we can see another pop up saying do we want to override an existing mapping to this MIDI event.
If we're happy to assign the knob to the Drive control in this case, select yes.
We can now control the parameter from the controller.
Let's also see the same in action on iOS. Using MIDI learn on 3rd party plug-ins works in a slightly different way:
we'll first open the plugin you want to control and then move the target control
click the “MIDI learn” button (which looks like a small keyboard) in the plugin window.
A menu will appear listing the latest parameter that was moved for the plugin.
Go ahead and select it.
At the "learning" prompt move the MIDI control to finish the association.
If you see this pop up box click yes to discard any existing control to the event and now moving the knob controls the attack
parameter in the external plugin.
On desktop we can also use the "MIDI learn" button to select the parameter that we want to automate from a list of all the available plugin parameters (the list may get big for some 3rd party plug-ins).
Clicking the parameter dropdown for external plugin we can see a lot of options to control. We can assign a knob to the the various plugin settings.
Using hardware controllers with transport bar
We can also use MIDI controllers to control the n-Track mixer and transport. We can solo tracks, stop, rewind, mute, and play.
Notice how tapping the cycle button doesn't do anything so need to assign it to the cycle button in n-Track Studio by using the MIDI Learn function.
We'll long press, select MIDI Learn, and now tap the cycle button on the controller.
We'll select yes to override any existing controls. And that’s it.
Using hardware controllers with the mixer
We can also use hardware faders and knobs to adjust the volume and panning in the mixer.
Let's click on the mixer icon in n-Track Studio and have a play with some mix elements.
Using dedicated hardware control surfaces
n-Track directly supports dedicated MIDI hardware control surfaces.
As many of those are complex devices that send commands to n-Track but also receive info from n-Track to control the devices leds, display and motorized faders, some of those devices have presets to set them up without having to manually use MIDI learn.
The Behringer X Touch, for example, is a device that uses the Mackie Control Universal protocol.
There are many similar devices on the market from various manufacturers that use the same protocol.
Any of those devices can be configured in n-Track by selecting Mackie Control Universal from the Presets drop-down box in the MIDI Faders/Control box.
In the case of a controller like the X Touch, we can see that the mixer faders and the transport controls (play, record, etc.) are being controlled by the hardware MIDI control surface, and that moving a fader with the mouse inside n-Track makes the fader physically move on the control surface. The control surface has an array of 8 faders and knobs. There are two bank up/down buttons to switch the set of tracks that the faders and knobs are associated with.
Manual Configuration of MIDI Control Surfaces
The MIDI faders/control box from the settings menu is useful to delete controls that you have added using MIDI learn.
If you’re not afraid of MIDI controllers, channels, velocities, pitch bends and the like, you may also use the MIDI control box to manually configure the actions associated with the MIDI events generated by the control surface faders and buttons.
You don’t need to configure this if your control surface is directly supported by n-Track or if just using MIDI learn works with your device.
The dialog box shows a list of the controls associated with the MIDI control surface. To change a control, click on its name in the list, change the desired options in the lower part of the window, and then click on an empty part of the list window to save the settings.
Using MIDI Learn in MIDI Control Box
If you don’t know which events are generated by your control surface, you can select the control you want to edit, click on the “Learn” button, and then move the control on the control surface. n-Track will detect which event is sent by the control and update the “MIDI event” settings accordingly.
MIDI event box
Let’s review the details of the MIDI control box:
In the ‘MIDI event’ section, we can choose the MIDI event with which to associate the desired action. If for example we are using a MIDI controller (also known as a ‘control change’) event, we will need to select ‘controller’. We can also choose the number of the MIDI controller and the channel number to which the MIDI event is sent. Finally, ‘Range’ specifies the range of values that will be used to interpret the event.
Pressing the ‘Learn’ button in the MIDI event box automatically detects the event generated by the control.
Action box
In the Action section, we can select the action (change in volume, pan, mute, solo etc.) that we want to associate with the MIDI event. ‘Track’ enables us to choose which track we want to apply the selected action to - we’ll keep that checked at track 1. We also can see ‘receive/send as’. Check the ‘Receive’ option if you want n-Track to respond to the MIDI events coming from the control surface. Check the Send option if you want n-Track to send MIDI events to move the control surface faders when the faders are moved within the program (useful to turn on LEDs or to move with motorized faders).
Controlling n-Track with MIDI Faders
The mixer faders and the transport controls (play, record, etc.) can be controlled by a hardware MIDI control surface. You can configure what actions are associated with the MIDI events generated by the control surface faders and buttons in the Settings/MIDI faders – control setup dialog box.
The dialog box shows a list of the defined events and the associated actions. To change an event, click on its name in the list, change the desired options in the lower part of the window, then click on an empty part of the list window to save the settings.
If you don’t know which events are generated by your control surface, you can select the event you want to edit, click on the “Learn” button, then move the control on the control surface. The program will detect which event the control sends and update the “MIDI event” settings accordingly.
Use the options in the dialog box to set up the faders on your MIDI device:
MIDI event: The type of MIDI event with which to associate the desired action
Channel: The channel to which the MIDI event is sent
Controller/Note: Number of the MIDI controller (if the event is a MIDI controller) or of the MIDI note (if the event is a note-on or note-off event).
Learn: Automatically detect the event generated by the control
Range: Specifies the range of values affected by the control
Action: Action (change in volume, pan, mute, solo etc.) that you want to associate with the selected MIDI event
Track: Track to which you want to apply the selected action, or output channel number (if the action is return volume or return pan setting)
Aux: Aux channel to which to apply the action (used for send vol, send pan, return vol & return pan actions)
Receive/Send as: Check the Receive option if you want the program to respond to the MIDI events coming from the control surface. Check the Send option if you want the program to send MIDI events to move the control surface faders when the faders are moved within the program (useful with motorized control surfaces).
MIDI System Exclusive Messages
System Exclusive messages are messages that MIDI devices may use to transmit or store data using their proprietary format. Other devices and programs make no assumption on the content of the data messages; they just store or transmit the messages. For example, a MIDI synth may use a system exclusive message to download a set of sounds from a sequencer (like n-Track), or an external multi-effect device could download its configuration through one or more system exclusive messages.
n-Track allows you to record system exclusive messages in two ways: as normal MIDI events within a track, and as a global set of system exclusive banks that can be managed using the View/MIDI System Exclusive banks dialog box. This dialog box allows you to manually receive (without the need for recording a MIDI track) and send system exclusive messages.
System exclusive banks may be configured to be sent automatically when a song file is opened, so that, if the messages are used to configure devices needed to play the song, the entire configuration is automatically done upon loading the song. In the example above, n-Track may set in the external MIDI synth the correct sound bank needed to play the song’s MIDI tracks by sending the song’s system exclusive banks.
Each bank can be set to be sent automatically when the song is loaded (select the ‘Autosend’ checkbox in the event’s editing dialog box). Although it’s not usually useful to do so, the messages can be manually edited by double-clicking on a message in the events list dialog box. Each system exclusive message consists of a series of bytes written in hexadecimal format. Each message must start with the byte F0 and end with the byte F7.
Grid Settings/Quantize
The MIDI quantize function snaps the selected notes to the nearest point in grid. Use quantization to correct imperfections on a recording. To quantize MIDI events: select the events clicking and dragging on a MIDI track's Piano Roll, then right click and select Quantize from the popup menu.
For more options click the Grid button holding down the Shift key to access the Grid and Quantize settings box.
Snap settings:
Snap: sets the grid spacing. The grid may be spaced according to a musical time (measures, beats, etc.), by number of musical ticks or by absolute time (i.e. 1.5 seconds).
Swing: moves forward (positive swing) or backward (negative swing) every other grid point. Swing helps to create a ‘shuffle’ feeling in the quantized notes.
Quantize region: the region where quantizing takes place can be limited so that the program will quantize only events that fall within a certain range from the nearest grid point. Events outside that range will be left untouched.
Excluding: excludes the given region around the grid point from quantizing. Events within the specified region will not be quantized.
Highlight quantize region: highlights the quantize region as defined by the ‘quantize region’ and ‘excluding’ parameters
Quantize settings:
Notes start: snap the start point of the selected notes to the nearest point in the grid, moving the notes’ ending points by the same offset ( the notes length remains unchanged).
Notes end: snap the end point of the selected notes (the start point is not changed, so the notes length can change).
Randomize: moves the event around the quantize point by a random amount limited by the randomize parameter.
Strength: if the strength parameter is less than 100, the program will move events towards the grid point only by the percentage set by the strength parameter. If, for example, the strength is 50, each time you quantize an event it will move half of the way towards the nearest quantize point.
Auto-quantize recordings: when this option is active, every time new MIDI notes are recorded, they will be automatically quantized according to the current quantize settings.
Quantize: quantize the currently selected MIDI events
Tempo/Time Signature
In n-Track Studio you can program changes in time signature (rhythm) and tempo (BPM) anywhere in your song.
This is useful when you want to:
Insert a single bar of a different time signature — for example, adding a 2/4 or 3/4 bar in a song that’s mostly in 4/4.
Change the time signature entirely for the remainder of the song.
Adjust the song’s energy by increasing or decreasing the BPM.
Create gradual tempo transitions such as a rallentando (slowing down).
Changing the Rhythm of the Entire Song
You can set a global time signature before you start working on your track:
In the lower toolbar, click the time signature display (e.g. 4/4) and set the beats per measure (top number) and the beat value (bottom number).
Tap the Metronome icon, then tap the time signature (e.g. 4/4) and set the beats per measure and beat value.
For example, set the project to 3/8, enable the metronome, and press Play — you’ll hear the metronome click in the new 3/8 signature.
Changing the Rhythm Mid-Song
You can insert time-signature changes at specific bars:
Start with a default time signature (e.g. 4/4).
On the timeline ruler (the time axis above the tracks), go to the bar where you want the change to occur.
Right-click on the time axis at the desired bar.
Long-press on the time axis at the desired bar.
Select Add Rhythm Change from the pop-up menu.
In the dialog, set the bar number (time-signature changes can only occur at the beginning of a measure) and choose the new time signature (e.g. switch from 4/4 to 3/4 or experiment with 12/8).
Tap Add
Click OK
A marker for the new rhythm appears in the timeline at the selected bar. When you play back from the start with the metronome enabled, you’ll hear the song begin in 4/4 and switch to the new rhythm at the chosen bar.
Adding a Single Bar of a Different Rhythm
If you want to insert just one bar in a different time signature (for example, a single bar of 3/4 in an otherwise 4/4 song):
Add a rhythm change to 3/4 at the desired bar (e.g. bar 3).
Then, at the following bar (e.g. bar 4), add another rhythm change back to 4/4.
This way you’ll have a one-bar switch to 3/4 at bar 3, with the song returning to 4/4 from bar 4 onwards.
Changing Tempo (BPM) Mid-Song
You can add tempo changes anywhere in your track:
On the timeline ruler, navigate to the bar (and beat) where you want the tempo change.
Right-click on the time axis.
Long-press on the time axis.
Choose Add BPM Change from the pop-up menu.
In the dialog, set the bar number, beat number, and new BPM.
For example, set a change at bar 5, beat 1, slowing the tempo from 120 BPM to 96 BPM.
A musical-note marker appears in the timeline at the tempo-change point. Play the track with the metronome enabled to hear the click slow down as it crosses from 120 BPM to 96 BPM.
Creating a Gradual Tempo Change
You can simulate a rallentando (gradual slowing-down) by inserting multiple tempo changes within a single bar - typically at the end of a section:
Open the Tempo Window from the View menu.
Add tempo changes at progressively later positions in the bar. For example, during bar 8:
At 8:2:000 set tempo to 104 BPM
At 8:3:000 set tempo to 96 BPM
At 8:4:000 set tempo to 78 BPM
Optionally add a further change at 8:4:500 for a more pronounced slowdown.
Play back a MIDI track or an audio track set to Follow Song BPM to hear the gradual slowdown during bar 8.
Tips:
Enable the Metronome when auditioning tempo or rhythm changes to clearly hear their effect.
Remember that rhythm changes remain in effect until a new change is added.
For smooth tempo transitions, use several gradual changes rather than one abrupt shift.
Synchronization
n-Track Studio can be synced to other audio programs or to external devices using MIDI Clock or the MIDI Time Code (MTC) protocol. The program can act as master or as slave, respectively generating or syncing to an incoming signal.
The MIDI Time Code (MTC) is a protocol used to exchange SMPTE (Society of Motion Picture and Television Engineers) time signals over a MIDI connection.
The SMPTE timing is the standard used to sync different machines such as video tapes decks, multitrack recorders, etc. in both the professional audio and video world. The standard SMPTE signal coming from hardware devices can be converted to MTC using dedicated interfaces.
Many software packages support MTC sync, and the syncing of different programs in the same computer can be accomplished without having to resort to hardware cables. It's possible to use a loopback MIDI driver that simply routes the MIDI signals sent to its inputs back to its virtual MIDI output ports.
You can download freeware utilities that accomplish this task.
In this way, it's even possible to sync multiple instances of n-Track on the same computer or even in different computers connected by a MIDI cable!
About MIDI Clock
MIDI Clock is a protocol used to sync different MIDI devices to the same clock reference. A program or device that generates a MIDI Clock signal sends a “MIDI clock” impulse every 1/24 of a quarter note. In this way, unlike MTC sync, in which absolute time is the only information sent, syncing to MIDI Clock automatically allows the slave to follow the master tempo variations.
Apart from the clock signal itself, three other signals are exchanged:
Song Position Pointer: sent to signal that the playback will be restarted from a new location
MIDI Continue: sent when the playback is being restarted
MIDI Start: sent when the playback is being started from the beginning of the song
Many software packages support MIDI Clock sync, and the syncing of different programs in the same computer can be accomplished without having to resort to hardware cables. It's possible to use a loopback MIDI driver that simply routes the MIDI signals sent to its inputs back to its virtual MIDI output ports.
You can download freeware utilities that accomplish this task. In this way, it's even possible to sync multiple instances of n-Tracks in the same computer or even in different computers connected by a MIDI cable!
SMPTE Time Formats
The time format most commonly used between audio programs is 30 fps non-drop. To make n-Track generate this timing, select "30 fps non-drop" from the MTC/MIDI Clock dialog box (accessed by selecting Settings/Synch with other devices), enable the "use real 30 fps for 30 fps non-drop" checkbox and click on the “Enable” button.
This is all you really need to know. However, if you are willing to dive into the subtleties of time formats, here’s some more info:
There are 5 SMPTE time formats that can be used with MTC:
24 frames per second (used mainly for film sync)
25 frames per second (as used by the European television standard)
29.97 frames per second with drop frame (also referred to as 30 fps drop)
29.97 frames per second (also referred to as 30 fps non-drop)
30 frames per second (used only in the audio world)
The last two formats are used to sync to NTSC video, which has a frame rate of exactly 29.97 fps.
The seconds counter is always incremented when the frame count reaches 30, so if the frame rate is 29.97, the SMPTE time soon departs from the real-world time. For example, when the SMPTE 29.97 fps non-drop time is exactly 1:00:00.00, the real world time would be 1:00:03.18, 108 frames higher than the non-drop time.
The 29.97 fps "drop" time format is used to compensate for this problem. In this format, two frames are dropped every minute, i.e. the time advances from 0:59:29 directly to 1:00.2 for each minute in the hour except at minutes 0, 10, 20, 30, 40 and 50. In this way, a total of 108 frames are dropped every hour, thus perfectly compensating for the "slowness" of the 29.97 frame rate. Note that this leads to some times that are never used, such as 1:00.00, 1:00.01, 2:00.00, and so on.
Open the Synchronization dialog box by selecting View/Synch with other devices
Select the desired MIDI out port (for example, LB1 if you're using a HUBI Loopback device)
Choose MTC or MIDI Clock sync (if needed, both signals can be generated simultaneously). For MTC sync, choose the desired time format (typically 30 fps non-drop)
Click on the “Enable” button
Click on the “Enable” button
On the program or device you want to sync, enable slave syncing and select the input port corresponding to the output port previously chosen
Now, every time the playback is started from inside n-Track, the device the program is synced to will (after a short delay) start the playback.
Configuring the Slave to an Incoming Time Code Signal
Open the Settings/Preferences/MIDI/MIDI devices dialog box, then set the MIDI input port (for example, LB1 if you're using a HUBI Loopback device) from which you want to receive the time code signal.
Open the Synchronization dialog box by selecting the View/Synch with other devices menu. Click on the “Enable” button corresponding to MIDI Clock or MTC. On the program or device you want to sync, enable master MTC or MIDI clock syncing and select the output port corresponding to the output port previously chosen.
Now when the playback is started from inside the master device (the device that is generating the sync signal), n-Track will also start playback. When the record button is pressed and slave syncing is enabled, n-Track will start the recording as soon as it receives the incoming sync signal.
n-Track needs a few instants to prepare itself for playback: after detecting an incoming signal, the program will actually start the playback after the time specified in the "pre-roll" field (the playback will start with this delay, but it will be nonetheless in sync with the other device). The program will stop the playback after the time specified in the free-wheel field has elapsed without having received an MTC signal.
You can compensate for possible sync problems by changing the "offset" and "set 0 at" values in the Synchronization dialog box.
MTC/MIDI Clock Dialog Box
You can configure additional synchronization options in the MTC/MIDI Clock dialog box:
MTC/SMPTE output:
Output port: port to which the MTC signal is sent to
Enable: enable MTC generation
Format: SMPTE time format used for the MTC generation
Offset: offset that will be added to the generated MTC (this value will be summed to the time you see on n-Track's time window. If, for example, the offset is 5 seconds, when you start the playback within n-Track the first timecode generated will be 00:00:05.00)
MIDI Clock output:
Output port: port to which the MIDI Clock signal is sent to
Enable: enable MIDI Clock generation
Offset: offset that will be added to the generated MIDI Clock
Use Start, never Continue: always send the MIDI Start signal instead of MIDI Continue
Send Song Position Pointer: send the SPP signal to notify the slave of the new position within the song
Wait after sending SPP: waiting to allow the slave to cue to the requested position
Use internal timer: use the internal timer instead of the soundcard's clock reference (recommended). The internal timer resolution is set through the Settings/Preferences/MIDI dialog box
Use real 30 fps for 30 fps non-drop: use the true 30 fps frame rate instead of the 29.97 NTSC frame rate (see SMPTE Time Formats)
Input:
Input Port: port from which the program received MTC or MIDI Clock signal
MTC/SMPTE - MIDI Clock: select the type of the incoming sync signal
Enable: enable syncing to the incoming signal
Set 0 at: offset in the song at which the playback is started
Start at offset: offset in the incoming SMPTE time at which the program will start the playback. For example, if the "start at offset" value is 1 hour and "set 0 at" value is 5 minutes, the program will start the playback when the SMPTE it receives reaches 01:00:00.00 and the playback will start at the offset 00:05:00.00 in the song (MTC only).
Preroll: time that the program takes to actually start the playback after it has detected from the MTC input that the playback should be started
Free Wheel: after not receiving a valid MTC signal for this amount of time, the playback will be stopped (MTC only).
A Virtual MIDI Patch Cable or Loopback Device is a driver that generates virtual MIDI input and output ports. Every MIDI event sent to a loopback output port instantaneously appears at the corresponding input port. The driver also allows routing the same output to more than one input. This can be used to sync n-Track Studio to one or more audio programs using MIDI time code, without having to resort to external MIDI connections.
You can download freeware virtual MIDI patch cables utilities from the n-Track studio website’s download section.
Syncing a Video Clip to Playback
n-Track Studio can also synchronize a video file to a song’s playback.
To play a video clip in sync with the song playback:
Select Sync with video command from the View menu
Click on the Browse button in the window that appears
Select the desired video file and click on “Open”
Check the Sync with checkbox
Un-check the Audio checkbox if you don’t want to hear the video clip’s original audio.
From now on, every time the playback is started, the video file will be played back in sync with the program's audio output. When not in playback, a single click on a given point on the timeline time slider will cause the corresponding video frame to be displayed in the Video Sync widow.
The program will be able to play any file type for which a proper codec is installed on the system. You can check which codecs you have installed in the Control Panel/Multimedia/Devices/Video codecs dialog box. Windows usually has codecs for playing .AVI, .MPG and .MOV files installed by default.
Video playback can use a great quantity of processing power, depending on the size of the video window: to reduce the load on the computer, reduce the size of the Video Sync window.
If you are experiencing playback problems you can download free filters, codecs and tools online that let you play popular and not-so-popular audio and video formats. K-Lite Codec Pack is one example.
n-Track Effects
This section shows how to use a selection of tools from the n-Track suite of effects.
Vocal Harmonizer is a tool designed to create harmonies that complement your music. It can work in real-time on live input or on existing tracks.
The harmonizer can create up to 12 voices that harmonize with the main melody, much like a choir of real singers. Each voice’s pitch is shifted based on the chosen interval, and to the current scale and key.
The harmonizer is designed for solo tracks that have a single melodic line. That is, where a single note is playing at any one time, such as vocals, solo guitar or brass.
We don’t recommend using the harmonizer on tracks where there are multiple notes at a time, like piano or guitar chords, as this can result in undesirable sounds.
Harmonizer Quick Start
Add Vocal Harmonizer to any channel with Add eFX → n-Track → Vocal Harmonizer
Whether you're going for tight, polished harmonies or more experimental textures, the harmonizer offers a range of modes to suit any style.
Choose your scale type, add voices, and adjust levels and panning dragging the voices up and down and left/right. Then fine-tune the sound with the knobs on the right section.
To focus on a single voice use the solo S button below each voice. To silence a voice, the mute M button.
Keys and Scales
The Vocal Harmonizer can automatically detect major and minor keys, making it easy to create harmonies that fit your music.
There are also a wide variety of scale types to choose from, including chromatic, all modes, blues, Whole Tone, and more.
Adding Voices
To add a harmony voice just click on an empty spot in the voices area, or press the + button on the right of the voices list. In the graphical representation of the voices, the height controls the volume, whilst moving the voice horizontally determines the pan.
You can remove a voice by double tapping on it, or from the Delete Voice button.
Voices intervals and parameters
You can set the interval of the voice tapping on the interval button.
The interval can be set to either positive or negative. Use a positive interval to make the voice sound higher in pitch than the main melody, or a negative interval if you want it to sound lower.
A voice can also be set to play a fixed note, which might be useful in certain situations, like when you want a voice to play a drone-like note.
To activate fixed note mode, simply tap the Note switch.
For precise adjustments, we can use the fine-tune knob to make subtle pitch variations. The knob shows the altered pitch in cents, which represents 1/100th of a semitone.
An effective technique for "enlarging" the sound is to use multiple voices with the same interval but with the fine tune parameter set at different positions in the +/- 5-10 cents range.
Adjusting Formant
You can have some fun by tweaking the harmony voice's Formant, which affects the vocal texture and resonance.
The formant can be changed independently of the pitch. Tweaking the formant allows us to modify the sound of a voice in expressive or extreme ways.
When a voice changes the pitch of the input signal, it still sounds as if the same singer is singing different notes, while when you change the Formant, it’s as if you also change the singer – such as switching from a baritone to a soprano.
Pushing the Formant value too high though can result in the chipmunk-like effect.
You can also add delay using the delay parameter, which helps simulate a singer who is slightly behind in timing, as might happen in a real choir. This adds a more natural and realistic feel to the harmonized sound.
Global Controls
The 'Dry' knob controls the level of the original input signal, while the 'Wet' knob adjusts the level of harmonizer voices. Setting Wet to -∞ lets you hear only the input, while Wet at 0 dB and Dry at -∞ isolates the harmonizer effect. Experiment with these settings to achieve the ideal balance for your mix.
The Spread control determines how far apart the harmony voices are placed in the stereo field.
The spread acts on multiple parameters at once so that when you adjust it, you'll hear the voices either widen for a more dramatic effect or narrow for a subtler blend.
Presets
Explore the wide range of preset options.
Again make sure you use the harmonizer only on tracks that play a single melodic line (solo guitar, brass).
Since the harmonizer tracks a single pitch at a time, on tracks that have multiple notes playing at the same time the harmonizer will jump from one note to another in rapid succession creating a strange sound.
MIDI keyboard input with Vocal Harmonizer
You can control Vocal Harmonizer by playing live on a MIDI keyboard, or from existing MIDI tracks, so that you’re no longer stuck with the same shape for each note of a scale - each one can have its own unique harmony.
How it works
To control Audio input via MIDI:
First add Vocal Harmonizer to an audio track
Then create a new instrument track with the + button. The bottom of the left column in the instrument browser shows existing MIDI inputs to which you route a MIDI track. Select the Vocal Harmonizer instance you added to the audio track.
That’s it! Now MIDI will shape and control the nodes that the harmonizer harmonizes to.
By default the harmonizer will start with the default preset which has two fixed +5 and +Octave voices. The notes you play on the keyboard will be added to the fixed voices. Once you’ve recorded a harmonization you can lower Dry all the way down to only actually hear the custom harmony.
Live audio
You can also use harmonizer to control live audio, i.e. audio that is coming from a mic. In that case make sure that the track is armed and that live input echo is enabled on the audio track.
Notes vs intervals
By default the MIDI input is in Interval Mode: the notes you play on the keyboard are interpreted as intervals relative to the detected note. By default the unison note is C5, so if you play a C5 a unison voice will play the same note as the input audio signal. A C4 will play -Oct (i.e. one octave down) and C5 will play +Oct (i.e. one octave up).
This way you can play simple C based chords and not worry about the actual key the song is. You can change the unison note with this button, or if you want to actually play the real notes instead of intervals you can select the Note Mode. Note mode is a fun and interesting way to play the underlying audio just like it was an instrument.
Settings - Polyphony
Defines the total number of simultaneous voices. Both midi-generated and fixed voices count. If you set polyphony to 5 and create 3 fixed voices, you'll get only 2 MIDI voices at the time, no matter how many notes you play. Note that polyphony is limited to 4 voices in the free version of n-Track Studio.
Note stealing and return
If you set polyphony to 2 and you play A, B, then C, the C note replaces A (since only two voices can be active at once). However, if you release C while still holding A and B, A returns, as it's still being sustained. This ensures that harmonies adapt smoothly, preventing abrupt cutoffs while maintaining natural voice transitions.
Attack / Release (ms)
Attack and release parameters set how quickly harmony voices fade in and out in response to MIDI notes.
Matrix view
Matrix mode is an advanced way (typically an alternative to playing using a MIDI keyboard) to create complex harmonizations.
The vertical axis represents the input notes, and the horizontal scale shows the interval to harmonize to. If a static voice is say +3, then you’ll see a vertical line. This means that for input note the voice will harmonize with +3. But you can change this, for example putting C and G to +12.
The vertical axis shows a chromatic scale, letting you harmonize not only notes in the current scale but also “passing” tones (those technically outside the key).
Matrix mode lets you assign unique harmonies to each individual note, allowing you to program different chord shapes per note.
You can also customize harmonizations by input note octave. If the Octave setting is ‘All’, a C3, a C4 or a C5 will harmonize to the same intervals. Instead, adjusting the Octave setting to specific octaves allows you to change the intervals independently for the same note in different octaves. E.g. C3 may have +3, C4 may have -3, C5 gets +Oct etc.
To reset Matrix view, just hit the Reset button and select ‘All voices’ to clear everything for a fresh start.
MIDI Harmonizer
The MIDI Harmonizer is a tool for creating harmonies from MIDI notes. Unlike the Vocal Harmonizer, which works by pitch-shifting an audio input, the MIDI Harmonizer generates additional voices as if they were played directly by the instrument receiving the MIDI signal. This results in harmonies that sound natural and properly articulated by the instrument.
Interface and Controls
The MIDI Harmonizer has a similar layout to the Vocal Harmonizer, with familiar controls such as:
Scale Detection - Automatically detects or sets the musical scale in which harmonies will be generated.
Voices - Defines the number of harmony voices to be created.
Matrix - Provides detailed control over how harmony voices are distributed in relation to the original input notes.
Differences from Vocal Harmonizer
Because the MIDI Harmonizer processes MIDI data rather than audio, a few parameters from the Vocal Harmonizer are not present:
Dry/Wet - Not needed, as there is no audio input signal.
Spread - Not applicable, since the harmonizer is creating new MIDI notes rather than manipulating stereo placement of audio.
Usage
To use the MIDI Harmonizer:
Insert the MIDI Harmonizer in your instrument track’s MIDI effects chain from ADD EFX > MIDI > nEfx (MIDI) > Effect > Midi Harmonizer
Configure the scale and number of harmony voices.
Play or record MIDI notes. The harmonizer will generate harmonized voices, which are then sent to the instrument. Voices can be added and removed. Presets can also be selected.
MIDI Harmonizer is especially useful for adding chordal textures, doubling melodies, or experimenting with alternative harmonic progressions, without having to manually program additional MIDI parts.
VocalTune
We can use VocalTune in n-Track Studio to correct and manipulate pitch. We’re going to look at how to apply VocalTune with a solo vocal example and as a creative effect with playable instruments, like the n-Track Steinway Grand piano.
Opening VocalTune
You can open VocalTune from the Add FX menu.
VocalTune Controls
Let’s take a look at the VocalTune interface.
We can control an input sound using correction speed & correction amount, stickiness, tuning, key selection, and keyboard notes, which you’re able to switch on & off.
You can also visually see how much tuning correction is going on, via the correct level meter.
So what do these controls actually do?
Correction Speed & Correction Amount
We’ll add VocalTune to a vocal track, and start by using the ‘Correction Amount’ knob to change how much we want the vocal to be corrected. If we choose the ‘Full’ correction amount setting, we can hear that almost all imperfections in pitch, however small, tend to get picked up - this can give a more artificial sound to the vocal.
Artists like T-Pain have used this type of effect to form part of their signature sound, but for most vocal examples it will sound too severe.
Let’s move the setting down to mid. We can see from the correction level meter that a correction is still occurring. It’s less severe than before, but we continue to hear undesired correction movements.
To make pitch correction less obvious-sounding, we’ll want to alter ‘Correction Speed’.
‘Correction Speed’ relates to the time a note can go out of tune relative to a target note before the correction kicks in. A target note could be the nearest semitone or a note of a specific scale, like C major.
Lower speed values preserve a sound’s natural attack.
We can take the speed setting down from extreme to soft. You can hear that when we enter back the ‘mid’ level, the vocal starts to shift to a less natural sound – higher values encourage more artificial or robotic effects.
Stickiness
Stickiness is the threshold that a detected note must cross to switch to another note in the scale. A larger stickiness value means that there is a higher threshold to cross & that the input signal has to vary more in pitch to get VocalTune to switch the detected note to a new note.
With a low stickiness value, we have a lower threshold, and so VocalTune will jump more from one note to the other.
Key Selection
If you know the key of your song, you can set it manually. This will tune your vocal or input sound to the nearest note of that key. In this vocal example we’re in F sharp major.
If you don’t know what key your song is in, that’s fine too - just keep the option set to chromatic, which will tune your note to the nearest keyboard semitone. Be warned if you choose the wrong key - and go aggressive on the amount of VocalTune - you’ll end up with a crazy sounding vocal that’s trying to be tuned to a key that it's not in. So if we set the vocal as C Major instead of F sharp major you’ll run into trouble.
If you want to change the actual key of the whole vocal, then use the n-Track pitch shifter plugin instead. This can be located from the FX menu too.
Also choose the chromatic option if you are singing note extensions out of a traditional scale like F sharp over C major, or if you know all the exact notes you are singing these can be selected manually by selecting notes on and off from the keyboard.
So if we want F sharp with C major we’ll enable the F sharp note on the keyboard in VocalTune like this. Click again to disable it.
Tuning
This is the tuning frequency that VocalTune will be calibrated at. The most widely accepted tuning standard in modern music is 440Hz corresponding to an A4 sound.
However, there are other options: for example the New York Philharmonic Orchestra use 442hz to tune to, and some say that 432hz can give music a more spiritual quality.
Using VocalTune with instruments
We can also use VocalTune with inputs other than vocals.
Setting up a new project, let’s try using VocalTune to warp a piano line, giving it a retro feel that might be used in a pop, r&b or rap production. Push the VocalTune settings to the maximum to intentionally change the sound from a clean input, and you'll hear how really leaning to that ‘correction’ sound will make the part feel warped & vintage.
Dynamic EQ
Is it an EQ, compressor or an expander? How exactly does it differ from a normal EQ, and how should I be using it? Here we’ll walk through the n-Track Dynamic EQ plugin, and answer the most common questions, so you can start harnessing the power of the Dynamic EQ on your next track.
Note that while the EQ is available in the Standard edition, activating the dynamic features of the EQ require the Extended or
Suite editions of n-Track Studio.
Opening Dynamic EQ
The easiest way to get to the EQ is to open the mixer and click on EQ. You can also add the EQ as a plugin: tap ‘Add EFX’, then click the plus icon, choose n-Track, then ‘Dynamic EQ’.
EQ settings
By default, when you open the Dynamic EQ plugin, there are three bands. To adjust the frequency response, simply click and drag a band up
and down to affect the gain, and left or right to adjust the frequency range that it occupies.
Changing a band shape
Each band can have one of 5 shapes. Band 1 defaults to a ‘low shelf’ shape which allows you to cut or boost all frequencies below the specified frequency. This can also be referred to as the cutoff frequency.
Band 3 defaults to a high shelf, allowing you to cut or boost all frequencies above the cutoff frequency. You can hear how boosting or reducing the gain in the high frequencies affects the sound.
Band 2 defaults to a ‘band boost or cut’ shape that can be used to increase or reduce the amount of gain applied to a specific area
on the frequency spectrum, around the center frequency of the filter.
Slope
You’ll see that we can adjust the ‘slope’ of a band in the menu that appears when tapping on a band controller. Adjusting the slope (sometimes called Q or quality factor) changes how aggressively frequencies are reduced by the curve, once the cutoff frequency is passed.
Setting the slope value helps us to change how selectively an EQ can cut or boost some frequencies without affecting others. You’ll
see that a larger slope value results in a finer curve, and a smaller value widens the curve.
To change the shape of a band, tap on a band controller to open the menu box and click on the current shape button. A menu with all
the available shapes will appear. You’ll see that high and low pass shapes can also be selected, which are named for the frequencies they leave untouched, rather than the frequency range they cut.
In the final row you can also tap ‘order’. The slope of a band is affected by the ‘order’ of the filter. By default the order value in n-Track is set at 2 - a two-pole filter.
A single pole filter has a slope of 6 dB/octave, so a 2 pole filter has a slope of 12dB/octave. If 4 is selected from the menu, a four-pole
filter, then the slope amount is doubled to 24dB/octave. And, if this is starting to feel too technical, just know that dB/Octave is a way of measuring the sharpness by which a filter changes shape around the cut-off frequency.
We can use lower order shapes to create gentle, transparent roll-offs, and sharper cut-offs like order 4, 24dB/octave, for more aggressive
filtering at exact frequencies.
Disabling / activating a band
Double tap a band controller to disable it. All bands can be reactivated by double-tapping again. We can continue to draw and modify
shapes and EQ parameters even when a band is disabled.
On iOS we can also use the on / off icon on the band settings panel to enable and disable a band.
On Android we can also use the on / off icon on the band settings panel to enable and disable a band.
Adding / Deleting a band
We can add or delete bands to the EQ. Tap the icon to add a new band.
To remove a band, tap the trash icon in the band menu box.
To remove a band, click the trash icon to the right of the band shape button.
Making a Dynamic Band
By single tapping on a band controller we open the band settings panel. If we activate the ‘Dynamic’ circle by tapping it, the circle will turn green and a new ‘Threshold’ setting becomes visible in the bottom right.
By dragging left we can see that, like a compressor, a dynamic EQ band has ‘Attack’ and ‘Release’ settings, in addition to Threshold. By dragging right. We can see a decibel value displayed underneath the green, now-active dynamic circle. This is our dynamic gain value.
Dynamic Gain
Gain is measured in decibels (dB) and boosts or cuts the signal of a selected EQ band.
Negative gain values mean a reduction in amplitude of the signal inside the band’s frequencies, while positive dB values mean frequencies have been boosted.
When a band is dynamic, besides having a fixed gain value for an EQ band, we can boost or cut with varying force, depending on how strong the incoming signal is at the frequency of our selected band.
Boosting (positive dB value) means that the dynamic EQ works like an expander, whilst cutting (negative dB value) makes the EQ band
act more like a compressor (that only affects the frequencies inside the band), reducing the gain when the signal gets stronger.
It’s worth noting that when the Dynamic button is active, the arrows that control the dynamic gain are visible only on the currently selected band. So if you have created more than one dynamic EQ band, you’ll see just one dynamic gain arrow at a time.
Threshold
The dynamic threshold level is the amplitude value in dB above which dynamic equalisation changes will kick in, and affects how sensitive
the selected band is to the dynamic.
Attack and Release
The dynamic gain of the EQ is applied only when the incoming signal exceeds the dB value we set with the threshold setting.
This allows us to use selective EQ changes for specific moments in a song, like a particularly strong input, rather than having to make a static frequency cut that affects the whole length of a track.
The dynamic attack setting adjusts how quickly gain is applied to the selected band.
The dynamic release knob adjusts the speed at which the selected band returns to normal after the level of the input signal level decreases.
Dynamic EQ Presets
We can use and modify Dynamic EQ presets by going to the presets bar in the Dynamic EQ plugin, scrolling down to the ‘Dynamic’ row and choosing from De-Esser, or Dynamic EQ presets for Guitars, Vocals or Drums.
The De-esser preset is particularly useful on vocal tracks, to reduce strong S vocal sounds.
Automating EQ plugin
We can also use effect automation features and morph filters in the Dynamic EQ plugin to create interesting effects.
Let's enable the record envelopes icon visible in the Dynamic EQ plugin, play our track and adjust the cutoff frequency of the low shelf filter as the track plays back. Once complete, the low shelf filter movement automation has been captured, plays back automatically and gives the effect of the piece ‘opening up’.
Note that only the plugin version of the EQ is automatable, the channel EQ cannot be currently automated.
Using the Limiter
Limiter is a powerful tool designed to help you enhance your audio recordings and mixes. It prevents distortion by keeping audio levels within a safe range, making it ideal for mastering channels where you want to ensure your song never clips.
Take a song that is clipping due to high volume levels, with red indicators on the time axis showing where clipping occurs. When the Limiter is added with the Lookahead Limiter (True Peak) preset, you can increase levels up to the limit without any clipping. Using the Meter tool, you can verify that the song peaks at exactly 0 dB, staying free of distortion.
Differences between Limiter and Compressor
Before diving into Limiter functions, let's clarify when to use the Limiter versus the Compressor:
Compressor: Reduces the dynamic range by lowering the gain of the audio when it exceeds a set threshold. This tool is commonly used creatively to increase the level of individual tracks, such as making vocals punchier.
Limiter: A type of compressor with a higher ratio and lower threshold, often used on the master channel to enhance loudness and prevent clipping.
n-Track now includes Limiter, Compressor and Noise Gate as three separate plugins, which under the hood share the same engine, with a slightly different skin and different presets.
Limiter Settings
To use the Limiter effectively, familiarize yourself with these essential settings.
Gain / Makeup Gain: When Makeup Gain is off, the Limiter limits the signal level to the maximum value in the signal graph. When enabled, Makeup Gain adds back a fixed gain that corresponds to the limit amount, allowing you to maintain peak levels while increasing overall loudness.
Ratio: Determines the aggressiveness of the Limiter. Higher ratios result in more aggressive gain reduction.
Threshold: The level at which the Limiter starts reducing the audio gain. Lowering the threshold makes the Limiter reduce the gain more aggressively.
Attack: Defines how quickly the Limiter begins reducing gain once the threshold is exceeded. Lower attack times result in faster gain reduction.
Release: Sets how quickly the Limiter stops reducing gain after the audio level falls below the threshold. Shorter release times provide a faster release from gain reduction.
Experimenting with attack and release times can help make the Limiter effective without being overly aggressive. Note that very short attack and release settings may cause distortion.
Advanced Limiter Features
True Peak: True peak allows the Limiter to account for the actual peak level of audio. In digital format, audio is represented by discrete samples. When converted to analog, samples are interpolated to form a continuous waveform. True peak measures the actual peak level of this waveform, which can be higher than the highest individual sample.
Lookahead: This feature allows the Limiter to detect the level of the audio in advance, so it can more effectively ‘stay on top’ of rapid changes in volume of the input audio. It’s like you had you hand on a big volume knob and you had to lower the volume when the signal gets louder (say to avoid waking up the neighbors…). If you are able to know in advance that the signal will be getting louder you have more time to rotate the knob to lower the volume, and you can do so more gradually avoiding harsh jumps in the volume which could otherwise distort the signal. This can help avoid pumping and other undesirable side effects.
Since Limiter needs to “look into the future” to look ahead at the signal level, in practice enabling Lookahead will make the plugin delay the signal for the lookahead time (which is the same as the attack time). This will add latency to the track and because of latency compensation this will be applied to the whole song. For this reason using lookahead is not recommended during recording or live instruments playing, only use it during mixing and mastering of your projects.
The Dynamics Response Graph
The dynamics response graph is a visual tool that shows the impact of the Limiter on the audio signal. The graph's line illustrates the relationship between the input signal level and the output level:
When the line is at a 45-degree angle, a 1 dB increase in input results in a 1 dB increase in output.
A decreasing slope indicates that the output level increases less than the input level.
When the line becomes horizontal, as in the Heavy Limiter preset, the output level remains unchanged even if the input level increases.
You can customize the response by adjusting nodes in the graph to achieve your desired Limiter effect.
Presets
For quick setup, you may want to begin with one of the existing Limiter presets. Try the contrasting Heavy Metal and Folk Tales presets to get a sense of how the Limiter adapts to different musical styles.
Additional Advanced Features:
Envelope: Limiter tracks the current level of the signal using something called Envelope Follower. It can track the absolute (peak) level of the signal or its RMS value and it can hold peak values (Peak+Hold setting) for a while. You can also set the order of the envelope follower filter, and a higher order roughly tracks the level more closely.
StereoLink: set this to Off to have Limiter work independently on the left and right stereo channels. Set to Mean or Max if you want to link how the volume is affected on the left and right channels, using either the mean or maximum of the level of the two channels as the controlling signal for the Limiter gain.
The Limiter in n-Track Studio is an invaluable tool for creating polished and professional-sounding audio recordings and mixes. By understanding and applying these features, you can maximize your production quality, preparing your music for final release.
DEnoiser
Background noise in audio recordings can be incredibly annoying - enter the DEnoiser. You can use it to greatly reduce background noise on vocal and instrumental recordings.
Overview
Once you have added an audio track, you can locate the DEnoiser plugin by selecting ADD EFX and then DEnoiser
Looking at the interface, the main controls are the “Auto” button to auto-detect noise and “Learn” button to learn a noise profile, as well as the knob that controls the amount of noise reduction.
A “noise volume” setting can be used to force re-introducing some of the noise that has been detected. The noise shape setting modifies the tone of the noise.
We can hear the detected noise only by clicking monitor noise. The effect includes an adjustable EQ graph too.
Auto or Learn?
By default ‘Auto’ will be enabled when the DEnoiser plugin is opened. This provides an automatic detection of the background noise. We can also see that the Noise reduction knob is by default set at 0.5, which translates in a moderate noise reduction.
By moving the noise reduction knob to its maximum value of 5 we can hear that almost all of the background noise is no longer audible. Because so much of the sound is being pushed down in volume, the maximum may somewhat degrade or ‘muffle’ the quality of the original recording.
If we take the noise reduction down to zero, we are no longer applying any denoising - the signal returns to its original form.
Let’s now switch to an example of a bass guitar with unwanted feedback in the recording. If we select & loop a section of our recording where the unwanted background noise is particularly audible, we can use the ‘Learn’ button to learn the profile of the unwanted noise. Once we press ‘Learn’ the button changes to ‘Learning’ with the prompt to play, where possible, only the sound we wanted denoised. Once we’re happy that DEnoiser has had enough time to analyze the noise, press ‘Learning’ and the state will change to ‘Captured’, with the circle changing color to green. We can then play with the noise reduction knob to our taste.
If we click ‘Monitor noise’ we can hear the sound that DEnoiser is identifying and removing as noise. In other words, we hear the noise we are removing from the audio. If we turn off Monitor noise, we return to our denoised version of the audio.
Sometimes together with ‘Monitor noise’ active DEnoiser can be used as a creating tool in itself, producing interesting ‘shimmering’ sounds from instrumental tracks, often almost completely removing vocals from a mixed song.
Noise volume & Noise shape
Noise volume is used to reintroduce noise sound that has been removed, in case we feel the denoising was too aggressive. We can think of it as sort of a dry / wet knob in a way.
Noise shape affects the tone of the noise volume, with a higher value moving the tone closer to the sound of white noise. Noise shape is directly connected to Noise volume meaning that if the noise volume is set at 0, noise shape even set at the maximum value does nothing.
Noise shape is included in DEnoiser to give you more creative options in shaping the noise of a recording.
Using the Equalizer
You’ll notice the EQ handles in the DEnoiser plugin. This can be used to manipulate the frequencies to which the Denoiser settings are applied.
Internally the EQ nodes have a value 0 at the top, and 5db at the bottom. This is a gain applied on the denoised noise profile, so, for example, if we draw a low pass filter at 10k then the high frequencies above 10k will be cancelled more. Similarly, if we drag a node closer to the top 0 value there will be less noise reduction applied to that frequency, and so we are likely to hear more of the original background noise.
The effect of the EQ is most visible when we set the main ‘Noise reduction’ setting to a high value.
Using DEnoiser
When using DEnoiser, think about the benefit that using the plugin will actually make to your track or sound. For standard kinds of noises you can try using one of the plugin factory presets.
Guitar Amp
The Guitar Amp effect in n-Track Studio simulates the sound of classic amplifier heads and cabinets. It is designed to give guitar or bass recordings a richer and more powerful sound - whether you are recording directly through a line input, working with real amps and mics, or simply exploring new tonal combinations.
Getting Started
To try the Guitar Amp effect, start with a clean guitar track recorded through your audio interface:
Arm an audio track with your guitar input
Enable Live Monitoring to hear the unprocessed sound
Add the Guitar Amp effect from the effects menu
At first, your guitar will sound plain and direct. Once you load Guitar Amp and choose a preset, the sound becomes immediately fuller and more expressive.
Presets
The effect comes with a wide range of presets that demonstrate different amp and cabinet setups. For example:
Clean - bright, present tones suitable for rhythm guitar
Rock Lead - a driven, cutting tone for solos
Metal Rhythm - heavy distortion for powerful riffs
Presets are a great way to quickly explore what the effect can do before diving into manual adjustments.
Amp Head Models
At the center of the interface are three amp head simulations, each with a distinct character:
Sparkle - warm, twangy tones, perfect for clean sounds and chords
Crunch - moderate distortion, suited to classic rock
Lead - heavily overdriven, ideal for gritty metal rhythms and soaring leads
Amp Controls
Each head includes a familiar set of amp controls:
Gain - increases distortion
Level - adjusts output volume
EQ (Low, Mid, High) - shapes the tonal balance
Bright Switch - boosts high frequencies for extra presence
You can combine these controls to dial in anything from clean sparkle to heavy crunch tones.
Cabinets and Microphones
On the right side of the effect you can pair your chosen amp head with different cabinet simulations:
1x12 - single cone, bright and focused
2x12 - warmer, slightly darker tone
4x12 - bold, powerful sound with more presence
You can also change how the cabinet is miked:
Select a Dynamic or Condenser microphone (or blend both)
Adjust the Mic Position just like in a real studio setup
Use the Crossfade Slider to mix between the two mic signals
Dynamic mics tend to give a tight, powerful tone, while condensers capture more high-end detail and a wider feel.
Extra Features
The effect also includes additional tools for shaping your guitar tone:
Boost Pedal - adds extra drive before the amp
Reverb - built-in ambience to add depth to your tone
These effects are ideal for giving your final sound more character and space before recording or mixing.
Recording
Once you have designed your tone, arm the track and record directly with the Guitar Amp effect active. You can capture anything from clean chord progressions to heavy solos with studio-quality amp sound, all without miking a real cabinet.
Checking the audio level with the n-Track level meters
The n-Track level meters allow monitoring the level of the audio signal in various points inside the audio engine. Most meters inside n-Track are pure Peak meters. The n-Track Meter plugin is instead configurable with any of the metering modes below.
The level meters can work in a combination of the following metering modes:
Peak
True peak
LUFS
RMS
We recommend using Peak monitoring during recording and composing phases of music production, then switching to LUFS+True Peak for mixing and mastering.
Peak metering
Peak metering displays using the dBFS (decibels full scale) unit the absolute maximum (i.e. peak) level of the signal. When working with digital audio signals that are going to or coming from hardware audio devices, you must be careful to avoid clipping, which happens when the signal goes above the maximum level allowed in the digital quantized representation of the signal, which is 0 dBFS. Levels above 0 dBFS will result in the top of the signal being chopped and will cause an annoying distortion. To avoid clipping when recording make sure you adjust the recording level on the hardware audio device so that the level is always below 0 dBFS. For playback, you can adjust the master channel volume or using a Compressor/Limiter plugin to make sure that the master channel level is always below 0 dBFS. n-Track includes a soft-clipping feature which avoids clipping distortion in most cases, even when the signal goes above 0 dBFS, although it will still report that the signal is clipping. Internal channels (e.g. individual tracks, instruments, groups) can actually clip without causing any distortion if the level is then brought back below 0 dBFS further down in the signal chain.
Peak metering is useful to check if the signal level is within a good range but is not generally useful to determine the loudness characteristics of audio.
True Peak metering
Peak metering may sometimes miss peaks that are between one sample and then next. True peak metering uses oversampling to transform the signal into a much higher sampling frequency allowing to check the level of the signal in-between samples.
True Peak metering is useful when mastering your song. It isn't very useful to keep True Peak active when you're in the recording/composing phase of the production of a song and may add unnecessary CPU weight to the song.
LUFS
LUFS stands for Loudness Units relative to Full Scale, and is a reference audio metering system that uses filtering to mimic how the human ear perceives audio signals and gives a reading that accurately reflects the loudness of a signal. You can use LUFS to ensure that a song you export is compliant with loudness specifications of music streaming platforms such as Spotify, Apple Music or YouTube, as well as cinema, TV and radio.
When only peak metering was used, people tried to boost loudness as much as possible to gain an edge over competing tracks or broadcasts, in the process sacrificing dynamic range, making everything sound flatly loud.
LUFS was designed in response to these so-called loudness wars and guarantees a standard loudness level between tracks and thus allows maintaining a good dynamic range.
LUFS generates multiple readings:
LUFS-m, where the m stands for momentary, measures the perceived loudness in the latest 400ms (slighly less than half a second) of the signal, and is shown graphically in the n-Track level meter
LUFS-s, where the s stands for short term, measures the perceived loudness in the latest 3 seconds of the signal, and is reported as a number in the LUFS section of the n-Track level meter. Despite the name, LUFS-s gives a longer range reading compared to LUFS-m
LUFS-integrated gives a total reading for the whole signal that has been played back so far. This is the number to watch for, as most music publishing platforms specify a LUFS-integrated range that the audio you post needs to fall into
LRA stands for Loudness RAnge and is an indication of the dynamic range of a signal. A song that is always very loud will have a low dynamic range, while a song that has some loud parts and some quieter ones will have a greater LRA. Note that the computation excludes the quieter parts of the signal so neither total silence nor very quiet parts will influence the reading. During the first 30 seconds from the last reset the LRA figure is not yet settled and is shown in gray.
LUFS and particularly LUFS-integrated is useful when you master your song. It isn't very useful to keep LUFS mode active when you're in the recording/composing phase of the production of a song and may add unnecessary CPU weight to the song.
n-Track LUFS metering is compliant with the ITU-R BS.1770-4 standard.
RMS
RMS stands for Root Mean Square. In contrast to Peak metering, RMS measures the average energy of a signal instead of the peak signal amplitude, and is consequently more suited to measuring the perceived audio loudness. n-Track is compatible with Bob Katz's K system to measure loudness using RMS. You can switch between K-20, K-14 and K-12 modes in the vumeter settings menu. As RMS is not as standardized as LUFS and doesn't include filtering to mimic the frequency response of the human hear, we recommend using LUFS instead of RMS to measure the perceived loudness.
Convolverb
Convolverb is n-Track’s convolution-based reverb plugin. It uses recorded Impulse Responses (IRs) of real acoustic spaces or custom audio files to recreate realistic reverberation and to design unique sound textures.
Loading Convolverb
You can add Convolverb to any track type (Instrument, Audio, or Step Sequencer):
ADD EFX → n-Track → Convolverb.
Exploring Impulse Responses
Convolverb includes a wide range of impulse responses (IRs) of varying size, length, and tonal character. Each impulse response shapes the sound differently:
Echo Hall - A classic warm reverb, adding sheen and depth to instruments such as piano.
Hangar - A large, spacious reverb ideal for cinematic and trailer-style sounds.
Doubler - A smaller IR that doubles the source signal, creating a tight pop-style effect.
Plate - A bright, smooth reverb often used on vocals.
On a Star - A dark, large-sounding preset for atmospheric vocals and instruments.
Victoria Dome - A darker, longer IR that can be shaped for dramatic effects.
Try loading a virtual instrument such as a piano or a vocal track and experiment with IRs to hear how the reverb transforms the original sound.
Impulse Response Editing
Each Convolverb preset is based on an Impulse Response (IR). You can customize how the IR behaves using the controls in the plugin:
Reverse IR - Flips the IR, creating a distinctive “reverse reverb” effect.
Length - Adjusts the duration of the reverb tail, making it shorter and punchier or longer and more ambient.
Pre-Delay - Sets the time between the original sound and the onset of the reverb, controlling how dry or wet the signal feels.
Amplitude - Increases or decreases the overall level of the IR.
Envelope Editing - Click and drag the orange IR waveform to customize its shape for highly creative effects.
Dry/Wet Mix - Balances the original signal and the processed reverb sound.
Using Custom Impulse Responses
Convolverb allows you to import your own audio files (e.g. .wav) as custom IRs:
Select any preset in Convolverb.
Click the File button in the plugin window.
Locate and load your desired audio file as an Impulse Response.
Loading a vocal sample as an IR, for example, can imprint its character onto an instrument or vocal track, producing creative, experimental textures.
Tip: Reversing a custom IR or adjusting its length and envelope can create highly unique and evolving soundscapes.
Performance Considerations
Convolution reverb is more CPU-intensive than algorithmic reverb. On modern computers you are unlikely to notice any issues, but on older systems or when using multiple instances of Convolverb in a project, you may experience higher CPU load.
To optimize performance, consider:
Freezing or bouncing tracks with Convolverb once you’re satisfied with the sound.
Limiting the number of concurrent Convolverb instances in large sessions.
Convolverb is a powerful tool for creating anything from subtle ambience to dramatic, cinematic soundscapes. Whether using built-in presets or experimenting with your own impulse responses, it can transform your productions in creative and inspiring ways.
Pitch Shift
The Pitch Shift effect in n-Track allows you to transpose the pitch of both Audio and MIDI tracks. It provides precise control over pitch as well as several algorithm options to achieve the best results for different types of sounds.
Pitch Controls
The Pitch section lets you shift the track’s pitch:
Transpose from –24 semitones (two octaves down) to +24 semitones (two octaves up).
Adjust by cents for fine-tuning pitch shifts more precisely than by semitone steps.
This makes it easy to retune vocals, match instruments to a different key, or create creative pitch effects.
Algorithm Selection
The Algorithm section lets you choose the processing style used for pitch shifting. Each algorithm is optimized for different source material:
Default - A versatile, general-purpose algorithm that works well for most sounds.
Phazed - Adds a subtle, modulated texture for a more experimental sound.
Melodic - Produces smoother results on pitched, sustained material, though it can be more CPU-intensive.
Percussive - Designed for drums and rhythm tracks, preserving sharp transients and adding extra punch.
Vocal - Optimized for voice, preserving formants to avoid the “chipmunk effect” often caused by standard pitch-shifting techniques such as PSOLA.
Single Melodic Line - Best for monophonic instruments (e.g., solo guitar, flute). This algorithm also preserves formants, maintaining the natural tonal character even when transposed.
Tip: For vocals and solo instruments, algorithms that preserve formants (such as Vocal or Single Melodic Line) typically deliver the most natural results.
The Pitch Shift effect makes it easy to adapt recordings to different keys, experiment with new creative textures, or fine-tune performances. Happy pitch shifting!
Oscilloscope
Oscilloscope is a versatile tool for visualizing audio signals in real-time. It displays the audio waveform - providing clear, detailed feedback that help you understand the finer details of your music.
While you can always see the waveforms for audio tracks in the timeline, you cannot normally see the waveform for instrument tracks and for group or master channels, so Oscilloscope is like a probe that you can insert at any point in the audio engine to see what’s going on.
It's the ideal effect for troubleshooting issues like noise, muddiness, and visually tracking how effects - like EQ and compression - shape the sound, or to visualize how a synth or sampler waveform looks as you tweak the instrument parameters.
Getting started with Oscilloscope
Welcome to the Oscilloscope plugin. To get started, simply add it to any channel by going to Add eFX → n-Track → Oscilloscope.
View modes
Scrolling, paging and sync views offer different ways to visualize a waveform.
In the scrolling view, the waveform continuously scrolls from right to left, giving you an uninterrupted view of the waveform’s flow.
Paging view displays waveforms in the context of one bar to another, or a defined time interval.
The sync view attempts to keep the waveform in a fixed position on the screen. It’s similar to the paging view, but the size of the page is adjusted automatically, locking to the period of the waveform. This view works great for example on synth and sampler tracks where you can visually see the instrument waveform as it goes through the attack, sustain and release phases.
Subdivision and time
The time unit used for the time axis in the scrolling and paging mode can be toggled between absolute and musical time with the note vs watch buttons. When using musical time the time axis total length is always a multiple of a musical time subdivision. This can be useful to analyze the sound as it sits in the musical tempo of the song.
Zooming
On mobile devices you can use the horizontal pinch gesture to zoom in and out of the waveform, on desktop hold down Ctrl and use the mouse wheel.
Make the waveform bigger or smaller by zooming vertically, pinching with two fingers vertically or with Ctrl+Shift and the mouse wheel.
Freezing
The Freeze button ‘freezes’ the current waveform display.
When the waveform is frozen you can go back in time tapping and scrolling or using the mouse wheel, as well as zooming in and out.
Channel Configurations
Oscilloscope can display stereo signals in multiple ways, that you can toggle between with the stereo mode button:
Left Only displays the waveform for the left channel
Right Only displays the waveform for the right channel
Mid is the sum of the left and right channels - the center of a stereo image
Side is the difference between the left and right channels, representing the edges of a stereo image
L+R displays the left & right waveforms side by side. Use it to compare elements that are panned left and right, such as harmonies or background instruments
M+S shows the mid & side waveforms separately. Use to fine-tune stereo imaging / see how much information is centered vs spread across the stereo field
When two waveforms are shown, in the L+R and M+S modes, you can change the spacing between the waveforms by dragging the handles on the left of each waveform. You can even put the waveforms one on top of the other, which can sometimes be useful when you want to visually see the differences between the two.
Oscilloscope settings
Waveform display modes offer another way of altering the visualization of the waveform:
Outline shows the waveform without any interior shading, allowing you to focus on features like the amplitude.
In Fill mode, the area beneath the waveform is filled in with color and provides a clearer view of the signal's strength.
Outline + Fill combines shows the waveform's outline along with a filled area.
Normalization is used to adjust the waveform so that its peak always touches the edge of the waveform view, so that you can always see the shape of the waveform independently from its amplitude. See how the waveform remains visually the same as the sound is fading out.
Enabling the grid lines aligns the waveform with horizontal and vertical divisions. Toggle the grid lines off when you prefer a distraction-free view while analyzing the signals.
Pure Data for n-Track
What's Pure Data for n-Track
Pure Data (abbreviated PD) is a visual programming environment for audio, video and graphical processing. This means that you can build audio (or video) processing programs - called patches - connecting basic blocks with virtual cables.
n-Track lets you load effects and synthesizers built as Pure Data patches into a n-Track song, leveraging all the flexibility in sound manipulation of Pure Data, combined with the advanced recording, mixing and MIDI sequencing tools available in n-Track. This is made possible by the LibPd project.
Note:
You don’t need to be a Pure Data patch author to enjoy its power in n-Track: loading ready-made Pure Data patches is as easy as loading a VST or AU plugin
Pure Data is very powerful, but integrating sound objects made with it into your creative workflow can be difficult at times. n-Track is here to help with:
Applying audio effects to complex sequences of recorded clips and tracks
Allowing synthesizers to play musical scores composed with either the piano roll or the step sequencer views
Saving the parameters of an effect or a synthesizer
Automating the parameters evolution in time
Visualizing the patch’s controls only, to focus on the performance
Creating a Pure Data effect patch for use in n-Track
Open Pure Data, create a new empty patch, and add both an [adc~] and a [dac~] object. They are needed to let n-Track know the audio entry and exit points.
Build your patch, adding and connecting the blocks you need to modify the audio signal as you desire.
Please note that you need to keep the left and right channel path separated if you want to keep your audio in stereo. A good practice is duplicating the audio processing blocks and controlling “twin” blocks with the same gui control:
That’s all! You can load this patch in n-Track, and apply this effect to any track. [see also: using a n-track pd patch]
Creating a Pure Data instrument patch for use in n-Track
Open Pure Data, create a new empty patch and add both a [midiin] and a [dac~] object.
The [notein] object will let the patch receive MIDI notes from n-Track’s sequencer tracks. You can also add a [ctlin] or [midiin] object to receive any kind of MIDI event from n-Track. The [dac~] object allows n-Track to catch the synthesizer’s audio output.
Then add any object you need to generate sound and control it
A good practice to ease the reuse of the sound generator core is to put it into a separate patch file (called “abstraction”).
To build a polyphonic synth, you can just load the sound generation abstraction multiple times. You can distribute midi notes to the various voices using [poly].
Pure Data objects supported by n-Track
Pure Data for n-Track currently supports all Pure Data (vanilla) objects, plus [fiddle~] and [expr~].
The GUI controls window is currently able to display:
Horizontal and vertical sliders
Horizontal and vertical radio buttons
Toggles
Bang Buttons
Canvases
Comments
Guidelines and known limitations
There are a few things to keep in mind when building Pure Data patches to be used in n-Track:
Currently, only two inputs and two outputs are supported, any additional channel will be ignored by n-Track.
Only GUI objects placed in the main patch will be shown by n-Track. All GUI objects in abstractions or sub-patches will be ignored, even if they are visible in the main patch through the “Graph on parent” mechanism.
When loading the patch, n-Track will parse it and generate a temporary patch with some additional informations, needed to bind to the supported GUI objects. This means that if you modify the patch using Pure Data, you will have to reload it in n-Track.
n-Track should be able to load any external built for your platform and placed in the same directory as the main patch, but this feature is still experimental.
Patches to be loaded in n-Track must avoid using the [dsp~] switch, since this is currently causing issues within the engine.
Load an effect patch
Right-click on an audio track and select “Effect → Add Effect → VST3 → Pure Data → n-Track Pd [Fx]”. Click on the button, and select Load patch.
Navigate to the location of the patch you want to load, and select it.
Load an instrument patch
Create a new instrument track: from the “Add Channel” menu, select “New instrument channel → VSTi → n-Track → n-Track Pd [Instr]”. Click on the button, and select Load patch.
Navigate to the location on disk of the patch you want to load, and select it.
To get MIDI messages, select the instrument as the destination in a MIDI or step sequencer track.
Load a mixed effect/synth patch
Pure Data for n-Track is able to receive MIDI events when added as an effect to an audio track, but it’s not able to receive audio when loaded as an Instrument. For this reason, if your patch is both processing incoming audio and listening for midi events you should load it as an effect on an audio track.
Please note that loading a synthesizer patch with no audio input on an effect track will break the audio flow from n-Track’s audio track to the mixer.
GUI modes
Pure data for n-Track can show your patch’s control using Pure Data's graphical style, or a custom style designed for n-Track. You can switch between the two skins from the menu, toggling the "User Pure Data Skin" option.
Load and save the patch's state in n-Track
You can save the current state of the patch as a preset, clicking on the button and typing a name for the new preset.
You can then load the saved patch at any moment, clicking on the drop-down menu and selecting one of the available patches. Your custom saved patched will appear below the default ones offered by n-Track.
Automation of GUI-controlled parameters
Pure Data for n-Track allows the automated control of the patch’s parameters exposed as GUI objects. To automate a parameter, enable automations clicking on the button, then click on the automation selector in the audio track’s panel.
Click on “Effect parameters → Add parameter…”, then select the “n-Track Pd” plugin and the desired parameter from the “Effects parameters envelopers” window.
Pure Data console in n-Track
You can show n-Track’s pure data console for debugging purposes, clicking on the “Show console” option in the menu.
Shimmer
Shimmer brings a sense of otherworldliness to audio, allowing you to layer ethereal textures alongside the original input, or even transform sounds into entirely new atmospheres.
To add Shimmer to your project:
Select Add EFX → n-Track → Shimmer.
Tap the + button, choose n-Track, and scroll down to Shimmer.
The plugin has three tabs – Shimmer, Diffusion and Output. Each controls a different aspect of the sound.
Shimmer tab
The Shimmer tab controls the pitch-shifting effect. You can select pitch intervals from the Shift dropdown, with octave shifts (Oct) being particularly effective for adding depth. The Amount knob adjusts how loud the shifted signal is compared to the original.
You can also choose between several shifting types:
Default - works well for most sounds.
Phased – adds a phasing character to the shifted signal.
Melodic – often smoother, though heavier on CPU.
Percussive – tailored for drums and percussion, with extra punch.
Vocal – preserves vocal formants to avoid the chipmunk effect.
Diffusion tab
The Diffusion tab controls the reverb applied to the pitch-shifted signal. Reducing Size to zero lets you hear only the dry input plus pitch shift. Increasing Size adds rich reverb, which you can further shape with:
Color – brighter settings cut lows, darker settings cut highs.
Decay – controls how long the reverb sustains.
Damping – reduces high frequencies in the reverb tail, for a warmer tone.
Output tab
The Output tab lets you balance the wet and dry signals. Adjusting Dry and Wet levels is the main way to set how much shimmer you want in the mix. Two additional controls, Mod Depth and Mod Rate, apply vibrato to the reverberated signal, adding subtle movement or dramatic modulation.
Presets
Shimmer includes a range of presets, available from the toolbar. These provide a quick starting point for creating ambient washes, wide pads or more extreme transformations. Once a preset is loaded, you can adjust the parameters to fine-tune the sound for your project.
Tips & use cases
Shimmer can be used in a variety of ways:
On monophonic instruments, push the parameters to create expansive, atmospheric textures.
On polyphonic instruments, use subtler settings to preserve clarity in chords.
On percussion, try the Percussive shift type with octave shifts and diffusion for creative sound design.
Automating parameters like Decay, Color or Mod Depth can make the shimmer effect evolve dynamically over time.
AutoFilter
AutoFilter is a powerful modulation tool in n-Track Studio. It allows you to reshape synths, instruments and beats with filters, waveforms, resonances and modulation. Use it to create sweeps, rhythmic pulses, or complex evolving effects that add movement and texture to your tracks.
Opening AutoFilter
To load AutoFilter, open the mixer and:
Tap the + icon
Select n-Track
Choose AutoFilter
Default view
The default interface shows:
A graph on the left with filter response controls
A single modulation section on the right, with a Frequency knob and waveform selector
Additional settings at the bottom of the window
Frequency & Interval
The Frequency knob controls the filter’s cutoff modulation rate. At the center (0 Hz) modulation stops. Lower values create slower sweeps, while higher values generate faster oscillations. Musical subdivisions can also be selected by switching to the Interval icon, which locks modulation to the project tempo for rhythmic effects.
Waveforms
Clicking the waveform menu changes how the filter oscillates:
Sine – smooth, pure modulation
Square – harsh jumps in cutoff
Triangle – bright and even
Saw – buzzy, with stepped movement
Envelope and Reverse Envelope – follow the input signal with Attack and Release controls
Manual – no oscillation, AutoFilter works like a one-band EQ (ideal for automation)
Graph controls
The graph gives detailed control over how the filter behaves:
Resonances – add multiple peaks that move in opposite directions
Recording & automation
You can capture ideas directly within AutoFilter. Press the red Record button, play your part, then stop and Undo if you want to retry. Using the metronome with a 1-bar preroll is recommended for recording in time.
For more advanced workflows, enable the Record Envelopes button and automate parameters such as Depth, Frequency or Band Shape. Automation data is then stored and played back with your project.
Presets
Factory presets are available as a starting point. Load a preset, then tweak controls to adapt it to your track. Presets cover rhythmic modulation, sweeping filter effects, and experimental sound design options.
AutoFilter can create anything from subtle movement to wild, evolving textures. Whether you’re shaping a synth, adding rhythmic life to drums, or designing cinematic sweeps, it’s a versatile tool for building fresh sounds in your mix.
Lo-Fi
Lo-Fi is the Swiss army knife of degradation and vintage coloration. Use it to make audio sound old, broken, or simply full of character. It adds vinyl crackle, tape hiss, static, hum, or even transforms signals into gritty 8-bit textures.
Opening Lo-Fi
To load Lo-Fi:
Open the mixer
Tap the + icon
Select n-Track
Choose Lo-Fi
Modes
The default mode is Vinyl, which layers different noises to emulate record playback artifacts. The output is never the same twice.
Crackles – thin, bright ticks. Adjust Gain, Density, Thickness
Clicks – thicker, wider bursts
Pops – low thump-like noises
Static – continuous noise, shaped by Gain and Color
Hum – adjustable frequency, can be tuned to or against song key
Brown, Pink & White noise
Lo-Fi also includes standard noise colors:
Brown noise – low and deep, relaxing character
Pink noise – rainfall-like, mix of lows and highs
White noise – evenly spread across spectrum, brighter and more present
Try adding Brown noise to drums for low-end texture, or blend White noise for airy effects.
Sparse & Velvet noise
These modes generate pulsed noise with a Density control:
Sparse – smooth irregular pulses, density sets average pulses per second
Velvet – similar to Sparse but rougher in texture
At maximum density, Sparse noise approaches White noise. At low density, gaps between pulses create rhythmic textures.
Bitcrush & Samplerate Crush
These modes process incoming audio rather than generating noise.
Bitcrush – reduces bit depth. Controls:
Bit Depth – fewer bits create grittier, distorted output
Waveshaping – adds noisy shaping, keep at 0 for pure bit reduction
Samplerate Crush – lowers sampling rate, producing aliasing and metallic tones. Waveshaping again adds noise depth.
Automating Lo-Fi
Lo-Fi integrates with n-Track’s automation. For example, to animate Bit Depth:
Enable the Record Envelopes button in Lo-Fi
Play your track
Adjust the Bit Depth knob during playback
Stop recording. The movement is stored as automation and plays back with the track
Presets
Lo-Fi includes factory presets covering vinyl textures, noise colors, sparse rhythmic pulses, and classic bitcrush settings. Use these as quick starting points and tweak parameters to taste.
With Lo-Fi you can add subtle retro warmth, lo-fi digital grit, or extreme sound design artifacts. It’s a versatile effect whether you want nostalgic vibes or experimental textures in your mix.
Creative Tools
The Loop Browser
The Loop Browser in n-Track Studio provides quick access to a large collection of royalty-free loops, samples, instrumentals, and song templates. It is designed to streamline the process of finding, previewing, and importing sounds into your song.
Opening the Loop Browser
The Loop Browser can be opened or closed in two ways:
Click the Loop Browser icon on the toolbar.
Or select View > Loop Browser from the main menu.
Importing Loops
To add a loop to your song:
Double-click on the loop name in the browser, or
Click and drag the loop into the timeline.
When importing for the first time, you will be asked whether to match the loop’s key to the song key. Loops always match the song tempo automatically, unless the Follow Song BPM option is disabled.
Browser Layout
The Loop Browser interface consists of several areas:
Main list (columns): Displays Loop Name, BPM, and Instrument Group. Columns can be sorted by clicking their headers.
Search bar: Enter a loop name, instrument type, or keyword (e.g. ‘guitar’).
Waveform display: Shows the waveform of the selected loop, with playback controls (Play/Stop) and scrubbing.
Info panel (i button): Provides technical details such as sample rate, bit depth, root key, and original tempo.
Follow Song BPM: Toggles whether the loop should match the current song tempo.
Categories
Loops are organized into multiple categories for easy navigation:
All - Displays all installed loops.
Audio - Displays all installed audio loops.
MIDI - Displays all installed MIDI loops.
Loop Packs - Lists all of the loop packs available: those both installed and not yet downloaded. Note various packs are available only in Suite Edition.
Instrumentals - Includes full-length royalty-free beats, often with associated song files for further editing.
Genres - Categorizes sounds by musical style (e.g. Rock, Pop, World, Hip Hop, Electronic).
My folders - Add and browse your own sounds and custom folders.
BPM - Organizes loops by tempo. n-Track supports tempos with decimal values (e.g. 92.5bpm).
Song - Displays recent files and all loops currently used in the open song.
Add-ons - opens the Add-on Manager.
Effects - Displays all n-Track and 3rd party effects that, if double clicked, get added to the currently selected track. Effects can also be dragged onto another track.
Instruments plugins - Displays all instrument plugins (both n-Track and 3rd party), which can be dragged to specific instrument tracks or, if double clicked, get added to the currently selected track.
Add-on Manager Packs
Loop packs, both free and paid, are available through the Add-on Manager.
Packs are marked by color:
White - Installed and ready to use
Blue - Installed but with updates available
Gray - Not yet installed
Buttons allow you to Get, Update, or Remove packs.
Packs cover a wide range of genres and instrument types, and all included loops are royalty-free.
To open the Add-on Manager click Add-ons direct from the Loop Browser. Or View > Add-on Manager.
Importing Your Own Sounds
You can add personal sample collections (WAV, MP3, AIFF, M4A, FLAC) into the Loop Browser:
In the Loop Browser, select My folders and then +
Select and open a folder containing your sounds.
The folder will appear in the browser, and its contents will be available for preview and can be added to a song.
Effects
The Effects panel displays all available n-Track built-in effects, as well as installed 3rd-party effect plugins.
Browsing effects by type
When selecting Effects in the Loop Browser, all effects are organized by category, such as CLAP, VST, VST3, and AU, making it easy to find and load the desired plugin format.
Adding effects to tracks
Drag and drop an effect onto a track to apply it.
Double-click an effect to add it to the currently selected track.
Instruments Plugins
The Instruments Plugins panel displays all available n-Track virtual instruments, along with any installed 3rd-party instrument plugins.
Adding instruments to tracks
Drag and drop an instrument plugin onto an instrument or step sequencer track to load it.
Double-click an instrument plugin to add it to the currently selected track.
Browsing instruments by type
When selecting Instruments in the Loop Browser, all instrument plugins are organized by category, such as CLAPi, VSTi, and AUi.
Loop Options in the Song
Once a loop is imported into your timeline, additional options are available:
Follow Song BPM - Enable/disable tempo matching.
Follow Song Key - Enable/disable key matching.
Pitch Shift - Use the transpose widget on the audio file to adjust the loop pitch without additional plug-ins.
Part Properties (‘i’ button):
View or adjust metadata (original BPM, original key).
Toggle tempo and key following.
Display the effective speed of the loop when synced.
The Loop Browser is great for building ideas and enhancing songs with ready-to-use royalty-free sounds and tempo/key matching.
AI MixSplit (iOS 13+)(Windows x64 and Arm64)
You can use our stem separation algorithm, AI MixSplit, to effortlessly remove vocals and extract individual tracks from a mixed song.
Right click on a waveform, select Process —> AI MixSplit.
Here we can choose if we want to only Remove the Vocals or to separate instrument stems. Let’s choose separate instruments.
You need to install AI MixSplit before using it for the first time. This window will appear automatically after choosing Remove Vocals or Separate Instruments. Let’s simply click on “Get” to download the module. You only need to do this once!
Now the module has been downloaded, we’ll see AI MixSplit working to extract the instrument stems from the mix.
And there you have it: isolated drums, bass, synths and vocals.
Removing Vocals
We can also try the ‘Remove Vocals’ option. Note that this time we go straight to the extraction as AI MixSplit has already been downloaded.
We can see an instrumental mix (a version without the vocals) added beneath our full mix.
Using AI MixSplit from the Loop Browser
We can also import tracks using AI MixSplit from the Loop Browser.
If we select ‘Instrumentals’, made up of downloadable n-Track songs, because they have multiple instruments, any of them can be imported into the timeline using AI MixSplit by clicking on the button.
We can also remove vocals and separate instrument from any track. From ‘My Folders’ you can add any audio file from your hard drive using the + button.
Again, if the first time you use AI MixSplit is from the Loop Browser, you will be prompted to download the module. Instead, if you’ve already installed the module like we showed before, you will go straight to the stem import.
In the timeline we have our full mix and the separated instrument parts.
Audio to MIDI Conversion
Capture an instrument part or sing an idea as audio, then convert it to editable MIDI instantly with
AI-powered Audio-to-MIDI.
Convert Recorded Audio to an Instrument Track
Right-click the audio part.
Select Process → Convert to instrument track.
The detected notes are transferred to MIDI automatically.
Once converted, you get the details of the original performance as MIDI data, ready for editing, transposition, and sound replacement.
Convert Loops by Drag-and-Drop
You can also drag audio loops from the Loop Browser directly onto an instrument track and convert them immediately.
Add or select an instrument track (for example, an upright bass).
Drag an audio loop onto that instrument track.
Confirm Convert audio to MIDI when prompted.
Mobile Workflow
Long-press an audio part.
Select Process → Convert to instrument track.
Or drag an audio loop from the Loop Browser directly onto an instrument track, as on desktop.
Tip: Audio-to-MIDI is ideal when MIDI programming feels slow, complex, or when you prefer to perform ideas vocally/instrumentally first.
Onda Synth
Onda Synth is n-Track’s built-in synthesizer for creating rich, expressive sounds. It combines oscillators, filters, envelopes, modulation, MPE support, and custom temperaments to give you a wide sonic palette. This section describes the main tabs and parameters so you can quickly get hands-on and start designing patches.
Quick Start: Onda Synth in 3 Steps
Load Onda: Add Onda to an instrument track from Synths > Onda Synth, then pick a preset.
Tweak Oscillators: Choose Wave Shapes in columns A and B and adjust to taste.
Shape & Modulate: Use the Filter, Envelopes, and LFOs to add movement and expression.
Default Tab
The Default Tab is the main interface for Onda Synth. From here you can quickly manage high-level controls and performance features:
Instrument Icon - shows the currently loaded instrument.
Add FX - opens the effects panel so you can apply built-in, and 3rd-party, effects to your sound.
Arpeggiator - enable arpeggiated patterns and sequences from the notes you play. (Arpeggiator section for more details.)
Parameter Tab
The Parameter Tab gives control over timbre and modulation. The default graph view is where most sound design happens:
Graph (default view) - main elements:
Wave Shapes - two columns (A and B) with selectable waveforms (sine, saw, square, triangle, off). You can mix up to two waveforms per row to build complex tones.
ADSR Control - visual Attack, Decay, Sustain, Release controls for shaping dynamics.
Morph Table - turquoise nodes control modulation values:
A = LFO Hz Rate
B = LFO Wavetable
Purple Orb - blends between Wavetable A and Wavetable B for evolving textures.
Envelope Tab
The Envelope Tab provides a knob-based interface for precise dynamic shaping. Use the ADSR knobs to set how each note evolves over time.
ADSR Knobs - Attack, Decay, Sustain, Release.
Attack Mode - choose between:
Attack until key release - sound sustains while the key is held
Always finish - envelope plays through even after key release
Oscillators
The Oscillators section controls the core pitch and harmonic content of your patch.
Tuning A / Tuning B - adjust pitch of Wave Shapes in columns A and B (in cents, range ±2 octaves).
First / Second Duty Cycle (%) - controls pulse width of each waveform, changing harmonic content.
Filter Tab
The Filter Tab sculpts the tonal color of the sound with classic filter controls.
Filter Type - Low-Pass or High-Pass.
Cutoff - frequency where the filter begins to affect the sound.
Resonance - emphasizes frequencies around the cutoff (0–100%).
Velocity to Cutoff - controls how note velocity influences the cutoff (Disabled to 5.00).
Filter Mod Tab
The Filter Mod Tab adds modulation and expressive mappings to the filter and related parameters.
Modulation Direction - choose whether modulation pushes frequencies Up or Down.
LFO on Filter - apply LFO modulation to the filter (Disabled or 20–20000 Hz).
Aftertouch on Cutoff - map aftertouch to the filter cutoff (Disabled–100%).
Aftertouch on Tremolo - map aftertouch to tremolo depth (0.00 dB to -24.00 dB).
Filter Envelope - modulates cutoff over time with controllable Attack, Hold, and Release (values: 0.00–6.00).
Tremolo
Tremolo modulates the output volume for rhythmic or textural effects.
LFO on Volume - depth control (0–1.00).
LFO Wave - choose Sine, Square, Triangle, Saw.
LFO Rate - modulation speed (0–20 Hz) and LFO Mode (Hz, Tempo, Tempo - triplet, Tempo - dotted).
LFO Phase - adjust phase offset (Free, 0–180°).
Note: Tempo (triplet) syncs the LFO to triplet subdivisions of the project tempo; Tempo (dotted) extends the note length by 50% (e.g. a dotted quarter lasts 1.5 beats).
Vibrato
Vibrato modulates pitch for expressive playing.
Rate - speed of pitch modulation (0.01–20 Hz).
Wave Type - Sine, Square, Triangle, Saw.
Delay - time before vibrato starts (0.00–20.00s).
Amount - depth in cents (0–200).
LFO 3 Mode - Hz, Tempo, Tempo (triplet), Tempo (dotted).
Legato Tab
The Legato Tab controls note connection and glides for expressive lines:
Legato Type - choose how notes connect or trigger glides.
Glide - set the time it takes to slide between notes.
Pitchbend Range - define how far pitchbend can move up or down.
The Settings Tab shows global options that affect overall synth behavior and performance:
Reverb - add space and depth.
Stereo Width - widen or narrow the stereo image.
Oversampling Factor - higher processing quality at the cost of CPU.
Polyphony - maximum simultaneous voices.
Velocity Mode - defines how playing strength maps to sound dynamics.
MPE Support
Onda Synth supports MIDI Polyphonic Expression (MPE), allowing each note to carry independent pitch bends, slides, and pressure. Use MPE-capable controllers (for example, the ROLI Seaboard) to unlock highly expressive performance techniques per note.
Temperament
The Temperament section enables alternative tuning systems beyond standard equal temperament:
Custom Tuning - adjust intervals in cents for bespoke scales.
Presets - includes Pythagorean, Vallotti, Kellner, and others.
Import / Export - save and load temperament settings for reuse.
Arpeggiator & Sequencer
Using sequencers and arpeggiators MIDI plugins help us to create slick and sometimes wild patterns. In n-Track Studio, we’ve included a step sequencer and arpeggiator plugin to help you spark creative ideas with synths and MIDI instruments.
Arpeggiator vs step sequencer
An arpeggiator is a plugin that creates an arpeggio from the chord (i.e. two or more notes) that you play on the keyboard, alternating between the pressed notes following a given arpeggio. Think of how a harp player moves the hands gently across the strings picking notes of a chord in a certain repeating sequence.
A step sequencer effect instead typically works with a single note played on the keyboard, playing a quick melody or sequence of notes, transposed according to the active note on the keyboard. The sequence can be very fast so you may not appreciate every single note but the overall effect is to create sort of a different instrument from the one each single note is playing.
The arpeggiator and step sequencer MIDI effects in n-Track are actually part of the same plugin that can operate in one of the two modes.
Opening the plugin
To get to the arpeggiator and sequencer, let’s add an instrument track. Then open the sampler using the keyboard icon and click the arpeggiator button. We’re prompted to ‘Select arpeggio’ , let’s choose ‘Coins’, a step-sequencer preset.
Sequencer Controls
To get started press and hold a keyboard note. We hear a pattern that plays and repeats based on the current sequence. The active steps are shown in green with their note intervals in the lower gray box.
Let’s tap to deselect a couple of the sequence steps. We can see that these change from green to grey as they are switched off. We can press and hold a note and hear that the sequence pattern has changed. We can also press and hold multiple keyboard notes at the same time.
Interval row
There’s an interval row below the sequence row. By clicking on an interval box we can set the interval. The interval is the number of semitones above or below the note that we play on the screen keyboard. For example, if we click on step 3 and change the interval to 12 semitones, we can hear that the third note of our sequence jumps up an octave from the note we are holding (12 semitones equals an octave interval.) We can actually see both the interval and semitone value when customising the interval row.
Subdivision
By default, the subdivision menu is set to 1/16. Let’s click and drag our subdivision menu to 1/8th triplet.
It’s worth noting that a sequence step always counts as a subdivision, whether it’s selected in green or deselected in grey. If we deselect step 2 for example, we hear that the step still “plays” as a silent note. Using this is important to be able to create interesting rhythmic patterns with the sequencer.
And to those of you who want to do some experimentation there are loads of subdivisions to mix this up with, including triplets and even quintuplets!
Changing step patterns
Returning to our original 1/16 subdivision value, we can hear that the sequence pattern of 8 steps plays twice as quickly as when the subdivision value was set at ⅛.
This is logical because where a step was previously equal to an eighth note, now it equals a sixteenth note and so plays at double the speed.
So to get our full bar of 4/4 time we need to add a second row of 8 steps, which will give us 16 steps. To do this simply click on the plus icon. Pressing and holding a note on the screen keyboard, we can now hear our sequence pattern extends to 16 steps.
If you want to mix things up more, additional rows can be added by tapping the plus button again, and rows can be easily removed by tapping the minus button.
Swing
We can use the swing knob to alter how swung our sequencer patterns sound. Let’s hear a couple of examples.
Using the side menu
We can record and playback our ideas without leaving the sequencer, simply click the red record button to start getting ideas down. If you make a mistake and want to retry the recording, stop, tap the undo button and press record again.
One recommendation would be to enable the metronome and set 1 bar of preroll when recording so that you can record in time and know where you are! To do this we’ll go to the metronome icon and enable it. We’ll then go to settings and turn pre-roll on.
Changing keyboard range
If you want to change the range of the screen keyboard tap the keyboard range button in the side toolbar. When the range button is enabled scroll the keyboard left or right to locate your desired range. We can also zoom in and out to view more or less notes at a time.
Make sure to tap the button again to lock the selected range, otherwise the keyboard will move under our fingers as we’re playing.
Quantize
Enabling the quantize button quantizes the notes you play according to the song’s tempo and the subdivision set in the plugin. Note that the first note you press is always played immediately, the quantize button sets whether the rest of the sequence of notes generated by the plugin will snap to the song’s grid, or use the same offset from the grid that the initial note you played had.
If after recording a track you want to also quantize the actual notes you played (not the ones generated by the step-sequencer plugin), you can do so in the piano roll.
Presets
Using the available presets can be viewed as a great way to get started quickly with the sequencer. We’d recommend trying them out and then tweaking and modifying the settings already discussed to taste.
Arpeggiator
Let’s switch to the arpeggiator using the tab on the plugin. We can see controls now familiar to us: subdivision, swing, quantize and the step editor. The main control of the Arpeggiator is ‘Mode’.
Mode
In the sequencer when more than one note is played, both notes simultaneously play the same step sequence in parallel with one another, so we can hear more than one note at the same time.
With the arpeggiator, when more than one note is played at the same time, we still only ever hear one note at a time.
If we play three notes with ‘Go Up’ mode selected, we can hear that the notes play one at a time from low to high, with the chosen subdivision and swing values.
You can choose from various ‘mode’ settings, which when combined with the other available tools leave you with a huge pool of combinations to create from. Let’s hear another example using the ‘Random’ mode.
De-Essing with Dynamic EQ
Looking for a way to reduce overbearing and distracting sounds on a vocal? Enter De-Essing, a mixing technique that is commonly used to reduce excessively loud ‘S’s sounds on vocal tracks.
De-Essers are often also used to control harsh sounds present in specific frequencies.
The n-Track Dynamic EQ works great for De-Essing vocals. In fact it works even better than classic De-Essers based on multiband compression, which we’ll get to shortly.
Opening Dynamic EQ
The easiest way to get to EQ is by opening the mixer and clicking on EQ. n-Track also adds the ability to use the EQ as a plugin: tap ‘Add EFX’, then click the plus icon, choose n-Track, then ‘Dynamic EQ’.
De-Essing with Dynamic EQ
It’s difficult to beat the added control afforded by De-essing with Dynamic EQ with more than one frequency range being controlled in a different way.
The dynamic EQ acts as a compressor - when the signal in the frequencies that make up the S vocal sound increase in amplitube, and any other ‘problematic’ frequencies, the EQ starts to reduce the band gain dynamically.
Getting started
If you have a vocal track with ’S’ sounds which stand out too much in the context of the mix, you might want to bring down the volume of those heavier S sounds to make things more consistent. If we use the EQ to cut around the frequency in which we hear these strong ‘S’ sounds, it’s going to darken the vocal part for the whole length of the track, which is a strong side effect.
Finding the ‘problem’ frequency
You’ll typically need to adjust a band’s frequency and slope to make sure you pick the correct frequencies, which will likely change depending on the melody and the singer’s voice. You can start by going to the presets menu in the Dynamic EQ plugin, tapping the ‘Dynamic’ folder, and selecting ‘De-Esser’. Then you'll see a dynamic curve drawn onto the EQ graph with a thin precise slope, to target very specific frequencies, and a negative dynamic gain value so any excess signal in that frequency range gets reduced.
How do we find the frequency we need? This is when we need to use our ears. A quick method is to use a positive gain to pinpoint the frequency space that the disturbing sound occupies. Once we’ve found the frequency, we can set the gain back to 0 and let the dynamic EQ do its magic.
It’s worth mentioning that with Dynamic EQ it’s possible to tune in a more specific frequency range than with a classic De-Esser. As well as being able to manipulate the slope value and number of bands, Dynamic EQ also gives the freedom of being able to boost and cut incoming signals, while plugins multi-band compressors are usually restricted to gain reduction only. Multi-band compressors also have the drawback of always applying some processing to the signal due to their cross-over filters. In a De-Esser configuration, when the dynamic reduction is not engaged, the DynamicEQ is perfectly transparent - it doesn’t modify the signal at all.
Choosing a curve
When de-essing, normally one of two band curves are used. A ‘band boost or cut’ shape can be used to increase or reduce the energy of the signal in a specific area on the frequency spectrum, around the center frequency of the filter. A band cut is particularly useful when very specific ranges of the frequency spectrum need to be targeted.
A high shelf can also be used and allows a wider cut or boost of all frequencies above the cutoff frequency. This is useful when there are a lot of unwanted sounds clustered together in a broader frequency range that we might want to reduce, or exaggerate, dynamically.
Setting the Dynamic Gain
Dynamic EQ can be used to reduce the gain only in the moments that a vocal part sounds too loud, and in a chosen frequency range.
Take a hard-hitting S vocal sound at a specific frequency, which otherwise isn't distracting. Instead of using a traditional static EQ cut to turn down the frequency range in question and darken the whole vocal part, dynamic EQ can react only in the moments we need to reduce gain in certain frequencies.
Setting threshold value
Setting the dynamic threshold value affects how sensitive the selected band is to the dynamic. The EQ’s dynamic gain is applied only in the moments when the incoming signal exceeds the dB value we have set in the threshold setting.
Attack and Release
The dynamic attack setting adjusts how quickly gain is applied to the selected band. The dynamic release knob adjusts the speed at which the selected band returns to normal after the level of the input signal level decreases. To De-ess our vocal set attack and release values low because we want a fast reaction time.
Manual De-Essing with Automation
Manual De-Essing with volume automation, though more time consuming, is another highly regarded way of de-essing vocal parts. This is when the gain envelope on a part is reduced using nodes, which are added and adjusted to affect the volume of track parts that stick out too much in the mix.
A Simple Guide to Mastering
You’ve poured hours into writing, composing, and recording your new song. After refining every detail—editing, adding effects, balancing volumes, and perfecting automation - it’s finally sounding just right. You’re proud of your creation, and you’re almost ready to share it with the world. But wait! Don’t skip the crucial final step: a solid mastering session. Give your track a polished finish by carefully listening and using the mastering tools available in n-Track Studio.
Mastering is the final step in the production process of a song. It's where the song is polished and refined to make the song sound its best across all playback systems, whether it's played on a phone, a car stereo, or heard through headphones. The term ‘Mastering’ comes from the act of creating a master copy of a recording to be used for replication. This used to be a physical mould from which vinyl records were pressed, now it’s simply an audio file that you can upload to music streaming services or use to burn an audio CD.
Be sure not to confuse mastering with mixing! Before mastering, the song goes through the mixing process. Mixing is where all the individual tracks that make up the song, such as vocals, drums, and guitars, are combined into a cohesive mix. The mix is where the song's tonal balance, dynamics, and spatial positioning are adjusted to create a balanced and clear sound.
So, once the mix is completed, mastering techniques can be applied to make sure the recording sounds its best across all playback systems.
In this chapter we’re going to review how to check that your song is ready for mastering, and how to approach the mastering process - that is, shaping the tonal balance, sweetening the song, and getting the volume level and export settings up to release quality.
Is your song ready for mastering?
Mastering can be a creative and musical way to add an extra dose of clarity, energy or crispness to your mix. What it shouldn’t be is a trick that takes a bad mix and magically makes it loud, clean and release ready.
Mix checklist
Before moving to mastering, be sure to review your mix. A good checklist would be:
Have you removed pops, hiss, and any bad cuts between the music?
Are the volume levels and overall balance between the instruments and tracks sounding right to you?
Have you used panning to give a sense of space and width to the production?
Are you happy with the EQ, the compression and reverbs used in the mix?
Mastering with intention
If we’ve answered yes to the questions and we’re happy with our mix, let’s get to the mastering. We’ll start by listening to the song and outlining a clear intention of what we want to achieve with the master.
What do we want?
Perhaps your mix is well balanced and already quite clean but could do with more punch on the lead lines, and more brightness in the snare on beats 2 and 4. The whole song could also do with an overall boost in presence and be volume ready for release.
Song balance
Let’s open the n-Track Dynamic EQ and begin by making some subtle boosts and cuts to achieve what we want. Try to avoid making big cuts and heavy EQing in the mastering stage, as this would suggest that there is more work to do at the mix stage - rather, when mastering, concentrate on small adjustments that can help bring your production to life even more.
Let’s start with our lead line - we’ll select band 2 and boost the gain to find the frequency in which the horn lines are most present. Once we have found that frequency range we’ll bring the gain level down to a couple of decibels.
Same for the drum snare. Let’s add a new band, exaggerate the gain to locate the range that the rim clicks are really popping and, when we’re happy with that, we’ll move the gain value to a more subtle decibel value.
Perhaps you also hear that the bass could be ever-so-slightly increased for a groovy, solid foundation. To achieve this - you guessed it - add another band and lightly kiss the gain value to a maximum of 2db.
Let’s hear before and after our EQ balancing. Can you hear how before we had a flatter sound, compared with the more dynamic balance after the subtle tweaks we made?
Presence and sweetening
Let’s open up the n-Track Tube Distortion plugin, and experiment with the smallest amount of drive to boost the saturation and warmth of the song. The tone needs to be kept at 100, and the volume boost at 0 (we’ll boost volume in the next step). We’ll add just a light amount of drive, at around the 3 value. Definitely use this with caution, we can hear that by increasing the drive too much the overall mix becomes distorted and loses its punch and clarity.
By listening with and without the distortion, you can hear the subtle detail it adds to the mix. Just be sure to use it carefully.
Limiter
Let’s open up the n-Track Limiter and choose the Soft Limiter preset.
With the preset selected, we can see the plugin working the gain bar too much and - most importantly - we can hear that the song distorts. Let’s try the Lookahead Limiter (True Peak) preset instead. In this mode the Limiter is very good at avoiding distortion, we can try to squash the levels to the limit, notice that regardless of how much we’re boosting the song is never clipping!
To remedy any distortion, bring the ratio value down, making the compression more gentle.
Bring down the attack and release values as needed so that the Limiter can react more quickly to the audio signal.
Loudness
We’ll now open the Meter plugin on the master channel to make sure that the level of our song ready for release.
The n-Track Meter has a useful Scan button that you can use to quickly scan the whole project and get a reading on the various metering levels, instead of having to wait for the song to play in its entirety.
If it isn’t already selected, choose LUFS from the meter menu. You can use LUFS to ensure that a song you export meets the loudness specifications of music streaming platforms such as Spotify, Apple Music or YouTube, and even cinema, TV and radio.
We can then switch the metering mode to Peak, which measures the absolute peak level of the waveform.
Peak metering may sometimes miss peaks that are between one sample and the next. True Peak metering uses oversampling to transform the signal into a much higher sampling frequency, which allows us to check the level of the signal in-between samples.
Note that True Peak metering is useful when mastering your song. It isn't very useful to keep True Peak active when you're in the recording/composing phase of the production of a song and may add unnecessary CPU weight to the song project. You can enable and disable True Peak from the ‘Meter mode’ menu.
Adding fades
To make sure there are no pops or unwanted noises at the start and end of our song we’ll add a fade in and fade out to the song.
To do this we’ll use volume automation on the master song. We’ll show the master channel on the timeline by selecting the arrow icon. Then, selecting the envelope automation icon, we’ll draw a fade in and fade out at the start and end of our example.
Export and final check
As a rule of thumb a 24 bit and 48kHz WAV is a good export format and should be compatible with streaming platforms and general uploading.
To export in n-Track click on the menu icon, select ‘Save song / Export’, then name your song and select WAV as format. Bit rate can also be selected from the menu. Sample Frequency is set as 48kHz by default.
How to Sidechain
Sidechaining allows an effect plug-in to process the audio signal from one track, based on another track’s signal. It's a quick, versatile way to help take your mixes to the next level.
What is sidechaining?
Sidechaining allows an effect plug-in to process the audio signal from one track, based on another track’s signal.
A common use is to adjust the dynamics of a bass track (i.e. compression) in response to a kick drum track, or to reduce music volume automatically in a spoken voiceover (i.e ducking).
Why use sidechaining?
Because sidechaining lets you control one track based on another, it’s perfect for creating space in your mix or balancing competing sounds.
For sidechaining to work, the plug-in must support it. Many compressor and limiter plug-ins include a switch for using a sidechain or external input as a key signal. The n-Track Compressor supports sidechain input, as do third party compressor plug-ins such as FabFilter Pro-C2.
Keys and Scales
The Vocal Harmonizer can automatically detect major and minor keys, making it easy to create harmonies that fit your music.
There are also a wide variety of scale types to choose from, including chromatic, all modes, blues, Whole Tone, and more.
Sidechaining on mobile
Let’s set up a two track project in n-Track Studio with a bassline and a kick, and let’s look at how to create a clean, punchy low end by using sidechain to make the bass ‘duck’ every time the kick hits.
On the track we want to alter, which for us will be the bassline, add the sidechain-capable n-Track Compressor and change the preset to ‘default’. If the Sidechain button is pressed, it will say that to activate it an input is needed.
To use the kick track for the sidechain source, send the kick track’s main output to the compressor’s sidechain (Output → Sidechain - Track 1: Compressor). Back in the compressor, as the ratio is adjusted, the ducking effect on the bassline can be heard and seen every time the kick signal is received.
We can refine the threshold and ratio parameters to alter the sidechain effect.
In the setup we just used, the kick track is being sent solely to the sidechain input, and can no longer be heard in the overall output.
However, in most situations we would want to hear the track that we’re using as a sidechain input. To accomplish this we’ll use a send as the sidechain input and set the track’s output to the master:
we’ll change the output back to the master output
select ‘Add new send’
we’ll change the output of the send from Aux 1 to the Compressor sidechain (Sidechain - Track 1: Compressor)
the kick now sounds, and we can monitor the sidechain input by clicking ‘Sidechain’ in the compressor
Sidechaining vocals
You can sidechain a vocal over some instrumental parts.
Let's say we have a few instruments: a guitar part, piano chords, bass and drums that are all competing for space with the low-ish pitched vocal line. In this case we would group the instruments and sidechain the vocal to the group to make it clearer in the mix.
Output the instruments to Group 1. Then, add a compressor to the group channel.
For the signal you want to act as the sidechain input, ‘Add new send’ and then change the Aux 1 output to Sidechain → Sidechain - Group 1: Compressor.
Monitor the sidechain using the button in the compressor. Then adjust the parameters to taste.
This technique can also be used for voiceovers.
Sidechaining with third-party plugins
Let’s use FabFilter Pro-C2 to improve clarity between a voiceover and a music track.
Sometimes it can be somewhat difficult to hear the spoken words over the volume of the music.
On the music track, which we want to control based on the voiceover input, open C2.
On the voiceover track output ‘Add new send’, and then change the output of the send to Sidechain FabFilter Pro-C2.
Lowering the threshold and adjusting the ratio allows the voiceover, the controller track, to shine through.
Automatic Tempo Detection
You don’t need to use a metronome when you start recording in n-Track Studio. Just record your audio track freely, and n-Track will automatically figure out the tempo for you. After the recording, a message will pop up asking if you want to set the metronome to match that tempo.
The tempo detection is very accurate - even down to a fraction of a beat (for example, 120.53 BPM). This feature is especially useful if you prefer starting a composition without a click track, or if you're importing external audio / working with drum tracks that do not align exactly with a standard tempo.
Automation
Automation in n-Track Studio lets you record and edit changes to effect parameters, volume, pan and send levels over time, bringing movement and life to your productions.
Volume Parameters Automation
To draw envelopes directly on the timeline:
click the Draw Volume Envelopes icon on the toolbar
tap the multitool icon on the toolbar, then select Envelope Edit from the menu that appears in the center of the screen.
choose the desired parameter (track volume, pan, send or return volume etc.) from the track's left panel
On Mac you can also Ctrl+click on any track and select Envelope → Select which envelope to draw.
The timeline window shows a line superimposed on each track, representing the temporal evolution of the selected parameter. When, for example, you select Draw track volume, you can program the track’s volume changes simply by drawing on the track. To switch between volume, pan, send and return envelopes, click Envelope Options on the track's left panel and select a parameter from the dropdown list.
By default, every click adds a new node to the envelope, which is handy for drawing it freehand. For more precise editing you can add nodes one by one instead: right click and deactivate the Click adds node option, then add nodes with Shift+Click or by right clicking and selecting Add new node from the popup menu.
By default, every tap adds a new node to the envelope.
Note: You can apply an envelope edit to all the currently selected tracks (selected by shift+clicking on the waveforms) when the right click → Envelope → Apply edits to all selected tracks option is active.
To draw the evolution of an effect’s parameter, select Find parameter... in the pop-up menu, then select the desired effect in the left-hand drop-down list and the parameter in the right-hand drop-down list.
Click the Automation Options icon to:
Enable faders automations following: the faders move during playback according to each parameter’s programmed evolution.
Enable effects parameters automation: if this option is disabled, effect parameters automation is switched off.
Record automation: when active, every action on a mixer’s fader during playback (including volume sliders and pan knobs, but excluding the master volume knob) is recorded in the envelope of the corresponding parameter.
To perform a fade in/out, select the time interval during which the fade should take place by dragging with the mouse on the track, then select the Edit/Volume/Pan drawing/'Fade In/out' menu option.
Clicking the icon on the toolbar mutes the current selection, i.e. sets the volume envelope to zero. If you don't see this icon by default, it can be added by pressing the gear icon and selecting 'Customize toolbar'. Clicking the same button while holding down the Ctrl key (Cmd on a Mac) destructively silences the selection: the audio file itself is modified (you can use the undo button to reverse this).
Effects parameters automation works with DirectX, VST and AU plug-ins, but while any VST or AU effect allows its parameters to be automated, not all DirectX plug-ins do. To see if a DirectX plug-in supports automation, select Find parameter... from the drop-down menu, then select the effect in one of the Effect drop-down boxes: if no parameter is listed in the drop-down box on the right, the plug-in doesn’t support parameter automation.
Aux Send/Return Automation
Sometimes it is useful to apply an effect only to specific parts of a track, or to vary the amount of an effect during the evolution of the track. For example, you may want to increase the amount of reverb during the chorus of a vocal track while keeping it low during the verses. This kind of processing can be obtained using aux channels and send/return automation.
In the preceding example, the reverb could be placed in the first aux channel, setting both the send and the return level for this aux channel to 0 dB. The amount of the effect can now be regulated by the send envelope:
click the Draw Volume Envelopes icon on the toolbar
select Draw send/return 1 volume from the track's left panel dropdown
draw the send envelope so that the line is higher during the parts where you want more of the effect
In a similar way, different effects can be applied to different parts of the same track. If you wanted to substitute the reverb with a delay only during the chorus, you could put the reverb in the first aux channel and the delay in the second. Then draw the send envelopes so that during the chorus the send to the first aux channel goes to 0 (-Inf) while the send to the second rises to a suitable level, with the opposite happening after the end of the chorus. n-Track can handle up to 32 aux channels, so sophisticated real-time processing can easily be configured.
If you are drawing many envelopes, it may be useful to view each automated parameter on a separate track. You can do this by clicking the icon on the track's panel.
Effect Automation in 3 Steps
Enable Automation: Open a plugin and tap the Record Envelopes icon (it turns red when active).
Record Movements: Adjust knobs or XY orbs during playback. A turquoise dot appears to show that a parameter is automated.
Edit Envelopes: Switch to Draw Envelopes mode in the project window to fine-tune your automation with nodes and shapes.
Recording Effects Automation
To record automation, first open an effect and click the Record Envelopes icon inside the plugin shell. By default this is off. Once enabled, the icon turns red and any movement of the plugin’s controls will be recorded as automation.
Many n-Track effects feature an XY editor view. To use this:
switch the plugin interface to XY mode
enable recording envelopes
move the XY orb during playback
When you play back the track, the orb replays your movements. A turquoise dot on the XY axis confirms that automation has been recorded.
While the Polygon view can be useful for morphing between presets, it often results in too many parameters being automated at once. For more control, we recommend recording in XY view or switching to Knob view.
In Knob view you can automate specific parameters individually. For example:
add the Tube Distortion effect
enable automation recording
adjust the Drive and Tone knobs
Both movements will be captured and replayed in real time, with turquoise dots marking the automated knobs.
Editing Automation Envelopes
Once you’ve recorded automation, you can edit it directly in the project window. To do this:
tap the Tool Selection button in the bottom toolbar
choose Draw Envelopes mode
look for the envelope button that appears on each track (to the right of Mute and Solo)
Clicking the envelope button shows the available parameters for automation. By default, Volume and Pan are listed.
To add a plugin parameter, simply move its knob in the plugin window. The parameter will then appear in the menu - for example, moving the delay knob in the Chorus effect adds Chorus - Delay to the list. Selecting the parameter displays a flat envelope line that you can now edit. You can also long press a plugin knob and select Show Automation to create an envelope.
From the same menu you can temporarily disable automation, which greys out the envelope and plays the track without parameter changes. Re-enable it at any time by selecting the option again or by clicking the turquoise dot beside the knob or XY control.
If you adjust a knob that already has automation, you’ll override it and the turquoise dot turns grey. Tap the dot or use Enable Automation from the long-press menu to restore the original automation. If you want to start over, use the menu option to delete automation, or undo to recover it if needed.
Advanced Automation Tools
Automation envelopes can be customized further with tools such as snapping, shapes, and multiple views.
Snap to Grid: When you add or move nodes on an envelope, they can be made to snap automatically to musical subdivisions (bars, beats) by enabling Snap to Grid in the grid menu. With snapping off, nodes can be placed freely.
Periodic Shapes: Long press a node and choose Shape to draw repeating waveforms such as Sine, Square, Triangle, or Sawtooth. These shapes are automatically mapped onto the envelope and can create rhythmic or evolving effects. For example, you can automate the Pitch Shift plugin, set its envelope shape to Sine, and then drag the frequency handle to control the speed of the pitch modulation.
Show Automation in New Track
To view multiple automation lanes for the same track:
open Draw Envelopes mode
select Show Automation in New Track
choose a parameter to display in a sub-track
You can close the sub-track with the X button at any time without deleting the automation itself.
How to Slide Notes
To create a glide effect between notes in Track Studio, follow these steps:
Add an Instrument Track Begin by adding a new instrument track to your project.
Access the Sampler Settings Open the Sampler and navigate to the Parameters tab.
Enable Legato Mode By default, the view is set to XY. Change this to Legato to access glide-related options.
Enable Glide Initially, glide is not active, so notes won't glide unless a value is selected.
In the Legato section, enable the Glide option.
Adjust Glide Time Use the Glide parameter to control the speed of the glide (in seconds) between notes.
A longer glide time results in a slower, more pronounced pitch transition.
A setting of 0.3 seconds produces a smooth and natural-sounding glide.
Set Pitchbend Range The Pitchbend Range determines how far the pitch wheel can shift a note. This is especially useful for gliding single notes manually.
A setting of 12 allows for a one-octave (12 semitones) shift up or down.
Increasing this value expands the pitch range available when using the pitch bend wheel.
Playing Multiple Instruments at Once
n-Track allows you to play and record multiple instruments simultaneously across different tracks. This is useful for layering sounds or combining instruments into a single performance.
To set this up:
Create two or more instrument tracks
On each track, press the circular rec-arm button on the left-side of the track and select 'Arm Recording'
Add instruments to each track, for example:
Acoustic Piano → Steinway Grand Lite
Electric Piano → Rhodes
Onda Synth → Bass 01
Confirm that all armed tracks display the red rec-arm button
Next, open the on-screen keyboard:
Tap the keyboard button on the left side of the track
You can maximize the keyboard by tapping the keyboard button in the top-left corner.
Next, open the on-screen keyboard:
Go to View → Screen Keyboard
To route the keyboard to all armed tracks:
Tap the Track button
Enable Send to armed tracks
Now, any key you press on the keyboard will be sent to all armed tracks, allowing you to play them together.
Note: With an external MIDI keyboard, Send to armed tracks is not required, as this is the default behavior.
The Key Widget
The Key Widget allows you to control the pitch of Audio and MIDI parts and loops, directly from the track. It is available on Audio, Instrument, and Step Sequencer tracks.
With the Key Widget you can:
Transpose loops and parts up or down by semitone, or shift entire octaves at once.
Reset Pitch to return the part to its original key.
Pitch Shifting Algorithms
n-Track provides several algorithms optimized for different use cases. Each algorithm processes audio differently to balance sound quality and CPU usage:
Default - A versatile, general-purpose algorithm that works well on most sounds.
Melodic - Provides smoother results on pitched material, though it can be more demanding on CPU.
Percussive - Tailored for drums and rhythm tracks, with sharper transients and extra punch.
Vocal - Specifically designed for vocals, preserving vocal formants to avoid the “chipmunk effect” that can occur with standard time-stretching methods like PSOLA.
Single Melodic Line - Optimized for monophonic instruments (e.g. solo guitar, flute). This algorithm preserves formants, keeping the natural tonal color intact even when transposed.
Tip: For vocals and solo melodic instruments, algorithms that preserve formants will generally yield more natural results.
Pitch/Speed Modes
The Key Widget also lets you choose how pitch and playback speed are linked:
Lock Pitch (default) - Changes to playback speed do not affect pitch.
Pitch follows Speed - Increasing or reducing playback speed also raises or lowers the pitch.
Speed follows Pitch - Adjusting pitch will automatically stretch or shrink the playback speed.
This flexibility makes the Key Widget useful not only for key changes but also for creative sound design.
BPM Detection with Beat Alignment
The BPM Detection with Beat Alignment feature analyzes imported audio and aligns it to the song grid with high precision.
This is especially useful when clips contain leading silence or start slightly before/after the first transient.
Auto-Detect and Apply BPM
Import an audio track into your song.
If needed, open Part Properties (click the i button on desktop).
Scroll to BPM and click to run automatic BPM detection.
Press Apply to sync the part to the beat grid.
After applying, the audio aligns correctly with the song tempo even when the original part includes silence at the beginning.
Fine-Tuning Start Position (Beat Sync Offset)
Use the vertical offset line on the audio part to set the exact musical start point.
Drag left or right to refine timing with sample-level precision.
This is ideal for intentional micro-timing choices, such as placing audio slightly ahead or behind the beat to create push/pull feel, tension, or release.
Mobile Workflow
Long-press the audio part and choose Properties to open Part Properties.
Enable Beat Sync Offset.
Adjust the offset directly with the widget on the audio track.
Tip: Start with automatic BPM detection, then use Beat Sync Offset for musical feel and groove refinement.
Global Solo Button
The Global Solo button streamlines solo monitoring in large sessions and complex mixes.
You can solo multiple tracks, then use Global Solo to toggle the full solo set on or off instantly.
How It Works
Solo any number of tracks as usual.
Use Global Solo to quickly enable/disable all currently soloed tracks.
While multiple tracks are soloed, Ctrl + Click a track’s Solo button to solo just that single track from the timeline. This is especially useful when you need to quickly audition one small detail in a dense project without losing your existing solo setup.
Mobile Support
The Global Solo button is also available on mobile for the same fast solo workflow.
Tip: In larger songs, use global solo groups for isolating instrument groups, then use Ctrl + Click for fast one-track spot checks.
Project Management
Transferring songs to a PC or Mac
Do you know that n-Track projects can be transferred from Phone to Tablet to PC?
As an example, you can start a song idea from anywhere and add effects, using n-Track Studio for iOS on a mobile or tablet. This project could then be exported and opened on a Mac, Windows or Linux computer, in order to complete the mix.
Watch our cross-platform video walkthrough to learn more about this style of music production.
As an example, you can start a song idea from anywhere and add effects, using n-Track Studio for Android on a mobile or tablet. This project could then be exported and opened on a Mac, Windows or Linux computer, in order to complete the mix.
Watch our cross-platform video walkthrough to learn more about this style of music production.
The audio files and projects (.sng files) you record with n-Track on Android are located in the app's folder in the device’s public storage area.
You can transfer files from the Android device to a PC in two ways:
Connecting via an USB cable
Connect the Android device to the PC using an USB cable
Browse from the PC to the nTrack folder
Transfer the contents of the folder to a PC folder
You can then open your .sng files with n-Track on your PC or Mac
Note
Note that the .sng file also depends on the .wav files that are created when audio tracks are recorded, so you can’t just copy the .sng file, you should copy all of the .wav files used by the .sng file, or all of the nTrack folder
Transferring files via the cloud
Use the Share button to share each song that you want to transfer in ‘Packed song’ format (.sgw file)
Share the sgw file using a file sharing service such as Google Drive or Dropbox
Open the sgw file with n-Track Studio on your PC or Mac
Song Browser
The n-Track Song Browser streamlines the process of browsing and loading your songs.
Getting Started
Let's say we’re working on a new song. If we press ‘Close song’ from the file menu, the song is closed and we enter the Song Browser.
On iOS, if we tap on the home button, the song is closed and we enter the Song Browser.
On Android, if we tap on the home button, the song is closed and we enter the Song Browser.
When a song is closed n-Track saves any changes you made to the song. You never have to manually save the song. To make sure you never lose your work, every time a new version of a song is saved, a snapshot of the previous state of the song is also saved so you can always go back to a previous version. Also the undo information is saved along with the song, so just after reloading a song you can hit the undo button and undo the last change that was done to the song before it was last saved.
The Song Browser shows your songs in chronological order, so that the last song you worked on is always the first one in the list. Click on the song name to rename it.
We can start a New Song or press the Collab button, which takes us directly to the n-Track Songtree community, from which you can find and overdub tracks or stems.
More options
Right clicking on a Song opens the song details popup menu.
Long pressing on Android opens the song details popup menu.
Long pressing on iOS opens the song details popup menu.
We can restore the song from an auto-saved backup by selecting ‘Restore song from a snapshot’. This will take us to the snapshot folder where we can select the snapshot based on the time at which the snapshot was created.
A song folder may grow in size as you import or record new tracks. When you delete an audio track, the audio wav files used by the track are not physically deleted from the song folder, as you may want to re-import them later or undo the deletion. The ‘cleanup unused files’ deletes all files in a song folder that are no longer actually used by the song tracks.
We can also duplicate the track from the menu.
‘Enter Song Folder’ takes us, still in the Song Browser mode, to all of the song files in a project folder. This is especially useful if we have multiple song versions in the same folder.
A song folder may contain multiple song files, which are independent from each other but they share the same audio files. A folder icon appears on the Song image if the song folder contains multiple song files. If we click on the song image, the song opens immediately. If we click on the folder icon we enter the Song folder, from which we can select the song file we’d like to open, or long press to delete individual song files.
Explore the song's folder in Mac Finder by selecting 'Show in Folder’.
Explore the song's folder in Mac Finder by selecting 'Show in Folder’.
Trash
You can move songs to the Trash folder with the Trash button in the song details menu. The song is not deleted immediately – instead, it is moved to the Trash folder, which can be found as the last item of the Song Browser.
Opening the Trash folder shows a list of Songs ready to be deleted. Manually empty the trash bin by clicking the Trash icon in the top toolbar highlighted in red. Note that this action cannot be undone!
Managing song files
When you save a song in the n-Track native .sng format, n-Track creates a folder with the name of the song, and inside the folder saves the .sng file, and an Audio subfolder where all the audio files used by the song are stored.
If instead of saving in the app home folder you save a new .sng file inside an existing song's folder, then n-Track will only save the new .sng file, and the audio files will be shared among all the .sng files saved in the folder. This allows creating multiple versions of the same song without always duplicating all of the audio files.
Also to note the fact that when you use the Open song or New song commands, the app doesn't ask if you want to save. It just saves, while it also creates a snapshot of the version of the song before the last save, so that you can always go back to any previous state of the song. You can access the snapshots in the Snapshots subfolder, or tap on the Home button in the lower right, then long press over the song icon, then select the Restore snapshot command.
Everytime you delete a file or songfile, the files are not permanently deleted, they are instead copied to the Trash subfolder in the song folder. This allows reverting an accidental delete. The files in the Trash are automatically deleted when they are one week old.
This song folder structure is designed to keep the n-Track files well organized, to avoid accidental loss of recordings, and to be able to easily identify all of the audio files used by a certain song.
Cleaning up the song folder
After you've worked on a song for an extended period of time, you may notice that the Audio subfolder of your song becomes populated with a large number of audio files. That is because n-Track never deletes an audio recording, even when it is removed from a song.
When your song is in a stable state and you're sure you don't want to undo the removal of audio tracks, and you need to free up some space on the device storage, you can tap on the Home button in the lower right, then long press over the song icon, then select the Clean up unused files command. This will cleanup the song folder, moving to the Trash all of the audio files that are no longer referenced by any of the .sng files in the .sng folder. This will also delete all of the snapshots of the song in the Snapshots folder.
Manually manage files
When you need to manually manage files or browse to folders outside of the default n-Track songs folder, you can go back to the classic way of browsing files with the Folder icon in the top right corner.
Other
We can open the interactive startup tutorial using the question mark icon, or close the Song Browser from the X icon.
On iOS we can also access the Settings menu via the top toolbar, to change everything from sampling frequency to audio engine settings.
On Android we can also access the Settings menu via the top toolbar, to change everything from sampling frequency to audio engine settings.
DAWproject File Support
From version 10.2.2, n-Track Studio includes support for the DAWproject file format. DAWproject is an open standard designed to allow the exchange of project files between different Digital Audio Workstations (DAWs).
Unlike exporting stems or MIDI-only data, DAWproject files contains more project information, including audio events, MIDI notes and automation. This makes it possible to transfer sessions between DAWs with minimal loss of information.
Importing a DAWproject file
To open a DAWproject file in n-Track Studio:
Choose File > Import > Dawproject file from the main menu.
Select a file with the extension .dawproject.
The project will be loaded into n-Track Studio.
You can also drag and drop a DAWproject file directly into the n-Track timeline.
Exporting a DAWproject file
To export your current n-Track Studio project to the DAWproject format:
While DAWproject enables cross-DAW project exchange, some features may behave differently depending on the application i.e some plug-in formats may not be available on all systems (e.g. AU plugins on Windows).
Video tutorials
Reference
Become an n-Track Studio tester
If you want the opportunity to try out new features before they go live for everyone, we’re on the lookout for new n-Track Studio beta testers on iOS.
Beta versions may not always have the stability of the public release.
For critical work and for non tech-savvy users we recommend using the public (non-beta) release.
To send feedback whilst using n-Track Studio use the Settings menu and then 'Contact Support'. You can also just take a screenshot on your device and use the 'Share Beta Feedback' menu from the share menu.
Below is a list of USB audio devices we tested. On Android compatibility sometimes also depends on the Android device + USB device combination, so we cannot guarantee that the audio interfaces below will work with 100% of Android devices.
Supported USB audio devices
Generic USB stereo in/stereo out audio device
Blue Snowball USB mic
Tascam US-16x08
Shure MV51
Shure MVi
Focusrite Quantum HD8
Creative Soundblaster Play
Griffin iMic
RME Babyface (10 inputs / 10 outputs)
Buffering: 4 x 220 samples
Focusrite Scarlett 18i20 (12 inputs / 18 outputs)
Focusrite Clarett 8pre USB-C
Focusrite Clarett 4pre USB-C
Focusrite Scarlett 2i2
Focusrite Scarlett 2i4
M-Audio M-Track Duo
M-Audio Fast Track
M-Audio Mobile Pre
C-Media USB PnP
Berhringer Xenyx 302
Behringer UCA202
Behringer Flow8
Native Instrument Komplete Audio 6
Prefers small buffers and high number of buffers. Works correctly at 96000 Hz with 6 buffers of size 480
Audioprobe Spartan Cue
Use small buffers (e.g. 176 for 44100 Hz) and 6 or as number of buffers
Audiotrak Maya 5.1 USB
AKAI APC Key25
CME xKey37
EMU 0202
Select Active Inputs = 2
Background audio
Sometimes it is useful to have n-Track keep playing or recording when you send the app to the background (i.e. close it) and you open another app. For example when you're using another app say to read or write lyrics etc.
By default n-Track stops all audio streaming when you exit the app. To avoid this and have the audio keep running in the background check the Allow background audio option in the Settings.
When the app is in the background and audio is running you'll always see an n-Track notification in the device's notification area that has the option to stop the audio.
Creates a new document and closes the current .sng file
Opens a saved .sng file
Saves the current .sng file
Sets the mouse mode to audio file offset dragging mode
Sets the mouse mode to the volume/pan evolution drawing mode. When this button is pushed, a menu will appear where you will be able to chose which volume, pan or aux evolution to draw
Enables you to select parts of tracks with the mouse
Toggles the editing mode between destructive and non-destructive modes
Switches between Audio Recording, MIDI Recording, and Audio/MIDI Recording modes. The audio recording input will depend on how the soundcard’s internal mixer is configured. To select the correct recording source and adjust levels, use the soundcard’s own software mixer or the Windows standard volume control.
Switches between MIDI echo modes
Opens the Signal Path window
Shows or hides the Navigator window
Opens the Metronome Settings window
Opens the Piano Roll window for the selected track. If no MIDI track is selected, a new blank MIDI track is added
Shows the playback VU meter
Shows the recording VU meter
Opens or closes the mixer
Cuts the selected portion of the selected track and the corresponding part
Copies the selected portion of the selected track and corresponding part
Pastes the clipboard contents to the selected portion of the selected track corresponding audio file. If the Ctrl or Cmd key is pressed, the contents of the clipboard will be pasted to a newly created audio file, which will be added to the song at the offset corresponding to the start of the original data.
Silences the selected portion of the selected track or its corresponding audio file. If the Ctrl or Cmd key is pressed while you click on the button, the audio file will be actually modified. Otherwise the track volume will be set to zero, but the audio file itself will not be modified
Undoes the last action
Redoes the last undone action
Opens the selection dialog box
Fades in the selected region
Fades out the selection region
Adds a marker; click this button, then click on the location at which you want to place the marker
Activates or deactivates the grid. When the grid is activated, all selection values and made files offsets will be snapped to the nearest grid line. Hold Ctrl or Cmd and click on the button to adjust the grid settings
Activates or deactivates the loop option: the current selection will be looped forever
Zooms in on the horizontal axis
Zooms out on the horizontal axis
Zooms in on the vertical axis
Zooms out on the vertical axis
Zooms to the selected region
Zooms to a view of the entire song
Undoes the last zoom command
Remote Control toolbar:
Starts recording
Starts playback
Puts the playback offset to the start of the song. If pressed during playback, restarts the playback immediately from the start of the song
Stops playback & recording. Holding down the Shift key stops only recording. Holding down the Ctrl or Cmd key stops only playback
Menu Commands Reference
File Menu
The File menu lets you work with song and audio files in n-Track Studio.
New
Closes the current .sng file and starts a new song
Open
Open a saved .sng file
Import audio file
Import an audio file in the current song (same as Track/Insert audio file)
Save
Saves the current .sng file overwriting the old file
Save As
Saves the current .sng file prompting for a new filename
Save as Packed Song File
Saves the song in .sgw format
Save as Template
Saves the song as a template
Convert .wav file
Converts a WAV file to MP3, WMA or OGG format
Move/Rename Song
Copy or move all the song's audio files to a new directory
Clone Selection to New Song
Creates a new song from the selected region
Mixdown Song
Mix down of all or some of the audio tracks to a single audio file
Import
Imports MIDI or AFF/OMF tracks
Export
Exports all MIDI tracks to a standard MIDI file or all tracks to a AFF file
Exit
Quits the program
Edit Menu
The Edit menu contains commands for altering waveforms in n-Track.
Undo
Undoes last editing action
Redo
Redoes last editing action
Volume/Pan drawing:
Draw Pan
Set mouse drawing to draw pan mode (the volume drawing icon on the toolbar must be activated)
Draw Volume
Set mouse drawing to draw volume mode
Move evolutions when moving parts
Locks the envelope to the waveform
Fade in
Opens the fade in/out dialog box with fade in settings
Fade out
Opens the fade in/out dialog box with fade out settings
Crossfade
Fades between two tracks
Remove selected nodes
Deletes the selected envelope points
Flatten track
Flattens the volume or pan evolution of the selected track (constant for the entire track’s length)
Fade settings
Changes the shape of the fades
Markers:
Place marker
Places a marker. Choose this command and then click on the place on the timeline at which you want to insert the marker.
Add marker here
Adds a marker at the current location on the timeline
Next marker
Jumps forward to the next marker
Previous marker
Returns to the previous marker
Manage markers
Opens the markers list dialog box
Snap to marker
Enables snapping files to markers when dragging them
Grid:
Snap to grid
If this option is checked, the selection and the parts offsets (when dragging with the
mouse) will snap to the nearest grid line
Edit destructively (i.e. by actually modifying the files) the audio files present in the song
Non destructive editing
Cut, copy & paste portions of references to audio files, without altering the actual audio files
Cut
Cuts the selected portion of the audio file corresponding to the selected track
Cut and move left
Cuts the selected portion of the audio file, then moves the separated waveforms together to “fill in” the gap
Copy
Copies the selected portion of the selected track and corresponding audio file
Paste
Pastes the clipboard contents to the selected portion of the selected track corresponding audio file. If the Ctrl or Cmd key is pressed, the contents of the clipboard will be pasted to a newly created audio file, which will be then added to the song at the offset corresponding to the start of the original data.
Paste Appending
Pastes the clipboard contents after the selected waveform on the timeline
Insert
Inserts the clipboard contents into the selected portion of the selected track corresponding audio file
Apply track effect/envelopes
Destructively apply the track’s effects and/or volume/pan envelopes to the selection
Normalize
Destructively normalize the selected portion of audio file
Scan song for clipping
Look for volume clipping in the song
Silence Selection:
Put volume to 0
The track volume will be put to zero, but the audio file will not be modified
Silence destructively
Silences the selected portion of the selected track corresponding audio file. The audio file will be actually modified
Split
Detach the current selection from the rest of the audio files: a reference to a audio file is cut in 3 pieces, with the exact middle one being included in the selected range
Spice to grid
Splices the selection along the grid lines
Splice in N parts
Create N concatenated parts out of the (whole) selected part
Merge parts
Rejoin two parts that have been previously spliced
Trim
Cuts the unused beginning and ending sections of the audio files corresponding to the selected track parts, regaining unused disk space. This option only has an effect if the edges of the audio files have been dragged, and consequently the audio files are not entirely in use in the song. For example, if a waveform is made up of the middle 3 seconds of a 9-second file, trimming it will transform the part into a 3-second-long audio, deleting the 6 seconds of unused audio from the hard disk.
Song comments
Opens the song comments dialog box. The text you type there will be saved in the .sng file: you can use this to remember, for example, the instruments, chords or whatever else you may need to remember when you will open the file at a later time.
Song information
Opens a dialog box with a textual description of the current song, including audio files used, effects, aux channels, etc.
Track Menu
The Track menu allows you to work with entire audio tracks.
Import audio file
Inserts an audio file in the selected track
MIDI:
Piano Roll
Opens the Piano Roll for the selected MIDI track
MIDI Events List
Opens the Events List for the selected MIDI track
Remove Track
Deletes the selected track
Remove Part
Deletes the selected part
Split stereo track
Splits the selected audio file into two mono audio files and adds these newly created files in the song, removing the original stereo file. The program will prompt you to delete it depending on the preferences settings.
Clone Track
Duplicates the selected track
Track properties
Opens the track properties dialog box
Wave file properties
Opens the audio file properties dialog box
Rename/Copy audio file
Renames the selected audio file
Effects
Activates the selected track’s effects window
Freeze:
Freeze/Unfreeze track
If the selected track is not frozen, freezes the track; if frozen, unfreezes it.
Refreeze track
Repeats the last freeze operation
Bounce track to a single wave file
Renders the selected track to a audio file
Special:
Reverse Playback
Reverses the selected waveform
Time Stretch
Time stretches the selected waveform; allows you to transpose the pitch as necessary
External Wave Editor
Launches the external audio editor configured in the preferences section
Transport Menu
The Transport menu controls audio playback and recording.
Play
Starts the playback
Record
Starts recording
Record Mode:
Audio
Records from audio input
MIDI
Records from MIDI input
Audio + MIDI
Records from both audio and MIDI inputs
Punch in/ multiple takes recording
Opens the punch-in/multiple takes recording dialog box
Stop
Stops playback and recording
Pause
Pauses playback or recording
Rewind
Restart the playback from the start of the song
Reverse Playback
Plays the song in reverse
Auto Scroll Timeline
Scrolls the timeline as the song plays
Loop Selection
Plays the selected audio in a loop
Split audio files being recorded
Starts a new waveform during recording
Voice/Level activated recording
Enables voice-activated recording
Mute all output
Mutes all outputs, both audio & MIDI
Add Channel Menu
The Add Channel menu allows you to insert new channels into the multitrack environment.
Import audio file
Imports an audio file into the program
Recently inserted wave files
Shows a list of audio files recently imported into the program
Import tracks from .sng file
Imports the tracks from a .sng song file
Add new blank channel:
Audio
Inserts an empty audio track
MIDI
Inserts an empty MIDI track
Add new Aux channel
Adds an aux channel to the mixer
Add new Instrument channel
Adds an instrument on a new channel
Add ReWire device
Connects n-Track to a ReWire-compatible program on your computer
Add channels
Adds audio, MIDI, Step Sequencer or Aux channels
View Menu
The View menu contains options for customizing the program’s interface.
Mixer:
Toggle all mixers
Turns all mixers off or on
Track Mixer
Turns the track mixer off and on
Master Mixer
Turns the master mixer off and on
Timeline Track Mixer
Toggles the timeline track mixer window
Add Mixer
Adds an empty mixer window
Toolbar:
Transport Toolbar
Shows or hides the transport toolbar
Punch-in/multiple takes Toolbark
Toggles the punch-in/multiple takes recording toolbar
Main Toolbar
Toggles the main toolbar
Reset Toolbars
Restores the default toolbar configuration
Editing History
Shows a list of all the edits made
Playback VU Meter
Shows the output VU meter
Recording VU Meter
Shows the input VU meter
Wave Files Selection
Opens the Pick Wave Files window
Big Time
Opens the large time display
Metronome
View the Metronome settings dialog box
Tempo
Opens the tempo envelope window
MIDI keyboard
Opens the virtual MIDI keyboard
MIDI System Exclusive Banks
Shows a list of any system-exclusive MIDI banks
Sync with Video
Synchronizes the audio with a video file
Save/Recall Selections
Opens the Save/Recall dialog box
Audio Files Regions
Open the Regions List dialog box
Navigator
Shows or hides the song navigator window
Effects Browser
Opens a list of installed effects plug-ins
Signal Path
Opens the Signal Path window
External Wave Editor
Launches the configured external audio editor
Start your song
Launches the startup dialog box
Enter Full Screen
Expands n-Track studio to fill the whole monitor
Settings Menu
The Settings menu allows you to configure the program.
64-bit mixing
Enables 64-bit mode
Audio Devices
Opens the Audio Devices dialog box
MIDI Devices
Opens the MIDI Devices dialog box
Buffering settings
Opens the Buffering control box
MIDI Faders/Control Setup
Opens the MIDI Control window
Synch with other devices
Opens the MTC/MIDI Clock sync window
Skins
Opens a list of skins that change the appearance of the program
Waveform Display
Allows you to alter the way that n-Track displays waveforms.
Soundcard Settings:
Recording Mixer Control
SOpens the operating system’s recording control panel
Playback Mixer Control
Opens the operating system’s playback control panel
Recording Format
Allows you to configure the audio format for recording
Playback Format
Allows you to configure the audio format for playback
Zoom:
View All
Displays the entire song
Zoom Selection
Zooms in on the selected area
Zoom in/out
Zooms in or out on the specified axis
Toggle Last Zoom
Reverts to the last zoom level
Keyboard:
Keyboard Mixer
Enables the keyboard mixer
Refresh View:
Refresh
Refreshes the screen
Recalculate Waveforms
Refreshes the waveforms in the song by recalculating the corresponding .npk files
Help Menu
n-Track’s Help menu offers assistance with the program’s operation.
Quick Guide
Opens/closes the quick guide
Quick Tips
Shows/hides Quick tips
Contents
Opens this help file
Tutorial
Opens the Tutorial help topic
About
Opens the about box
Activation
Opens the activation dialog box. If you are a registered user, you can enter your login credentials to activate the software and unlock all the features not otherwise accessible in the evaluation version
Check for new versions
Checks the n-Track website for updates to the program
Buy the registered version
Connects to the web page where you will be able to register the program using a credit card through a secure server
Use keyboard shortcuts to quickly run commands in n-Track studio.
Note:
On a Mac, use the “Cmd” key to run “Ctrl” key shortcuts, and use the “Ctrl” key as the Windows “Alt” key.
Shortcut
Function
Spacebar
Play/stop
0 (zero)
Start Recording (if pressed during recording re-start recording a new take)
Backspace
Rewind
F12
Pause
ESC
Mute All output
Mouse wheel
Move left/right
Ctrl+Mouse wheel
Zoom In/Out horizontally
+ / -
Zoom In/Out horizontally
Ctrl+Shift+Mouse wheel
Zoom In/Out vertically
Windows Key + Drag
Duplicate and drag part
Ctrl + Drag
Drag part (without clicking on crosshair icon)
Alt
Show volume envelopes
S
Splice selected portion of part
Shift+S
Merge parts
M
Mute selected channels
Shift+M
Solo selected channels
Q
Mute selected part
Ctrl+A
Select All parts
Ctrl+0
Clear selection
Ctrl+R
Mixdown Song
Left arrow
Select previous track
Right arrow
Select next track
Up arrow
Increase volume of current track (shift → faster)
Down arrow
Decrease volume of current track (shift → faster)
Ctrl+Up arrow
Pan current track left (shift → faster)
Ctrl+Down arrow
Pan current track right (shift → faster)
Ctrl++ / Ctrl+-
Nudge (move by small amount) selected part right/left. Zoom in to decrease the nudge amount
Ctrl+O
Open Song
Ctrl+S
Save Song
Ctrl+Shift+S
Save Song As
Ctrl+1
Import Audio file
Ctrl+Z
Undo
Ctrl+Y
Redo
Ctrl+T
Toggle timeline follows playback cursor
Ctrl+C
Copy
Ctrl+V
Paste
Ctrl+Shift+V
Paste at the end of track (append)
Ctrl+X
Cut
Ctrl+Shift+X
Cut and eliminate silence in the middle
Ctrl+I
Insert
Ctrl+B
Toggle snap to 0 crossing of audio parts
Ctrl+G
Toggle snap to Grid
Ctrl+Shift+G
Grid Settings
Ctrl+M
Place Marker at playback cursor
Ctrl+Shift+M
Click and place Marker
Ctrl+Shift+Left cursor
Go to previous Marker
Ctrl+Shift+Right cursor
Go to next Marker
Ctrl+P
Preferences
Ctrl+F4
Soundcard Recording mixer
Ctrl+F3
Soundcard Playback mixer
Ctrl+Alt+F3
Playback format
Ctrl+Alt+F4
Recording format
Alt+F4
Close program
F5
Recording meters window
F6
Playback meters window
F2
Big Time window
Shift+F3
Show/hide Master mixer
F3
Show/hide Track mixer
Ctrl+Shift+Tab
Show/hide all mixer windows
Ctrl+9
Toggle Keyboard mixer (see below)
When the Keyboard Mixer is active (Ctrl+9 to toggle; Cmd+9 on a Mac), you can use the keyboard to control n-Track’s virtual faders:
Press the letter shown at the top of the fader to raise the volume of the respective track; press the letter at the bottom of the fader to lower it. Holding down the Shift key or activating Caps Lock will increase the step to 10 units. Holding down the Ctrl key (Cmd on a Mac), or activating Scroll Lock, will configure the keyboard mixer keys to operate on the pan settings.
For tracks other than the first 8, select the desired track (by clicking with the mouse on any of its waveforms or by using the left/right keyboard arrows), and then use the up and down arrow keys to move the selected track's volume (hold Ctrl or Cmd to adjust pan).
Z and X adjust the master volume level.
Preferences
n-Track’s Preferences section allows you to configure the program for your computer. Access this section by selecting Settings/Preferences, or by pressing Ctrl+P (Cmd+P on a Mac).
Recording Settings
Sampling Frequency
Sets the sampling frequency of the recorded tracks. Make sure that all the tracks are recorded using the same frequency.
Maximum number of tolerated buffers under-runs
the program will halt the playback when this number of buffer under-runs (i.e. clicks in the playback caused by excessive load on the computer) is exceeded. Set this value to -1 to disable the detection of this ‘out of resources’ condition.
Hide lag indicator if lag values is less than
This option will control when the lag indication will be displayed on the time window: sometimes the lag value can grow to a large size due to playback or recording glitches, ruining a recording. It’s important to know when this happens. Entering the critical value of the lag above which one can actually hear synchronization problems into this field will make the program normally hide the lag value indication. Entering 0 will make the lag indication always show. The default setting is 500.
Restore global default settings
Resets the n-Track configuration to its default settings.
Language
Sets the program’s language.
Options Settings
Program Priority
Use higher priorities to make the program able to exploit more of the system CPU resources. Be careful with very high priorities, as they may render the system unusable. Default = Normal
Use system timer for playback/recording time
When this option is checked, the program will calculate the current playback or recording time using the computer timer. If the option is unchecked, the program will use the playback or recording time reported directly from the soundcard.
DSP thread priority
Sets the Digital Signal Processing audio processing priority. For the highest priority, set this option to “3.”
Copy record buffers
Optimizes the audio engine; enabling this option reduces latency at the cost of a slightly higher CPU usage.
Allow automated volume/pan for audio tracks
This option allows the volume and pan of the audio tracks to be programmed by drawing on the track (click on the volume icon on the toolbar to enable this). If this option is unchecked, the drawing will have no effect. The automation of the volume and pan consumes some resources. You can uncheck this option if you need to economize on CPU usage. Default = checked
Read data from tracks even if muted
When this option is disabled, a few seconds may pass between disabling the mute control for an audio track and hearing the track again.
Ask for names of audio files to be recorded
If this box is checked, the program will prompt you for the name of the WAV file(s) to be recorded each time you click the “Record” button. Otherwise, the program will assign a filename based on the name of the current song (displayed on the main window’s caption). For example, if the name of the song is “blues.sng,” the first recorded track will be named “blues_1.wav,” the second “blues_2.wav,” and so on. It’s always possible to rename a song’s audio files using the “rename WAV file” option from the track menu. Default = unchecked
Ask for “ready?” before recording
If this option is checked, a little message box will appear before the actual recording starts. Default = unchecked
Ask to delete wave files to be removed from the song
If this option is checked, every time the program is told to remove a track from the song, it will ask if you want to actually delete the audio files associated with the track from the hard disk. This may cause accidental deletion of audio files, so be careful when answering the query in the message box. Default = unchecked
Song start / stop marker
Right click on the Time Axis, then select 'Place'. If 'Song Stop Marker' is selected, n-Track will stop playback when it reaches the Stop Marker. Otherwise, it will continue playing even after the song has finished.
Effect tails length
When this is checked, n-Track will automatically compensate for delays introduced by effects plug-ins when mixing down a song.
Shift mixdown file according to plug-ins latency
The length of time, in seconds, that n-Track continues to include output from an effect plug-in after the audio signal has stopped.
If this is enabled, when you hover the cursor over the timeline, a pop-up label will indicate the cursor’s exact position.
3D time axis
Enables or disables the 3D graphical effect on the timeline.
Keep undo info for up to [x] actions
Sets the number of steps that n-Track keeps in its undo history. Higher values allow you to backtrack farther, but use more memory.
Delete all undo data
Deletes all the temporary audio files created to allow undo on audio editing operations.
VU meter update max refresh
Determines how quickly n-Track updates the VU meter display in correspondence to the audio signal.
Fast time window refresh
Enabling this allows n-Track to quickly update the display.
Save backup every [x] minutes
When this is checked, n-Track will automatically save a backup copy of your project at the time interval specified. The backup will be named "~ntrck_backup-XXXX", where XXXX stands for the current song name. If the song you're working on gets corrupted, you can revert to the last saved backup by loading this file.
Use different color for each new track
If checked, n-Track will use a new color for every track you add. If this option is unchecked, new tracks will be assigned the color set in the Default Colors dialog box
Refresh VST plug-ins every [x] ms
Specifies the time interval, in milliseconds, after which the program will refresh any VST plug-ins.
Default Time Format
selects the time format used by default on every dialog box. Available formats are 10 (i.e. tenths of seconds), 24, 25, 30, 75 FPS (Frames Per Second), samples or M:B:T (measures, beats, ticks).
Lower timeline axis time format
selects the time format for representing time in the time axis at the bottom of the timeline window.
Skin
Opens the Skin dialog box, which allows you to change the program’s appearance. Double-click on a program element in the list, then click on the color you want to use for that element. To change the fonts in the program, click the “Fonts” button in the Skin window.
Volume envelopes/ranges
Opens the Volume Range window, which allows you to specify minimum and maximum ranges for the volume envelopes and faders in the program.
Envelopes log interpolation
Enabling this option displays volume envelopes logarithmically (i.e. curved); disabling it displays them linearly (i.e. straight). Logarithmic envelopes reflect the actual volume changes more accurately; however, they are slower to draw.
MIDI Preferences
MIDI events shown in the timeline
Allows you to specify which MIDI events (notes, pitch changes, controller commands, etc.) are shown in the timeline view.
Filter volume/pan events
Eliminates events that control the volume and pan of the MIDI synth from playback. For example, while recording a MIDI track, you might have moved the volume slider on the keyboard. This will have made the program record that event and, if this option is left unchecked during playback, the same volume change will be reproduced: after the volume event is posted, the volume setting made in the program’s mixer will have no effect, unless you move the volume slider again (making the program send another volume event).
Filter program changes
Same as above, but with regards to the channel’s program (instrument) setting. Default = checked
Add track settings exporting to MIDI file
If this is enabled, when you export a MIDI file from n-Track, the program will include program changes, volume events, etc. in the MIDI file.
Mute all notes at stop
If enabled, when you stop playback, n-Track will mute all MIDI notes.
When a track is muted:
Use this drop-down menu to specify how n-Track should treat muted MIDI tracks. You can tell n-Track to set the volume to 0, to stop streaming MIDI events, or to perform a combination of the two.
Play note when playback is started between the note start time and before the note end time
Normally, when you start the playback of a MIDI track after the beginning of a note, the note will not play. When this is enabled, if you start MIDI playback in the middle of a note, n-Track will play the note. This option is useful when working with MIDI tracks that contain long notes (chorded pads, for example).
MIDI devices
Choose which soundcard to use as the input device and which to use as the output. This dialog also includes the “connect input to output” option: check it if you’re playing through a MIDI keyboard attached to the soundcard MIDI input and you want the output to be heard through the selected output soundcard.
Timer to use
Sets which timer the program’s internal MIDI sequencer should use. The Wave timer (which retrieves the actual time by querying the soundcard’s WAV output’s elapsed time since the playback has started) may be preferable in some situations when MIDI tracks may not be in sync with the audio playback. Default = system timer
Internal Timer Resolution
Sets the resolution of the Windows timer used by the program to generate MIDI events. Higher resolutions (lower values) result in better timing at the cost of more CPU utilization. Default = 8 ms
Ticks per quarter note
sets the resolution with which notes are represented (used for representing time in M:B:T format and for MIDI clock sync). Default = 960
Paths Settings
External Wave Editor Path
Insert the path to your external audio editor here.
Soundcard’s mixer/Volume control path
Sets the path to the mixer software. Launch the mixer from within the program by using the Settings/Soundcard settings menu command.
Working folder
Sets the directory the program uses by default to store the audio files, .npk peak files and undo data. If none is specified, the program will use the current directory.
Record new wave files in the current song/working folder
Tells n-Track which folder to store newly recorded audio files in.
Set VST folders in Effects Settings dialog box
Open the Effects Settings dialog box, in which you can specify the path in which n-Track looks for VST plug-ins.
Locate LAME MP3 DLL
Click this button to download the LAME MP3 encoder, then point n-Track studio to the path of the downloaded file.
Always use LAME for MP3 encoding
Check this box if you want to use the LAME encoder exclusively.
Soundcard Settings
Audio Devices (Advanced)
n-Track supports different types of soundcards drivers. To open the audio Devices dialog box, select Settings/Audio devices and click “Advanced.”
Show MME devices
Show MME devices in the devices list boxes.
Show DirectSound devices
Show DirectSound devices in the devices list boxes.
When using multiple input/outputs soundcard, the program will normally use all the available input and output channels. You can use this setting to make the program use only a certain number of channels.
Asio Settings
To open the Asio dialog box, click the “Settings” button on the VU meter, then click “Asio Settings.”
Asio Control Panel
Opens the soundcard’s Asio driver control panel, where you can change settings specific to your soundcard’s driver. Not all drivers have a control panel: the button will have no effect if no control panel is available.
Process in driver’s thread
Use this setting for maximum efficiency and low latency. If, with this option activated, the program becomes unstable, uncheck it.
Restart when driver asks:
Uncheck this option if you don’t want the program to stop and restart the playback or recording when the Asio driver reports that a loss of sync has occurred.
Clock source
Some soundcards allow you to sync them to external clock reference signals. If unsure, use the “internal” setting.
Buffering Settings
To open the Buffering Settings dialog box, select Settings/Buffering settings. Click “More Options” to open the buffering options.
Playback buffers
number and size of buffers used during playback and for live processing output. Decrease the buffering to decrease the time between an action operated on the mixer and its hearable result (output latency). Low values of this parameter will make the program more resource-consuming: if you can hear jumps in the playback, try increasing this parameter.
Preload
a value higher than 1 allows the program to load buffers from the hard disk while at the same time processing another buffer.
Disk loading buffers [x] times bigger
sets how many times the buffers used for loading data from disk are bigger than the buffers used for accessing the soundcard. Since big disk loading buffers lead to a more efficient use of the hard disk while small buffers lead to a lower latency, a relatively high value for this parameter can allow you to use the hard disk efficiently while maintaining a low output latency.
Recording buffers
number and size of buffers used during recording and for live processing input during recording.
Size
sets the size of the blocks the program uses to save data to disk. Bigger blocks make the access to the hard disk more efficient, but too-large blocks may cause small drop-outs in both recording and playback during recording.
Click the “Apply” button to use the new values. If playback, recording or live input processing are active, they will be stopped and restarted with the new buffering settings. The default values appear when you rotate the knobs, but any other value for both the buffer size and number can be manually entered typing the number in the text boxes.
Always start from the default values, then try to increment the buffers if you need more reliable playback and decrement them if you want lower latency.
When using Asio drivers, the buffer size and numbers are dictated by the Asio driver, so the program will complain if the settings are different from those requested by the driver.
MIDI Settings
MIDI Devices Settings
MIDI Input port
Select the MIDI Input ports to use. Multiple devices can be selected dragging with the mouse or clicking while holding the Ctrl key (Cmd on a Mac).
MIDI Output port
Select the MIDI Output ports to use. Multiple devices can be selected dragging with the mouse or clicking holding the Ctrl key. Selected devices will have the device order number written to the left of the device’s name. The device number sets the order by which the devices are shown in the ‘Output port’ drop-down list in the MIDI track’s properties dialog box
MIDI Devices:
Always
n-Track will open any connected MIDI device as soon as you start the program. Use this setting for MIDI input devices like keyboards.
Lazy
n-Track will only open a connected MIDI device when it has data to send to the device. Use this setting for MIDI output devices; if you use it for a MIDI input device, n-Track will never open the device.
Close
n-Track will never open connected MIDI devices.
Input to output echo:
None
The program doesn’t send any incoming MIDI signal to any MIDI output port.
Automatic
The program sends the incoming MIDI signals to the MIDI output port and channel of the currently selected track. When in this mode, you can switch the sound produced by a MIDI keyboard by clicking on the MIDI track that has the desired channel and output port settings.
Manual
When this mode is active, you can select the MIDI output port and channel to which the incoming MIDI signals will be sent. You can also alter the incoming notes, transposing them and changing their velocity.
MIDI Track Properties
Right-click a MIDI track, then select “Properties” to open this dialog box.
Track name
Edit the track name displayed on the timeline and on the mixer window.
Program
Select which program (instrument) is assigned to the selected track. Not every MIDI synth has the same set of instruments. You can change or customize the set of instrument names associated with program numbers by clicking on the small button to the right of the programs drop down box. When “(none)” is selected, the track will use the MIDI synth default instrument for the track’s channel.
Channel
The channel the MIDI track is assigned to.
Bank
The bank of instruments used for the track channel. Leave “(none)” to use the default channel. If switching banks has no effect (and your MIDI synth has different instrument banks), try to change the “Bank selection method” parameter.
Bank selection method
The method used for switching instrument banks. The “Normal” setting will work with most MIDI synths. Creative Labs soundcards use the “Channel 0” switching method.
Output port
The MIDI output port the MIDI track is sent to. The drop-down box will include all the devices selected in the output section of the Preferences/MIDI/MIDI devices dialog box.
Velocity +/-
Augment or diminish the track’s MIDI notes velocity by this factor
Transpose +/-
Augment or diminish the track’s pitch by this factor.
Chorus +/-
Augment or diminish the track’s MIDI notes chorus by this factor.
Reverb +/-
Augment or diminish the track’s MIDI notes reverb by this factor.
Piano Roll
Open the Piano Roll window
Remove
Remove the selected track from the project.
MIDI Event Properties
Right-click a MIDI event in the Piano Roll, then select “Properties”:
Notes:
Start
time at which the event starts.
End
time at which the note ends.
Note
pitch of the note.
Velocity
note velocity. The velocity parameter reflects how an acoustic piano keyboard actually works. When the player pushes a key, the way in which the key is pushed in the end reflects only how fast the key hammer hits the piano strings. With most MIDI synths, and with most instruments, higher velocities result in louder notes, but the velocity often also affects the timbre of a note.
The MIDI events editing window allows you to sequentially view and edit all the events in a MIDI track in a table that shows all of the event’s parameters. For example, for a note event, the note name, channel, start time, velocity and duration parameters are listed in the event’s row in the table. Some events (for example, program changes) may be easier to add or edit using this table view instead of the piano roll view. As with the Piano Roll, you can customize which events are displayed and which can be inserted in the dialog box that appears when you select Settings/Preferences/ MIDI/MIDI events shown in the timeline.
Piano Roll Settings
The piano roll window can show a number of different MIDI events. In this dialog box, you can select which events to show and which kind of event to insert when the button is activated. Click the button to open the Piano roll settings:
Place
select which event to place when the button is activated.
View
select which event should be drawn on the timeline window.
Additional Audio Settings
Mixdown Dialog Box
Select File/Mixdown song, then click the “More Options” button to see the mixdown options.
Output
name of the audio file that will be created.
Tracks to mixdown
select the tracks to be mixed down (Default = all tracks).
Insert mixdown result into song
let the program remove the mixed down tracks and replace them with the newly created audio file.
Process Master Channel
if this option is unchecked, the program will not process the master channel and will consider the master volume as if it was 0 dB. Uncheck this option if you want to substitute the tracks to be mixed down with the audio file to be created.
Bits
by default, the program creates audio files with the same bit depth you’re currently using on the output soundcard. You can force the program to generate 16, 24 or 32-bit (float) WAV files by clicking on the relevant radio button. CDs have 16-bit resolution, so if you intend to use the mixed down WAV file to burn an audio CD, use the 16-bit setting. Generating 32-bit WAV files can be useful if you intend to process the file again using a WAV editor or n-Track itself, as maintaining a high intermediate quality helps keep the noise that is always generated when the audio data is processed low.
Channels
select the number of channels of the mixed down file.
Output
name of the audio file that will be created.
Sampling frequency
select the output file sampling frequency. If the selection is different from the working sampling frequency, the program will mixdown to the working frequency and will then convert the resulting file to the specified frequency.
The two typical applications of the mixdown feature are:
Mixing down the whole song to a single WAV file
Mixing down some tracks to apply effects permanently or to reduce the number of tracks that the program mixes “on-the-fly”
For the first application, typically all the tracks will be selected (as the program does by default) and the “Process Master channel” option will be checked
For the second application, the “Process Master channel” option will be typically unchecked, and “Substitute tracks with the mixed down file” will be checked. In this way, the program will create a new audio file with the selected tracks and will substitute the tracks with this single audio file, in such a way that the song will sound exactly the same as before but the actual number of tracks will be decreased, thus making the program occupy fewer system resources. The program will also ask for a .sng filename to which to export the mixed down tracks, so that, at a later time, it will be possible to reload the single tracks as they were before mixing down (audio files associated with the tracks should obviously not be deleted) using the “Track/Import tracks from .sng file” menu option.
Metronome
Open the metronome settings window by clicking on the metronome icon on the toolbar. Set the tempo, choose MIDI or PC speaker output and choose whether the metronome should be hearable during recording and/or during playback. Click on the test button to hear if the tempo is right.
Output to:
PC speaker
check this option if you want hear the metronome clicks through the standard PC speaker.
MIDI note
check this option if you want to hear the metronome clicks through a MIDI synth. You can select which MIDI device to use: usually you will set the metronome device as the same device used for normal MIDI output (as set through the Preferences/MIDI/MIDI devices dialog box). If the program reports an error when starting playback, make sure that you’ve not selected MIDI MAPPER in the metronome settings and the actual MIDI device the MIDI MAPPER points to (as set through Control Panel/Multimedia/) in Preferences/MIDI devices, or vice-versa. If you want to use the same device, select the same entry for both settings (i.e. set both to MIDI MAPPER or both to “Xyz Inc. MIDI synth”).
When to use:
Recording
activates the metronome during recording.
Playback
activates the metronome during playback.
Accent first beat
Makes the first beat of a measure sound different than the other beats.
Velocity
sets the velocity of the MIDI note (that ideally corresponds to the velocity of the keyboard key as pressed by a finger); this influences the volume of the note.
Duration
duration of the MIDI note corresponding to a beat. Too high values make the metronome lose timing, due to the fact that it can’t play two notes at the same time.
Note
sets which note to play for the beat. If you select a drum channel, the note selects the drum sample (snare, kick, hat, etc.).
Channel
sets the channel to use for the MIDI output. Channel 10 is usually used by MIDI synths for drum instruments, so this is the default setting.
Tempo
Sets the tempo and time signature (3/4, 4/4, etc.).
At [x] bpm
sets the number of beats per minute.
Test
test the selected metronome configuration. Press the button again to stop.
Time Stretching
This option allows you to change the speed and size of an audio file. To stretch an audio file, click on its waveform in the timeline, then use the Track/Special/Time Stretch menu command.
Transpose
Set the change in the file tonality. The file size and speed will be changed accordingly. For example, an increment of 12 semitones (one octave) corresponds to making the new file half the length of the original.
New length
Set the desired file length. The change in speed and tonality will be inversely proportional to the change in size.
Replace existing file
Change the original file size.
Create a new file
Create a new audio file with the desired length, leaving the original file untouched.
New bit depth
Bit depth of the converted file. If you intend to apply further processing to the converted audio file, the 32-bit format guarantees the greatest possible quality.
selects which shape the fades should assume. Logarithmic fades are the most natural-sounding ones.
Interpolate logarithmically
the program interpolates linearly between the volume envelope nodes. This reflects in a logarithm-like evolution between two nodes in a logarithm graph such as the timeline volume evolution representation (the levels are shown in dB). The correct representation of the volume evolution takes place when this option is checked. When it isn’t, the program simply connects the nodes with a straight line, which is not how the volume actually evolves between the nodes. Un-checking this option speeds up the drawing of the timeline window and may render the volume representation more clearly, although less correctly.
Audio Conversion
WAV to MP3 Conversion
MP3 (which stands for MPEG Layer 3) is a standard compressed audio format that guarantees high sound quality while obtaining very high compression ratios. Depending on the chosen bit rate, compression ratios up to 1:10 can be achieved with an almost inaudible (at least to a non-audiophile’s ears) loss of quality. This makes this format ideal for distributing audio files over the Internet or in any situation when the size of regular WAV files will make their transmission impractical.
On the other hand, MP3 is always a lossy compression, so it isn’t suited for storing audio data when the sound quality must be kept as high as possible. For this reason (and also because on-the-fly decompression of MP3 files will be way too heavy on the computer’s CPU) n-Track Studio doesn’t support MP3 file format for recording or importing tracks. It only allows conversion from finished WAV files (i.e. created after mixing down) to MP3. To listen to the MP3 file you’ll need an MP3 player, such as Winamp.
For the actual MP3 encoding, n-Track uses the free, open-source LAME encoder. You can download the LAME encoder from the n-Track website; the first time you run File/Convert WAV file/To MP3, the program will ask you to specify the location of the file “Lameenc.dll.”
Determine the sound quality of the converted MP3 by changing the LAME “Mode” options using the drop-down menu:
Constant Bitrate
The converted MP3’s bitrate will be the same across file. Use the slider to set the bitrate from 32 to 320 kbps. The higher the bitrate, the better the sound quality, and the larger the MP3.
Variable Bitrate
The MP3’s bitrate will change depending on how much audio data the signal contains at any given point in time. Set the quality of the converted file using the “Quality” and “Bitrate” sliders; use the “Max” slider to set an upper limit for the bitrate.
Average Bitrate
LAME will encode the MP3 so that its bitrate averages out to a specified quality level. Use the “Average” and “Max” sliders to set the bitrate parameters.
Stereo Mode
Choose from normal Stereo (higher quality) and Joint Stereo (lower quality).
WAV to WMA Conversion
Converting WAV files to WMA format is useful for distributing audio files over the Internet or in any situation when the size of regular WAV files will make their transmission impractical. WMA files contain audio data that is compressed using a high-quality lossy audio compression scheme (codec) called the Windows Media™ Audio codec. WMA files can be significantly smaller than MP3 files of comparable audio quality.
To convert to WMA, select File/Convert WAV file/To WMA (Windows Media Audio), then set the encoding options:
Format
selects the output file format. Higher values for the bitrate and the sampling frequency will generate bigger but better-sounding files.
Attribute
select the attribute you want to set and enter the corresponding text in the edit box. The attributes you set will be visible when opening the file with a compatible player.
Multiple conversions can be executed simultaneously by the program, and normal program operation can continue during the conversion(s).>
Playing WMA Files
A number of players support the WMA standard, including Winamp v2.5 and later and the newest Windows Media Player. If you attempt to play a WMA file in an older version of Windows Media Player, the player will recognize the new file type and will automatically download the appropriate codec from the Internet.
Ogg Vorbis Conversion
Ogg Vorbis is a non-proprietary standard for audio file compression. Although not as popular as MP3, it is rapidly gaining acceptance and support from audio software, as it’s currently considered the best audio format in terms of achieving the best sound quality for a given file size.
Most current audio players, such as Winamp, can play .ogg files.
More information on Ogg Vorbis can be found at Xiph.org.
n-Track Studio can convert WAV files to the Ogg Vorbis format with the File/Convert WAV file to/Ogg Vorbis menu command. It also uses Ogg Vorbis for compressing audio data saved in packed song files (.sgw), and can import .ogg files into the current project using the Import WAV file command in the Track menu.
Sampling Frequency Conversion
This option allows changing the sampling rate of audio files; you can run this conversion by selecting File/Convert WAV file/Change sampling frequency. The program will also automatically ask to convert the sampling frequency if you try to import a WAV file with a sampling frequency different from the working frequency (as set in the Settings/Preferences/Recording settings dialog box), or if, when doing a mixdown, you select a sampling frequency different from the working frequency.
File to convert
The file to be converted. You can browse for the file clicking on the browse button. Multiple files can be selected.
Replace existing file
Change the original file sampling frequency. The change will generally not be undoable. If you’re lowering the sample frequency, a subsequent increase in the sampling frequency will not restore the file as it was before the first conversion. This happens because when lowering the sample rate the signal is low-pass filtered to avoid a phenomenon called aliasing. For example, when converting a 44100 signal to 22050 Hz, all the frequencies in the 11025-22050 range will be eliminated.
Create a new file
Create a new file with the desired sampling frequency leaving the original file untouched. When multiple source files are selected the program will automatically generate the name of the converted file appending to the original name the new sampling frequency (for example converting the file named “guitar.wav” to 32000 Hz frequency the resulting filename will be “guitar_32000.wav”.
New sampling frequency
The sampling frequency you want the file to be converted to. Any integer number can be specified. The most common sampling frequencies are listed in the box to the right of the sampling frequency text box.
New bit depth
Bit depth of the converted file. If you intend to apply further processing to the converted audio file, the 32-bit format guarantees the greatest possible quality.
Sometimes WAV files get corrupted following hardware (hard disk) or software (file system, Windows crash, program crash etc.) failure. The File/Convert WAV file/Recover .wav file from raw audio data command allows you to try recovering the audio data from a WAV file whose headers (i.e. the beginning of the file which contains information about the file format) have been somehow corrupted.
In order to restore the WAV file headers, n-Track will ask you to manually specify the format that the wav file uses, including the file’s sampling frequency, sample format (16 bit, 24-bit, etc.) and number of channels. If you don’t know or remember which format the WAV file is supposed to have, you can try going by trial and error. Start trying each of the bit formats. If you select an incorrect bit format, the resulting WAV file will play as pure digital noise. If the recovered WAV file resulting is too slow or too fast, an incorrect sampling frequency or number of channels might have been specified.
Warning:
Playback of a recovered WAV file that has been unrecoverably corrupted or that has a bit format different from the one you specified will result in a very LOUD noise which may hurt your ears and damage the speakers.
The Audio data starts N bytes from the beginning of file parameter should typically be left at the default setting, particularly for files originally created by n-Track. If you change the setting, you should change it by a multiple of the file sample size. For example, a 16-bit mono WAV file has a sample size of 2 bytes. Increasing the Audio data starts… parameter by 1 will result in all the file samples being shifted by 1 byte, resulting in pure noise. Likewise, if the format is 16-bit stereo (2 channels), shifting by 2 bytes will result in the file’s left and right channels being exchanged.
Technical Information
Appendix
Frequently Asked Questions
The latest updated version of the FAQ can be found at:
Unlocking all the features otherwise locked in the evaluation version
Free upgrades to all n-Track Studio 10.x versions
Unlimited email technical support
30-day money back guarantee
Purchasing options:
Credit card / PayPal
You can purchase and immediately receive the full version of n-Track using a Credit Card with the option of making the purchase online over a secure web server.
Clicking on the “Buy n-Track Studio” button in the “About” dialog box or select “Buy n-Track Studio” from the Help menu will open the purchase page.
Immediately after completing the order you’ll receive an email with instructions on how to activate the full version of n-Track.
If you have any questions before or after purchasing n-Track please contact us via our support page.
Thank you for purchasing n-Track, your purchase will help support the development.
Upgrading to n-Track Studio 10
Registered n-Track Studio users can upgrade to n-Track v10.x at https://ntrack.com/upgrade.
If you have a current subscription or purchased n-Track Studio on or after the 29 November 2022, the upgrade to 10 is free (please contact us if you have not already received the upgrade information).
Benefits of registering n-Track:
You’ll receive the codes to register the shareware version of the program, removing all limitations and nag screens
You will get free upgrades to all n-Track Studio 10.x versions
Being a registered user you can ask for technical support any time
Purchasing options:
Credit card / PayPal:
You can purchase and receive the full version of this program using a credit card over a secure online server.
Connect to https://ntrack.com/upgrade to purchase the upgrade.
Thank you for purchasing n-Track, your purchase will help support the development.
License
All copyrights to n-Track Studio are exclusively owned by the author - Flavio Antonioli.
Anyone may use this software in evaluation mode during an evaluation period of 40 days. Following this test period of 40 days or less, if you wish to continue to use n-Track Studio, you must purchase.
Once purchased, the user is granted a non-exclusive license to use n-Track Studio on one computer, for any legal purpose, at a time. The program can be installed on multiple computers belonging to the same person, but can actually be used by one person at a time per license. If more than one person needs to use the software at the same time additional licenses must be purchased.
The purchased n-Track Studio software may not be rented or leased, but may be permanently transferred, if the person receiving it agrees to the terms of this license. If the software is an update, the transfer must include the update and all previous versions.
The n-Track Studio evaluation version, may be freely distributed, provided the distribution package is not modified. No person or company may charge a fee for the distribution of n-Track Studio without written permission from the copyright holder.
n-Track Studio is distributed "as is". No warranty of any kind is expressed or implied. You use at your own risk. The author will not be liable for data loss, damages, loss of profits or any other kind of loss while using or misusing this software.
All rights not expressly granted here are reserved by Flavio Antonioli.
Installing and using n-Track Studio signifies acceptance of these terms and conditions of the license.
If you do not agree with the terms of this license you must remove n-Track Studio files from your storage devices and cease to use the product.
Thank you for using n-Track Studio, Flavio Antonioli.
Glossary of terms
Audio Interface
a soundcard which, not being attached to the computer PCI bus, is no longer a ‘card’, but is still the device responsible for audio input and output. Some audio interfaces are made of an internal card and an external break-out box attached to the internal card via a proprietary cable. The term is generally used as a glorified term for soundcard.
Comping
the process of combining different takes into a single track, selecting the best portions of each take.
MIDI
a standard mechanism for digital representation and transmission of musical information. A MIDI track represents music as a sequence of events, as opposed to an audio track, which represents music as the digitized acoustic signal as detected by a mic or other device.
Soundcard
the device attached to the computer (via USB, Firewire, PCI or the motherboard) that is responsible for capturing and digitizing the audio input signal and sending the audio output generated by the computer to external devices such as speakers or mixing consoles.
Take
an attempt at recording a particular track, or musical part. In the process of recording a song, multiple takes are recorded, then the best one is selected to be part of the final version of the song, while the other takes are discarded.
The n-Track Mixing Algorithm
The n-Track mixing algorithm is conceptually very simple: the tracks are first fed through the inserts effects and then mixed together, each one amplified by a factor resulting from the combination of the master volume, the track volume slider and the track envelopes. The volume evolution is used at the very ending of the mixing process so it doesn’t influence the aux sends, even if the “pre-fader sends” option is unchecked. After the tracks are mixed, everything goes to the master channel effects. Sends and returns are placed at different points depending on the Aux dialog settings.
Audio engine vs audio device bit resolution
The format of the input or output (16- or 24-bit) has no influence on the precision with which n-Track performs internal signal processing calculations. The program always uses 32-bit (or 64-bit if the Settings → 64 bit mixing option is selected) floating point signals for optimum sound quality and dynamic range.
Fine-Tuning the Program to Your System
There are a number of settings you can customize to make the program work better with your computer. You can alter some parameters to make the program more or less “heavy” on the computer CPU, so that if you have a slower CPU you can use the program without problems.
Experiment with different playback buffering settings to find the optimum compromise between reliability and “real-timeness” of the program’s operation: fewer buffers of a smaller size will allow the result of actions made during playback, such as altering the volume, pan, or effects parameters, to be audible in less time. Low buffering can, on the other hand, lead to occasional jumps in the playback and loss of sync which can be very disturbing if they happen during recording. Consider keeping the buffering heavy during recording, then, during the final mixing phase, when real-time response is more important, using smaller buffers.
One strategy for working with a great number of tracks is to mix down a partial version of the song.
Suppose your system can’t seem to handle more than 8 tracks: you can record the first 8 tracks, adjust the settings and mix them down to a single audio file without deleting the original audio files. Then you record the next block of tracks using the partially mixed down file as the base. Once all tracks have been recorded, you can reload all the audio files that were previously mixed down, adjust all the settings and mix down all the original tracks into the final song.
Enabling RT kernel realtime audio engine on Linux
n-Track Studio supports real-time priorities on Linux, to improve performance when using low audio latency. On most common Linux distributions such as Ubuntu the real-time priorities are reserved to root users. You can however enable them also for regular users.
To enable real-time priorities (ulimit -r) for a non-root user on a Linux system, you need to adjust some configuration settings to allow the user to modify the real-time priority limits. Here's a step-by-step guide on how to achieve this:
1. Edit /etc/security/limits.conf
This file controls user limits in terms of resources (including CPU, memory, and process limits). You can set the limits for specific users or groups.
Open the file /etc/security/limits.conf for editing with a text editor (like nano or vi):
sudo nano /etc/security/limits.conf
Add the following lines to specify the real-time priority limits for your user. Replace username with the actual username of the non-root user you want to grant real-time priority permissions:
username   soft   rtprio   99
username   hard   rtprio   99
soft sets the soft limit (the limit that can be increased by the user up to the hard limit).
hard sets the hard limit (the absolute maximum allowed by the system).
rtprio is the real-time priority, which controls the priority for real-time scheduling policies.
99 is the limit for real-time priorities. The range for rtprio is usually from 1 (lowest) to 99 (highest). You can adjust this value as per your needs.
For example, if you want to give a group of users access, you can specify a group instead of a single user:
@groupname   soft   rtprio   99
@groupname   hard   rtprio   99
If you're using a Debian-based system (such as Ubuntu), you may also need to ensure that the PAM limits module is enabled, which enforces the limits set in /etc/security/limits.conf.
Open the /etc/pam.d/common-session file:
sudo nano /etc/pam.d/common-session
Make sure the following line is present:
session required pam_limits.so
This ensures that limits configured in /etc/security/limits.conf are applied to sessions.
3. Modify /etc/systemd/system.conf (for systems using systemd)
If the system is using systemd, you also need to ensure that the real-time priority limits are not being restricted by systemd settings.
Open /etc/systemd/system.conf for editing:
sudo nano /etc/systemd/system.conf
Make sure the following values are set, or adjust them accordingly to allow non-root users to access real-time priorities:
DefaultLimitRTPriority=99
This setting allows processes spawned by systemd to have the specified real-time priority.
4. Restart the System or Session
After making these changes, you may need to restart your system or re-login for the changes to take effect.
To apply the changes to your current session, log out and log back in.
Alternatively, restart the system:
sudo reboot
5. Verify the Changes
Once you've made these changes, you can check the real-time priority limits for the user by running:
ulimit -r
This should return the real-time priority limit you've set for the user. The user should now be able to set real-time priorities for their processes up to the specified limit.
Important Notes:
Allowing real-time priorities can affect system performance. Be cautious when increasing the rtprio limit or setting the Priority inside the n-Track preferences box, as real-time processes can potentially monopolize system resources if not properly managed.
The user still cannot exceed the hard limit for rtprio, which is enforced by the system.
Windows default Sample Rates
Note:
The following applies when using n-Track on Windows with MME audio drivers or Wasapi audio drivers in shared mode. It doesn't apply when using WDM, WaveRT, Asio audio drivers or Wasapi audio drivers in exclusive mode.
Some Windows systems are configured to have two different sampling frequency default values for audio input and output. In these cases, you could experience slight drifts or sync issues between your playback and recording. If n-Track detects this, it should warn you when starting up.
To fix the issue, you must manually change your hardware's input and output sampling frequency settings.
Open the Windows Control Panel, and select 'Hardware and Sound'.
Next, select 'Sound', and open the 'Playback' tab. Now double click on the audio device or sound card you're using (if you didn't select any in the n-Track Settings -> Audio devices box n-Track will be using the default Windows audio devices)
You'll find the Sample Rate settings in the 'Advanced' tab. Repeat the steps for the 'Recording' tab, and make sure the two Sample Rate values match. Common values that are widely supported by audio devices are 44100 Hz and 48000 Hz
Pan Law
The pan slider popup menu shows the 'Pan law' settings.
In the upper part of the menu you can choose which pan law to use:
Legacy:
the pan law used by earlier versions of n-Track: when a track is panned to one side the other side's volume is decreased without increasing the volume of the side you pan to.
Constant power:
as you pan from center to one side, the volume of the side you're panning to is gradually increased until it reaches +3dB.
Linear:
as you pan from center to one side, the volume of the side you're panning to is gradually increased until it reaches +6dB.
Custom:
same as 'Constant power' and 'Linear', but you can specify the dB level the volume is increased by.
Independent left/right:
on stereo tracks, activating this option replaces the pan slider with two sliders, each one independently controlling the pan of the left and right channels - just as if they were two separate mono tracks.
Boosted side:
available using all pan modes except for 'Legacy' and 'Independent left/right'. When this option is checked, the volume of a track that has the pan slider centered is at 0dB. When 'Boosted side' is unchecked, the volume of a centered track is at the dB level corresponding to the pan law in use. For example, if the pan law is set to 'Linear', the volume will be -6dB.
Working with Surround
You can use n-Track to mix songs in a surround format or to create a surround-sound soundtrack to a video. n-Track supports all popular surround formats, including 5.1, 6.1 and 7.1. The majority of film and audio DVDs use the 5.1 format.
To create a surround project:
Select the Settings/Audio devices menu. Make sure that the desired physical output channels are selected in the box that appears. If you select a multichannel Wasapi, WDM, WaveRT or Asio audio output driver, select the Settings/Soundcard settings/Playback format menu command, click on Select I/O channels and make sure that all the desired outputs are active
Select an audio track. Right-click on the audio track and select Surround from the pop-up menu. The track will automatically be sent to the Surround Main output.
Right-click on the circular surround pan control that has been added to the track mixer strip. Click on the surround format name (for example “Surround 5.1”) in the upper right corner of the surround pan window. The surround configuration dialog box will appear, allowing you to select the desired surround configuration (5.1, 7.1, etc.), which surround channels go to which physical audio outputs and the order of the various surround channels (the central channel is usually the 4th channel, but since your setup might be different, you can use the up/down buttons to change the relative ordering of the channels). You can modify the surround configuration even after you have started working on the project.
The Surround Main output is a virtual channel that maps to the actual physical output channels according to the current surround configuration.
Surround effects plug-ins can be applied on Surround Group channels: select a surround track, right-click on it and select “Send to a new group” from the pop-up menu. A new group channel will be added to the mixer.
Effects applied to the surround group channel will need to be able to process surround signals (i.e. regular mono or stereo effects will not work or will not produce the expected results).
When the project is complete, you can create a single mixed down audio file:
Select the Mixdown command from the File menu
Click on the More options button
Select Single multichannel audio file from the output format drop-down list in the lower right corner of the window
Surround Formats
The most common surround format is 5.1. Increasingly common formats are 6.1 and 7.1. The 5.1 format is the standard multichannel audio format for movie DVDs. Audio on video DVDs are usually encoded in either Dolby Digital or DTS compressed formats. Multichannel compressed formats allow you to store 6 channels of audio data in less space than 2 channels of uncompressed audio data, such as the uncompressed format used in audio CDs.
The output of a surround project created with n-Track will be in uncompressed PCM WAV format. The mixdown audio file will need to be imported into a DVD-authoring program that will use it to create the audio track of a DVD by encoding it to a multichannel compressed format.
The basic version of both Dolby Digital and DTS allow up to 5.1 channels. Extended versions of both standards, named Dolby Digital EX and DTS-ES, allow the encoding of 6.1 channels.
The “.1” in a surround format specification stands for the LFE channel. LFE is an acronym for “Low Frequency Effects.” In contrast to the main channels, the LFE channel contains only low frequencies below 120 Hz. The LFE channel is used to drive the sub-woofer, which is used in all home-theater speaker systems.
One of the main reasons why the LFE channel has been added to Dolby Digital and other multichannel digital standards is for compatibility with legacy analog film audio formats. LFE channels were used in analog film audio for technical (unburdening the main channel tracks from the distortion easily caused by heavy bass signals) and economical reasons (eliminating the need to install expensive analog cross-over filters to separate the signal going to the subwoofer and to the main speakers) that don’t matter in the digital world.
Some confusion usually arises between the concepts of LFE channel and subwoofer. The subwoofer is typically used for the reproduction of both the low frequency content of the signal of the main channels (left, central, right, surround left, etc.) and for the reproduction of the LFE channel. On many small home theater setups, the speakers can’t reproduce low frequencies, so the home-theater amplifier divides the signal of each of the main channels, sending the high frequency content to the corresponding main channel speaker and the low frequency content to the sub-woofer.
It follows that you don’t typically have to do anything to have a signal go to the subwoofer. You can totally ignore the LFE channel and the sub-woofer will still play powerful bass sounds according to the bass content of the main channels. The LFE channel allows for extra control and separation of bass sound effects. LFE content is typically present in movie soundtracks only during scenes containing sounds such as explosions, airplane engine noise, etc.
It’s generally believed that human ears can’t detect the spatial origin of a bass sound. That’s the reason why, in home-theater speaker systems, the sub-woofer’s position in the room is considered irrelevant. Accordingly, the n-Track surround panner doesn’t place the LFE channel as a speaker in the virtual room shown in the panner screen. The LFE channel has a separate slider that controls how much of the source signal goes to the LFE channel.
Creating a Surround DVD
The mixdown created with n-Track can be used to create a DVD that will play on standard DVD players connected to a home theater speaker system.
A very high-quality audio standard (24-bit 192 kHz) exists for audio-only DVDs. Unfortunately, the DVD-Audio standard is not yet widely used, and only a minority of DVD players can play DVD-Audio discs. An alternative way to create audio-only DVDs is to create regular video DVDs with no video (or just a static background image). Although the audio quality will not be as good as with DVD-Audio, the discs will be playable on any standard DVD player.
Audio on standard video DVDs is typically encoded in Dolby DigitalTM AC3 format. Third-party software that can be used to convert the n-Track mixdown to an AC3-encoded file includes:
The resulting .ac3 file can be imported into a DVD authoring program to create and burn the actual DVD.
Some DVD authoring or Dolby DigitalTM AC3 encoder programs require a single .wav file as input for each of the surround outputs. You can create single WAV files for each output by selecting the Two mono WAV files for each output option in the mixdown dialog box.
Customizing the Program
The colors and fonts used by the program can be configured through the Preferences/Appearance/skins or simply settings/skins
Bug reports, suggestions and comments are welcomed and will help in developing better versions of the program. If you are submitting a bug report or reporting a problem you are facing using the program, please check if you can find an answer to your problem in the F.A.Q.
Also, check if you are running the latest version of the program. If not, check the version history web page to see if the problem may have already been fixed.
If none of this helps, please contact us using the support form at https://ntrack.com/support.php.
Please include in your message as much information you know about your system:
The exact version of the program you have installed
Hardware configuration details (processor, memory, hard disk(s) and especially soundcard(s))
Software configuration (including the operating system you’re using)
Sync & Lag Issues
With some soundcards, new recordings don’t sound perfectly in sync with the previous tracks because of the inability of the soundcard to start the recording and the playback at the exact same time. If you notice a sync problem in which recorded tracks are constantly (i.e. with equal delay during the whole length of the recording) too early or too late with respect to existing tracks in the song, you can use the Offset recording by parameter in the Settings/Audio devices/Advanced dialog box to compensate for the problem. Use a negative value if the new tracks sound delayed or a positive value if new tracks sound too early (the program will shift new tracks to the right by the amount specified; if the compensation is negative, the shift will be towards the left). The default value of 0 will work on almost all systems.
Usually, there’s no need to worry about the compensation settings, so read this only if you can hear a shift between the recorded tracks. If you experience sync problems try unchecking both the Preferences/Options/Use system timer for checkboxes, then set the Preferences/Recording settings/Hide lag indicator... parameter to 1.
During a recording, notice the value that appears near the "lag" label on the time window on the program’s toolbar. If the lag value is constant throughout the duration of the recording, you can compensate for it using the compensation setting discussed above. If the lag value grows constantly during the recording, the problem is most likely caused by the soundcard sampling frequency not being perfectly constant or by a difference in the soundcard’s recording and playback sampling frequencies. When this occurs, the problem can’t be fixed using the compensation parameter and the program may not work properly, so it may be necessary to use a different soundcard.
Note: the lag values reported are based on the recording and playback position information reported to the program by the soundcard. This information may be incorrect so it may lead to think that sync problems exist while it’s just that the recording and/or playback times are being reported incorrectly. It’s very important to double check with your ears if the lag values reported make sense.
Feedback & support
Please let us know if you have comments or bug-reports about n-Track Studio. We are continually working on improving n-Track and your feedback is greatly appreciated.
I have problems with garbled or distorted audio, or I get errors opening the audio device
If you hear distorted, noisy or corrupted audio, it probably means that n-Track is not being able to communicate with the audio hardware device correctly. That's typically a configuration issue.
Likewise if you get an error opening the audio device, it probably means that the audio format selected in the Settings is not supported by the device's builtin audio device or to the external device that you may have connected.
To try to fix the issue, open the Settings box tapping on the home button in the lower right, then selecting the gear icon in the top left. When you're inside the Settings:
Select the Use recommended audio settings option in the Settings box
Try unchecking the Enable low latency performance mode option
Please try restarting the app:
press the multitask button in the lower Android toolbar
swipe over the n-Track app to kill it
open the app again
Try terminating all the apps that may be accessing the speaker or microphone.
Try to temporarily disabling the always-on Google Voice Assistant. The Google Assistant needs to always record from the mic in order to respond to the Hey Google command. On some devices the Google Assistant access to the audio device may interfere with n-Track's recording. To temporarily disable the voice assistant:
open the Google app
select Settings
select Voice
select Voice Match
disable Hey Google or Ok Google
The details of the steps above may change slightly from device to device.
Try restarting the device.
If the sampling frequency drop-down in the Settings box shows multiple frequencies available, try switching between 44100 and 48000 hz sampling frequency.
Change the 'Mic level preset' setting to 'Default' or 'High quality'
If the audio is distorted or glitchy, try increasing the "Buffer size" and "Number of buffers" settings.
Try switching between AAudio and OpenSLES device drivers in the Settings box.
Please try this recommended configuration:
open the Settings box
select AAudio drivers for input and output
make sure that the 'Use recommended audio settings' checkbox is checked
uncheck 'Auto-tune buffers'
set 'Number of buffers' to 3 or 4
check 'Reserve CPU for audio'
What is the recommended configuration for low latency?
Please try this recommended configuration:
open the Settings box
check the Enable low latency performance mode option
if you're using Android 8.1 or later select AAudio drivers for input and output
make sure that the Use recommended audio settings checkbox is checked
uncheck 'Auto-tune buffers'
set Number of buffers to 2 (OpenSLES), 3 or 4 (AAudio)
check 'Reserve CPU for audio'
With some devices checking Enable low latency performance mode causes noise in the recording. If that happens, with certain devices (such as the Samsung S9) the problem is fixed by selecting "2" in the Active inputs setting.
You may also need to temporarily disable the Google Assistant.
The recorded tracks are almost silent, the recording level is too low
Android doesn't currently allow setting the mic recording volume. There are a few recording presets available that depending on the device may change the mic recording level (while also possibly changing other processing options on the mic signal such as equalization and limiting). Try switching between the available options for the "Mic/input level preset" setting in the Settings box.
When I record a new track it also ends up containing the audio from the base track(s)
Please make sure you’re using headphones while you record, otherwise the sound from the speakers will be picked up by the mic, in what is commonly referred to as bleeding. The problem may still occur to a lesser extent if you use open ear headphones and the volume is high, the mic may still pick up the signal coming out of the headphones, so if you’re using open headphones make sure that the listening volume is not too high.
If you're using a phone headset (i.e. the one with the mic along the cable, with a TRRS 4 pole jack), try using regular headphones instead (i.e. the kind without the mic), so that the device's builtin mic will be used instead of the headset's mic.
Also try switching between the available options for the "Mic/input level preset" setting in the Settings box.
If you’re using an external audio interface make sure that the mixer or cabling is configured so that the output from the audio device is not fed back into the device’s input.
I can't connect or I get errors connecting my USB device to my Android device
Compatibility with USB audio and MIDI devices on Android depends on a number of factors including both the Android device and the USB device (which must be USB Audio "class compliant").
If you get errors or the audio is not working properly make sure you try both the n-Track USB driver and the Android USB driver (n-Track asks for which driver to use when it detects the USB device). When using the n-Track USB audio driver, n-Track circumvents the Android operating system to access USB audio and MIDI devices. While that has the benefit of eliminating the typical audio latency that occurs with Android, unfortunately we cannot guarantee compatibility between all USB devices and Android devices because we are unable to test all combinations.
When you plug an USB audio device with n-Track open, you should see a prompt that asks you to select which USB driver to use. If you don't get the prompt it means that either the USB device is not USB audio class compliant, the Android device doesn't support USB audio, or that the two devices are incompatible. If you do get the prompt try to see if you can play and record audio. Experiment with both the n-Track driver and the Android driver.
If you get an error try switching buffering (number of buffers and buffer size) and/or “sampling frequency” settings in the Settings box that appears clicking on the bottom right menu button and then on Settings. Also an USB device may offer multiple streaming profiles (for example 16 bit, 24 bit, stereo, multichannel). If you have problems with one try switching between the other available profiles in the Input and Output drop-down boxes. If you get audio glitches in the playback or recording, try both bigger and smaller buffers, sometimes USB devices don't tollerate big buffers and work better with smaller buffers.
If you get a prompt to use the n-Track or the Android USB driver and you select the n-Track driver, but then you don't see the device in the audio Settings box, try to kill n-Track and restart it with the USB device already connected.
Sometimes a USB device may require more power than the Android device is able to provide. In that case you may need to use a powered USB hub between the Android device and the USB audio device.
For more info on how to connect and use USB devices with n-Track for Android please see this user guide topic
My phone is new and has a fast CPU, why I can't add many effects without hearing clicks or distorted audio?
Some of the effects included with n-Track require a fast CPU, most notably the Convolverb convolution reverb. The n-Track Reverb effect on the contrary doesn't require many CPU resources.
When the CPU is not able to handle the processing of the audio you'll start hear to hear clicking sounds or the audio becoming distorted. This happens because after say one audio buffer has been played the audio device has to wait for the device to send it another audio buffer (that the CPU is still busy preparing), so it's forced to output silence instead.
Even some fairly recent top line devices are not currently able to handle many effects simultaneously or even just one instance of Convolverb. For example in our tests the Samsung S9+ can't handle the Convolverb effect with the default Fast path audio buffering setting (when the Low latency Convolverb option is on). We found out that even though the S9+ CPU is quite fast, the device tries to aggressively reduce the CPU speed to save battery. This is called CPU power/thermal throttling, performed by the CPU Governor. Unfortunately this conflicts with high performance audio, as with audio the CPU is not used continuously but only during the audio callbacks. This makes the device think that the CPU is not being fully used so it tries to reduce the CPU speed (clock frequency) to consume less power.
If you run into this situation:
Try using a bigger audio buffer size and an higher number of buffers, as configured in the Audio Settings box
Another option is to use the Freeze or Bounce command to pre-process a track (i.e. apply effects offline, instead of during realtime playback), which does the same thing as solo-ing a track, using the Export Mixdown command to save it as a wav file and then re-importing the file into a new track and deleting the old track. The new track will now have the effect 'printed' on it so that you can remove the real-time effect
My device has multiple mics, can I record in stereo?
Depending on the device you may be able to record in stereo from the device's built-in mics:
Open the Settings box
Set Audio inputs to 2
Select Camcorder for the Mic Level Preset setting
This appears to work with recent Samsung devices. If it doesn't work try different values for the Mic Level Preset setting. Manufactures sometimes assign different meanings to the Mic Level Preset values.
Also the 2nd mic is typically designed for echo cancellation or beam-forming (i.e. to improve the audio quality for phone calls) so when both mics are used to record different channels, the result may not be optimal. For example the two mics may have different frequency responses and/or may be physically placed in a way that makes capturing the stereo recording field difficult (i.e. instead of being one at the top and one at the bottom of a phone they may both be at the bottom).
Also try using AAudio drivers:
open the Settings box
select AAudio drivers for input and output
make sure that the 'Use recommended audio settings' checkbox is checked
try switching between the available options for the Input device setting to see if one of the options allows access to two independent mics
How can I find the song files in my device storage using a third party app?
Android with version 11 and later has started blocking access to the app specific data folders from within the device. Instead of accessing the n-Track files from other apps, we recommend using the Share command from inside n-Track and then selecting the app to share the file with. If you want to export the song wav mixdown, you can use the Save Song command, then select the Share tab (as opposed to the Share button in the main lower toolbar) and select the format of the file to export.
If you need to access the n-Track song files, most file manager apps such as the built-in Files app no longer have access to the n-Track data files. To access the n-Track audio and song files externally from the app you can:
Open the device's Android Settings -> Storage -> Files -> Android -> Data -> com.ntrack... -> files
Note that the Files view in the Settings is not the same thing as the Files app.
connect the device to a PC and browse to: PC -> [Device Name] -> Phone -> Android -> data -> com.ntrack.studio...
You can also use the Android Settings -> Apps -> n-Track -> Storage page to inspect the n-Track folder total size and there you have the option to delete the whole app data folder. Note that if you clear the app storage you'll permanently loose access to the song files, audio recordings etc.
Why do I get permission erros when trying to save files outside of the app folder?
The latest versions of Android ban directly saving files most file types to folders outside an app's private folder (see answer above), which is the one that you can go to in the file browser tapping on the folder icon to open the folder picker, then tap the home icon in the upper right.
For some media files (wav, mp3, m4a) you should be able to save in the device's public music storage area. You can select the public Music storage folder in the n-Track folder picker by tapping on the home button, then tapping on the up arrow a few times until you get into the folder with the Download, Pictures, Music folders. Tap on Music, and you should be able to save a song export there. Note that Android will not allow you to save sng or sgw files there because the system doesn't recognize them as standard media files. To transfer n-Track projects to other devices we recommend using the share button in the lower right toolbar, then selecting "Share as multitrack project" and then sharing using a file sharing service such as Google Drive or Dropbox (the file will be typically too big to be sent via an email attachment).
I've just purchased n-Track Studio Pro and cannot find the songs I've recorded with the non-Pro n-Track Studio app
n-Track Studio Pro is a separate app which can be purchased as a one-off payment, as opposed to the subscription based n-Track Studio app. Since they are separate apps they don't have access to each other's files. To transfer a song between the apps:
open n-Track Studio
open the song
tap the Share button
select Share as multitrack song
select n-Track Studio Pro as the app to share the song with
Can I use the device's built-in mic when I connect my headphones?
n-Track normally uses the headphones mic when a set of headphones with builtin mic is connected. If you connect a regular playback-only set of headphones (e.g. with a 3 poles TRS jack as opposed to 4 poles TRRS connector, or generally without a mic) n-Track will record from the device's builtin mic.
When using an headset with a mic you may still be able to get n-Track to use the device's builtin mic:
open the Settings box
select AAudio drivers for input and output
make sure that the 'Use recommended audio settings' checkbox is checked
try switching betwen the available options for the Input device setting to see if one of the options allows access the device built-in mic
I can't play more than 2 keys on the screen keyboard, chords with 3 keys won't play
On some Android devices certain system wide gestures may prevent 3 or more touches to work on the keyboard. Check in the devices settings if there are multitouch gestures that you can disable and test if this fixes the issue on your device.
For example on certain Redmi/Xiaomi, Oppo and OnePlus devices the following works (with minor variations on specific devices):
Android Settings -> Additional settings -> Gesture shortcuts -> Take a screenshot
How can I import my audio files (loops, one shots etc.) into n-Track so that I can use them in my songs?
You can import your sounds into n-Track using the Import audio file command, which lets you import from the Music folder on your device.
To get to the shared storage space (where you might save files from other apps or copy files connecting the device to a PC), in the Import audio files box tap on the Home button in the top right, then tap on the up arrow in the top left a few times until you get to the folder that shows Music, Downloads etc.
To make your sound library visible in the n-Track loop browser:
Connect the device to a PC
On the PC browse to a location similar to the following (the exact path might be different depending on the device):
[Your device name] \Internal shared storage \Android \data \com.ntrack.studio.demo \files or
[Your device name] \Internal shared storage \Android \data \com.ntrack.studio.eight.pro \files
Your files will also be visible inside the n-Track loop browser in the My Folders section
How can I exit the n-Track app if I don't see the Android home button?
Exiting from fullscreen apps such as n-Track usually requires one of the following actions (the details may change slightly based on the Android version and device):
swipe twice from the bottom of the screen upwards
swipe once from the right edge of the screen towards the left and then press the back/home Android button
swipe once from the edge of the screen where the charging port is located towards the other side and then press the back/home Android button
swipe once from the bottom of the screen and then press the back/home Android button
Does the n-Track Studio Pro one-time payment app include all the sound packs?
The n-Track Studio Pro app contains the standard set of instruments also available in the Free edition. The Pro one-time purchase is essentially equivalent to the Extended subscription. To get the Suite sound packs you can get the Suite sounds bundle in-app purchase inside the Pro app which costs an additional €29, bringing the one-time payment total to approximately €58 (the exact sum may vary based on your country taxes), compared to the €5.99/month subscription price of the Suite edition.
Feedback & support
Please let us know if you have comments or bug-reports about n-Track Studio. We are continually working on improving n-Track and your feedback is greatly appreciated.


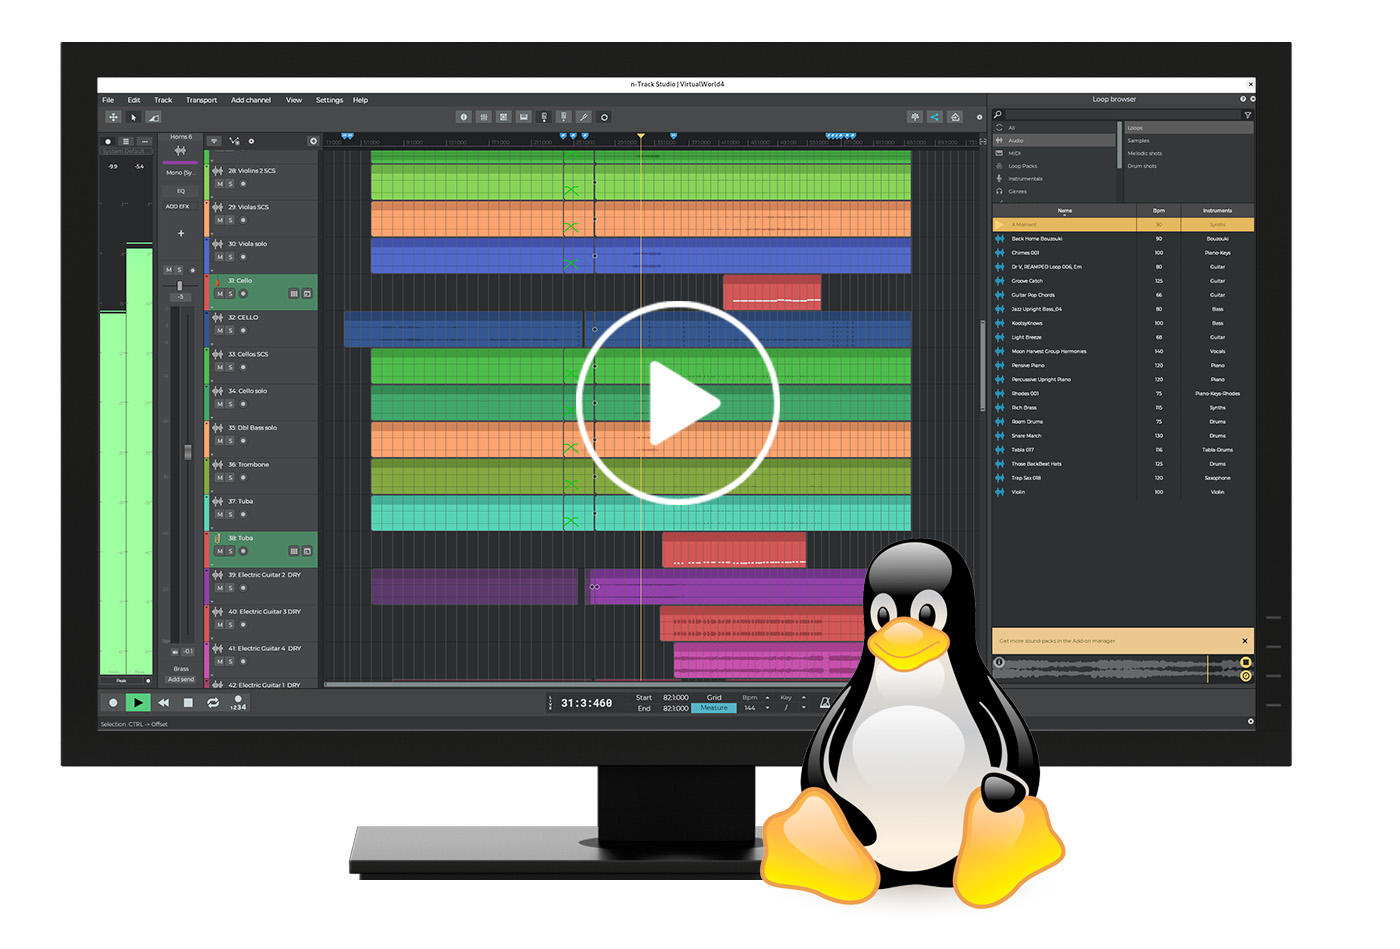
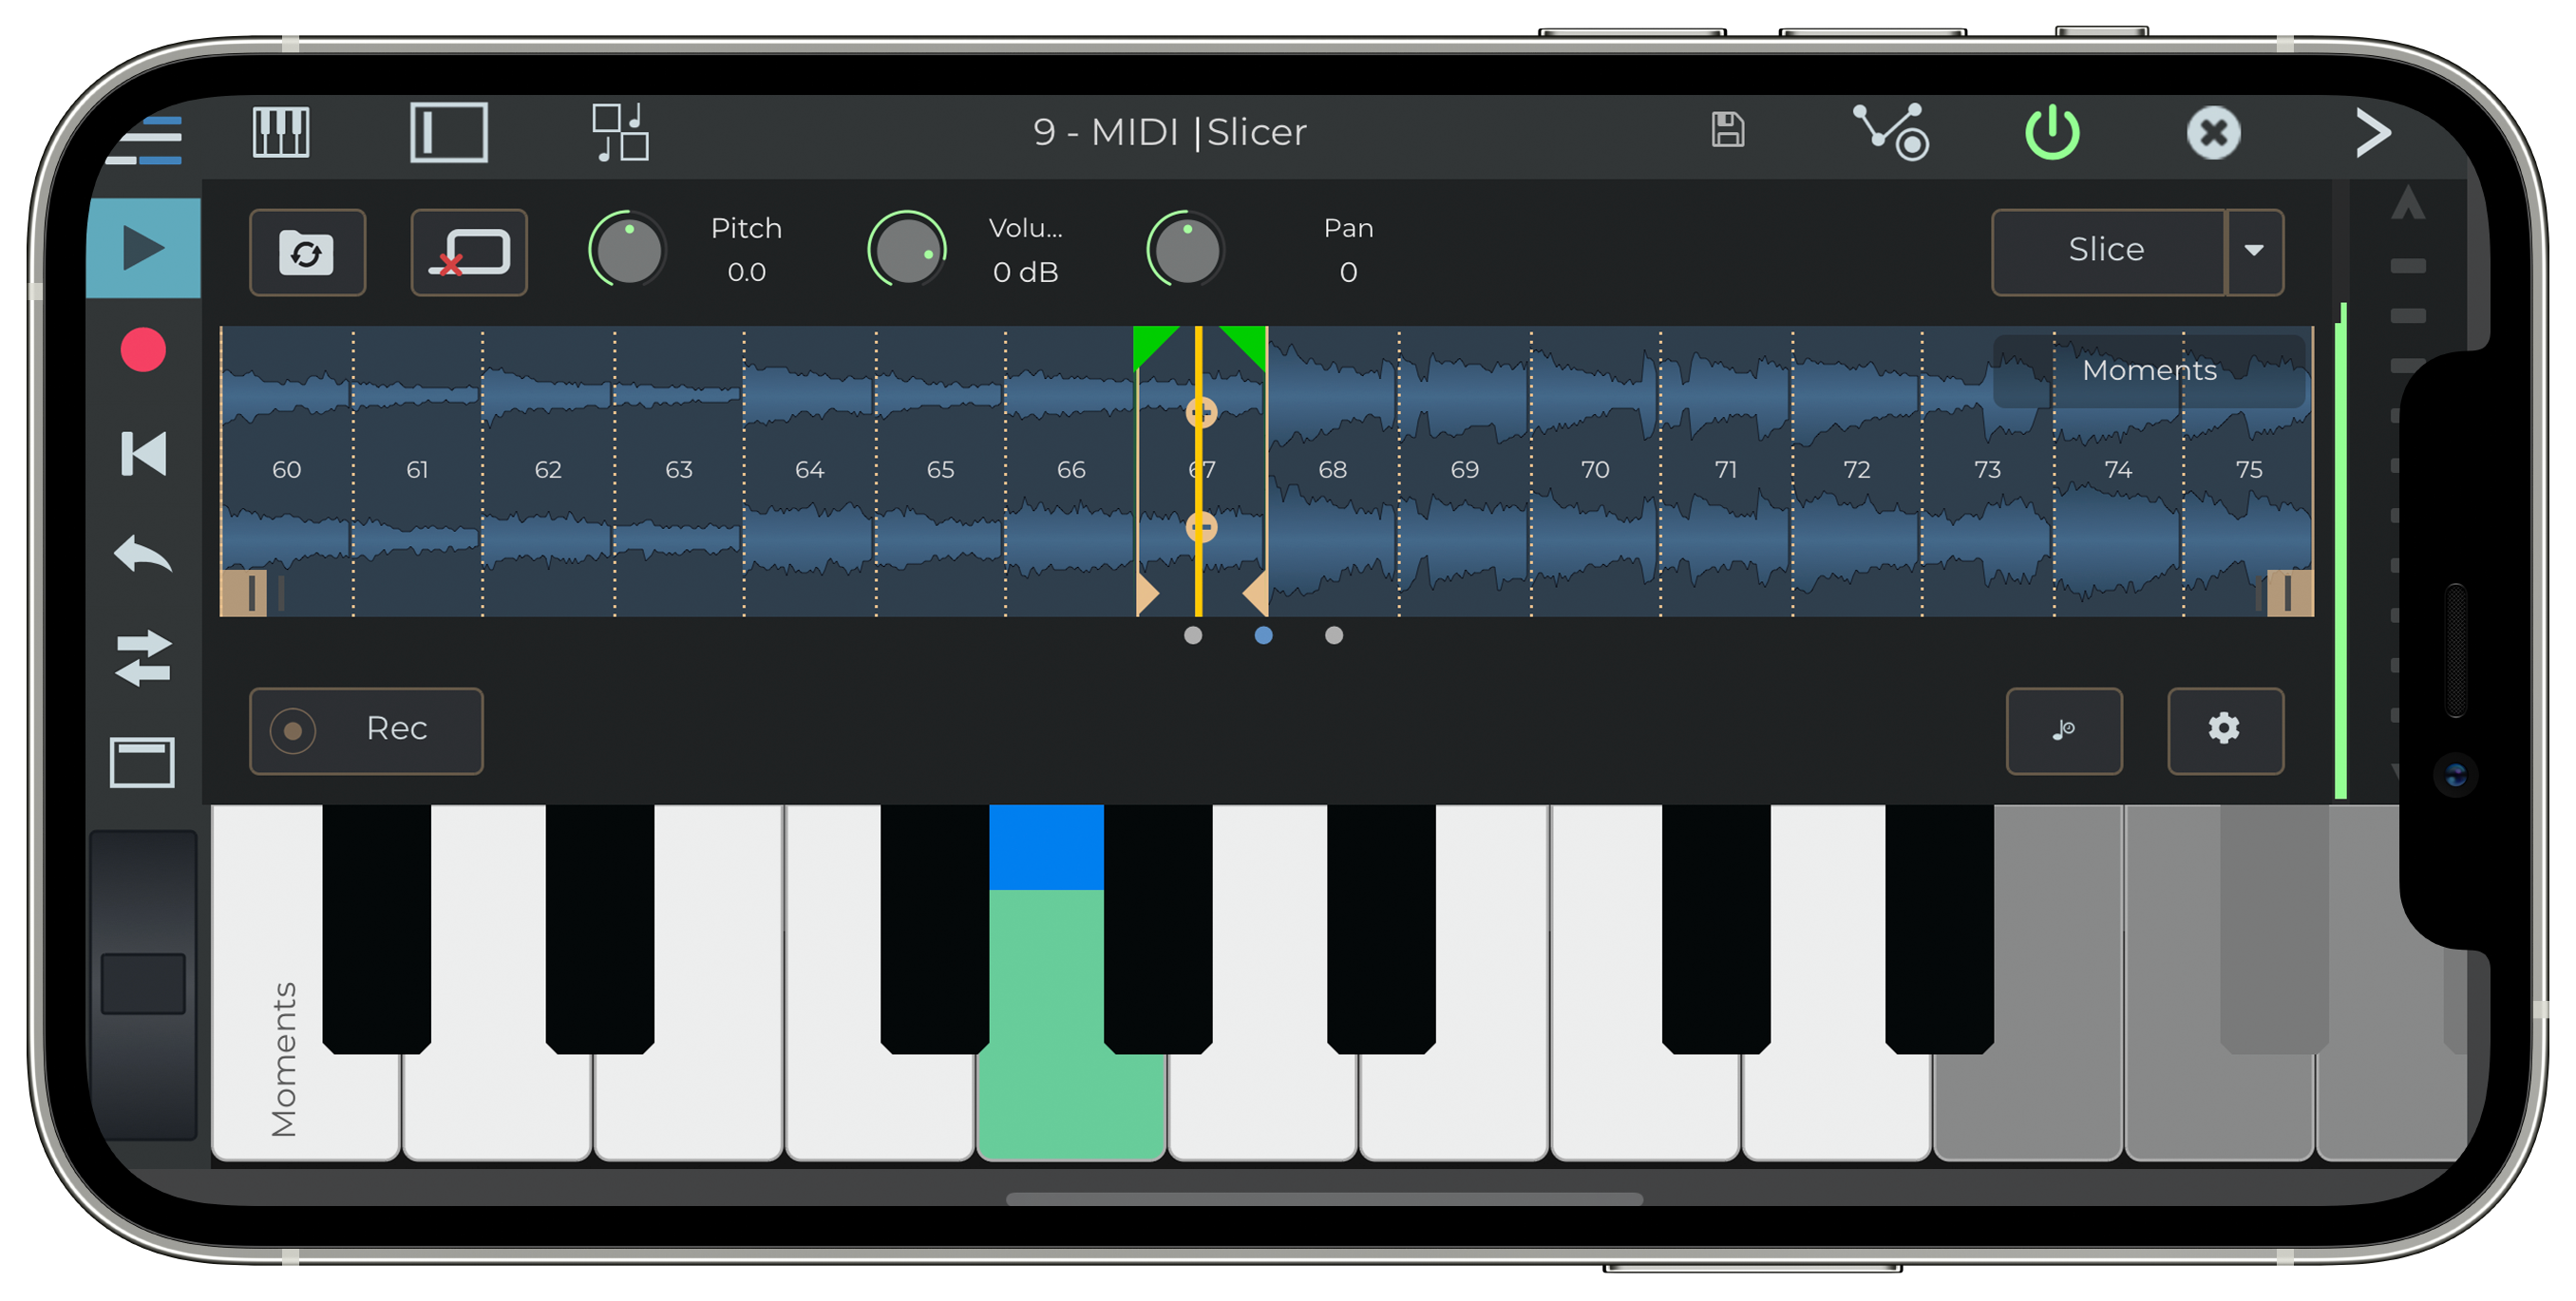


 Make sure you are ready to play and click the "Record" button again. Alternatively, you can start the playback by pressing the "Play" button and then, during playback, clicking the "Record" button to start recording at the desired point (this is called "


 button on the toolbar, let’s you add instrumental and drum MIDI and audio loops, directly into your project. In the Loop Browser, selecting MIDI —> Quick Groove lets you add a drum track, a bass track or a bass+drums track directly into your project, ready for you to jam on or start building your song.
 button on the toolbar, let’s you add instrumental and drum MIDI and audio loops, directly into your project. In the Loop Browser, selecting MIDI —> Quick Groove lets you add a drum track, a bass track or a bass+drums track directly into your project, ready for you to jam on or start building your song.


 button on the recording VU meter and select "Mono" (be sure that the vu-meter size enable you to see this icon, in case it don't, enlarge the vu-meter)
 icon in the popup window that opens. The program will ask you what you want to do with the recorded file. The safest option to select is "Recycle Bin." This sends the file to the system recycle bin, so that you’ll be able to retrieve it later if you realize that you erroneously removed a good file.
 on the toolbar, and it sounds fine.


 button on the left side of track 3, then select


 then "Show Aux channels")
 button in the guitar track's mixer section. When you click this button, n-Track will add a new aux channel to the mixer and a send section at the bottom of the guitar track's mixer strip.


 button on the track, then "Find parameter..." and select the Effect and Parameter to create an automation envelope for


 icon. Now you can design all of the track’s volume evolutions by clicking and dragging the envelope points.


 on the toolbar (right click on the toolbar then "add/remove" to add the fade out button).


 Click "Export Song" to set the audio encoding options. Selecting "Wav" and either "16 bit" or "24 bit", are industry standards. You can also choose to Export the whole song, a track selection or a chosen loop interval
 Click the "Save" button to save the mixdown. The mixdown process usually takes quite a bit less time than the actual duration of the song. If you want to hear how the mixdown audio file sounds, save your project (you should do this every time you make any important changes), then open a new project. Import the mixed-down audio file using the
 button on the toolbar and select “Destructive audio editing." Select the part of the track you want to cut out, then click on the cut
  button on the toolbar.


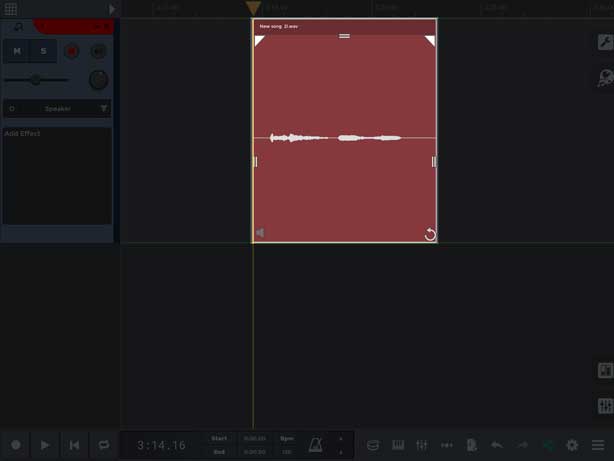


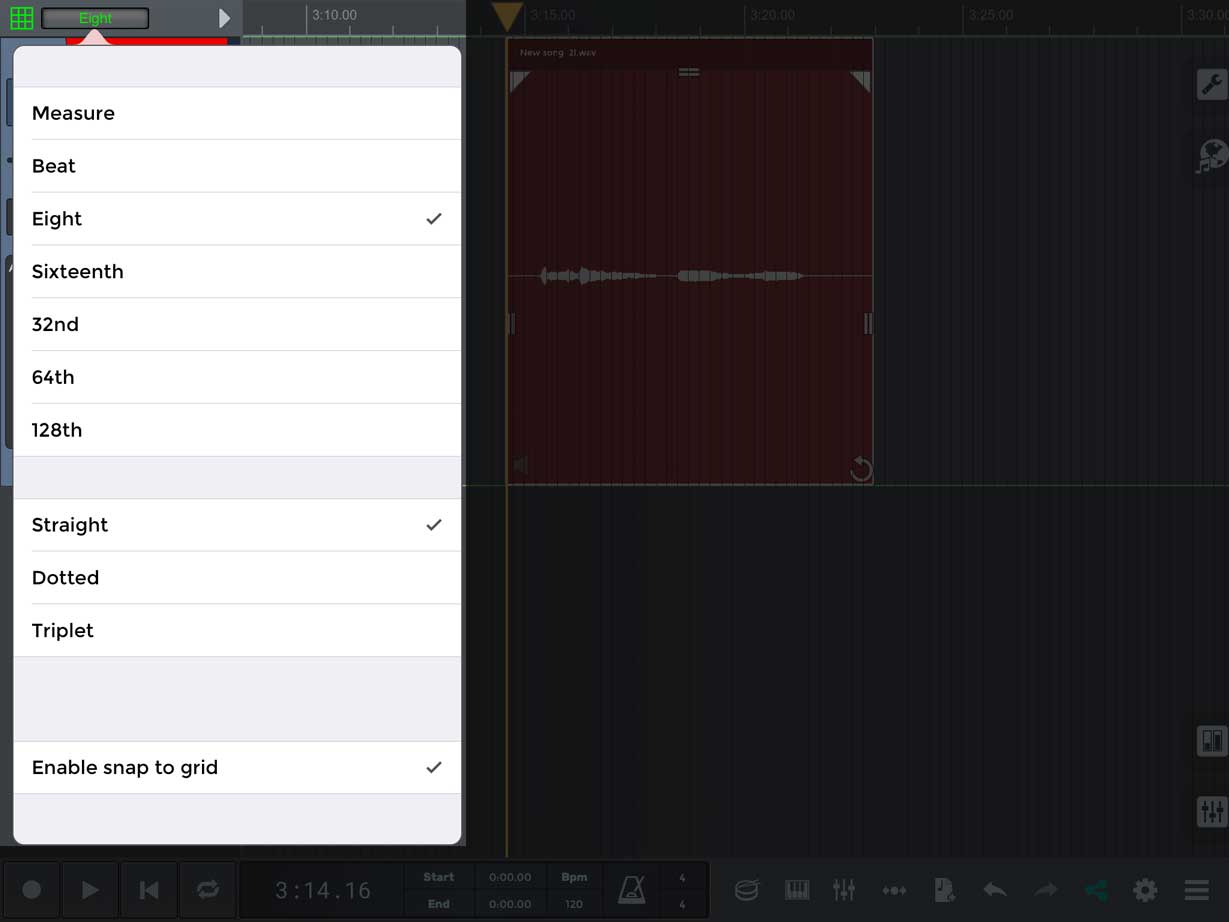


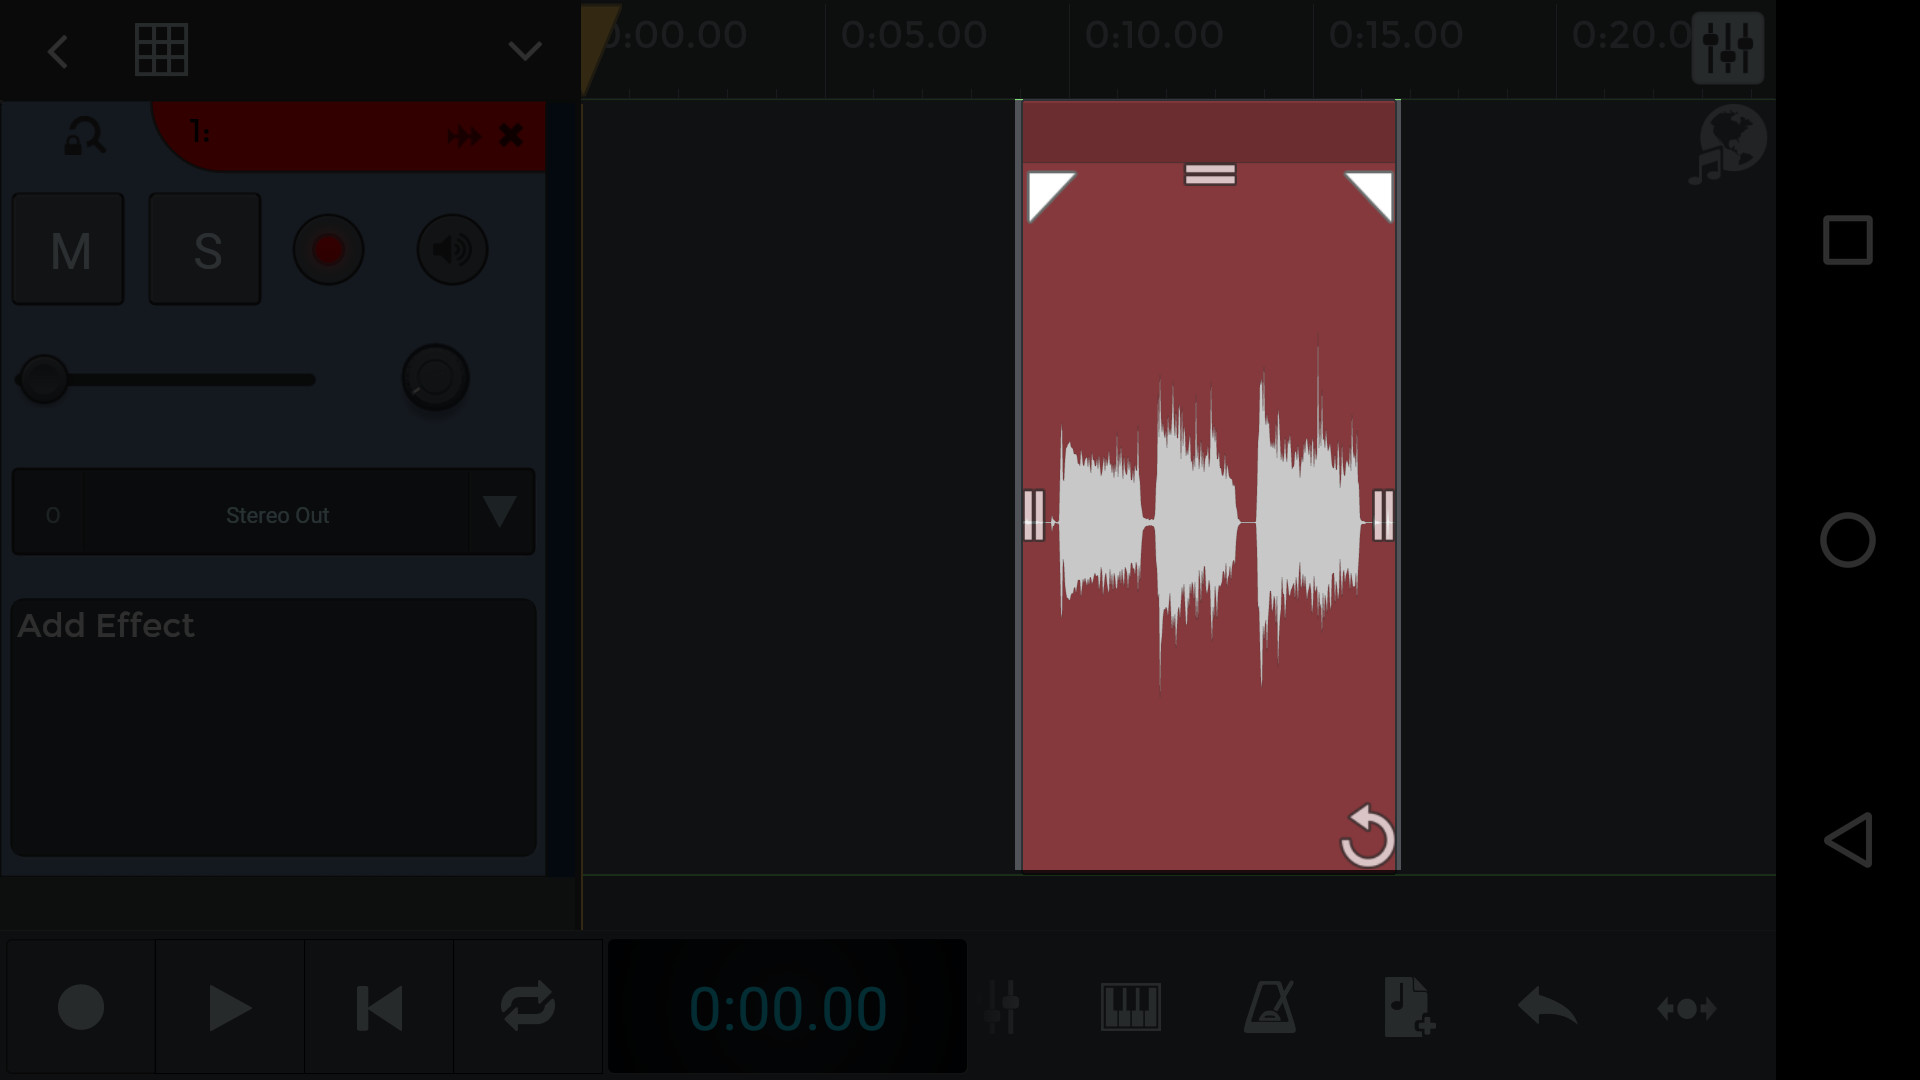


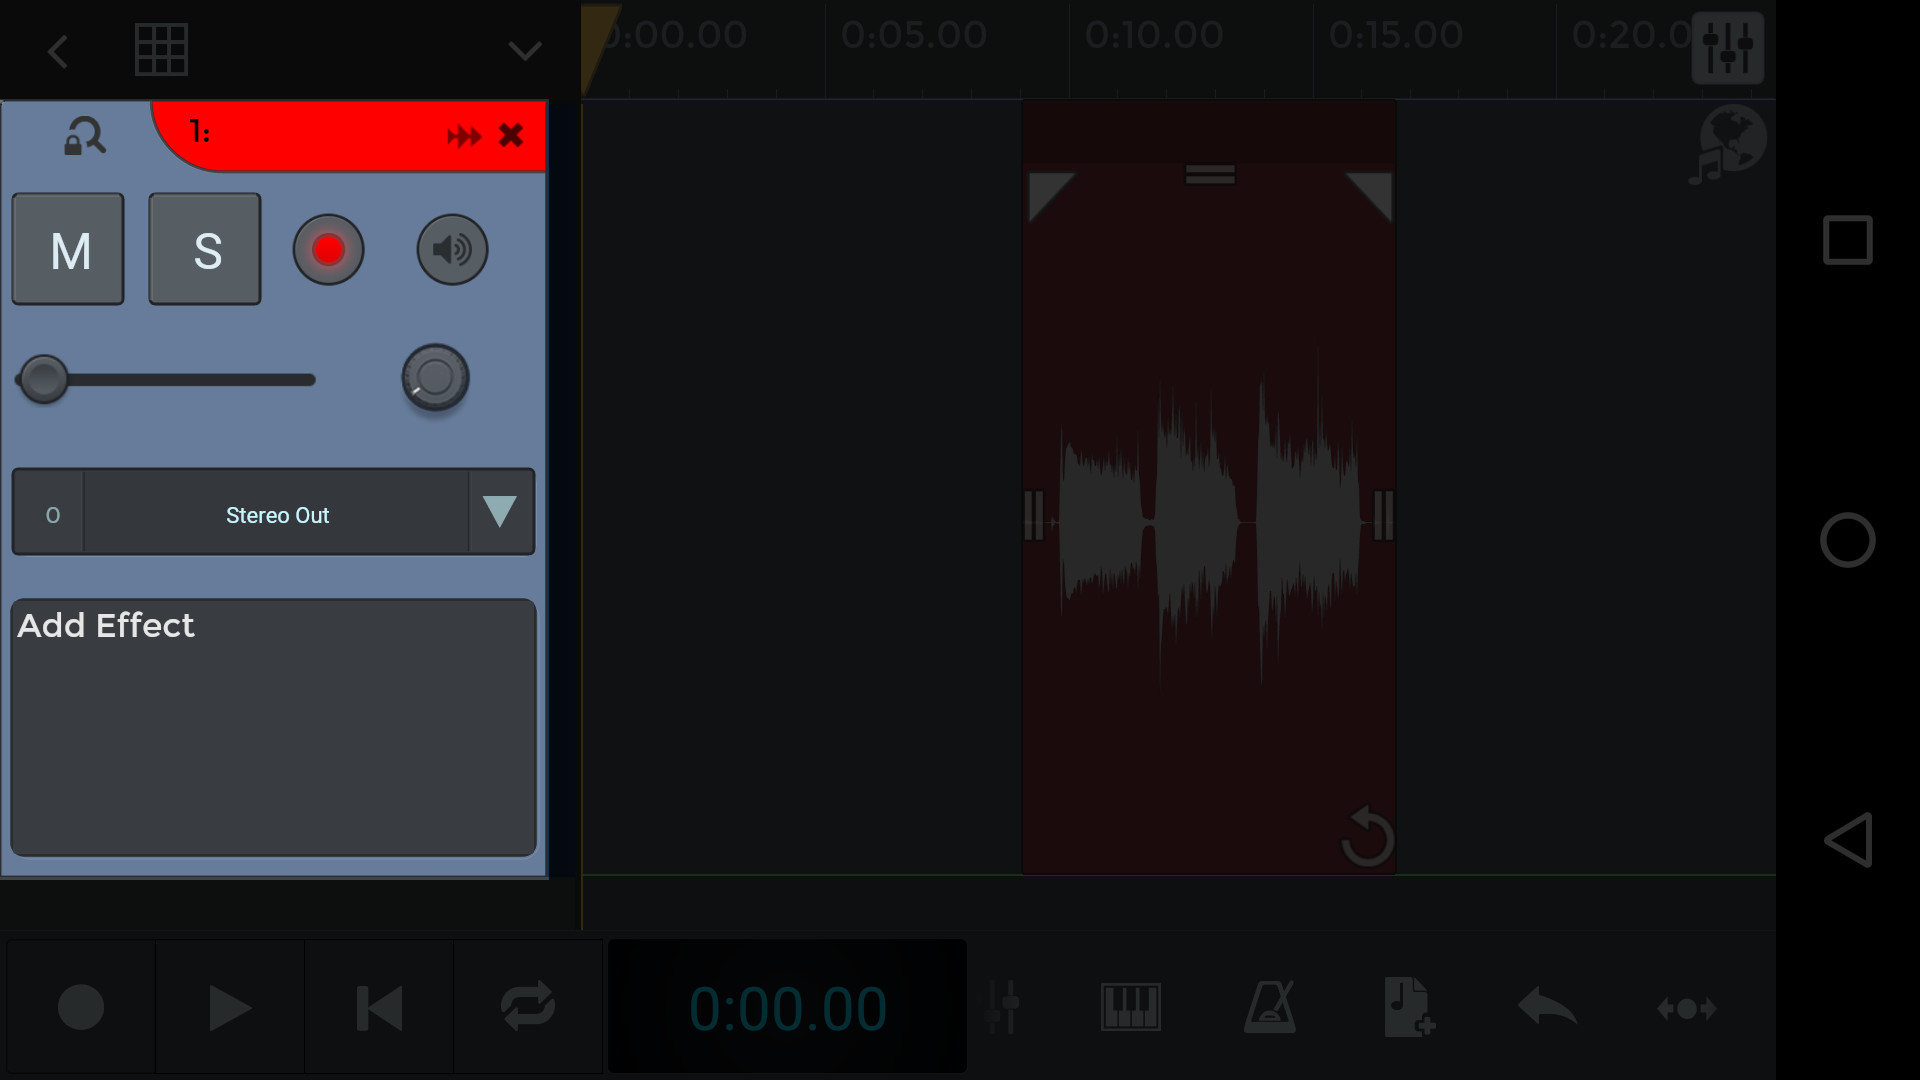

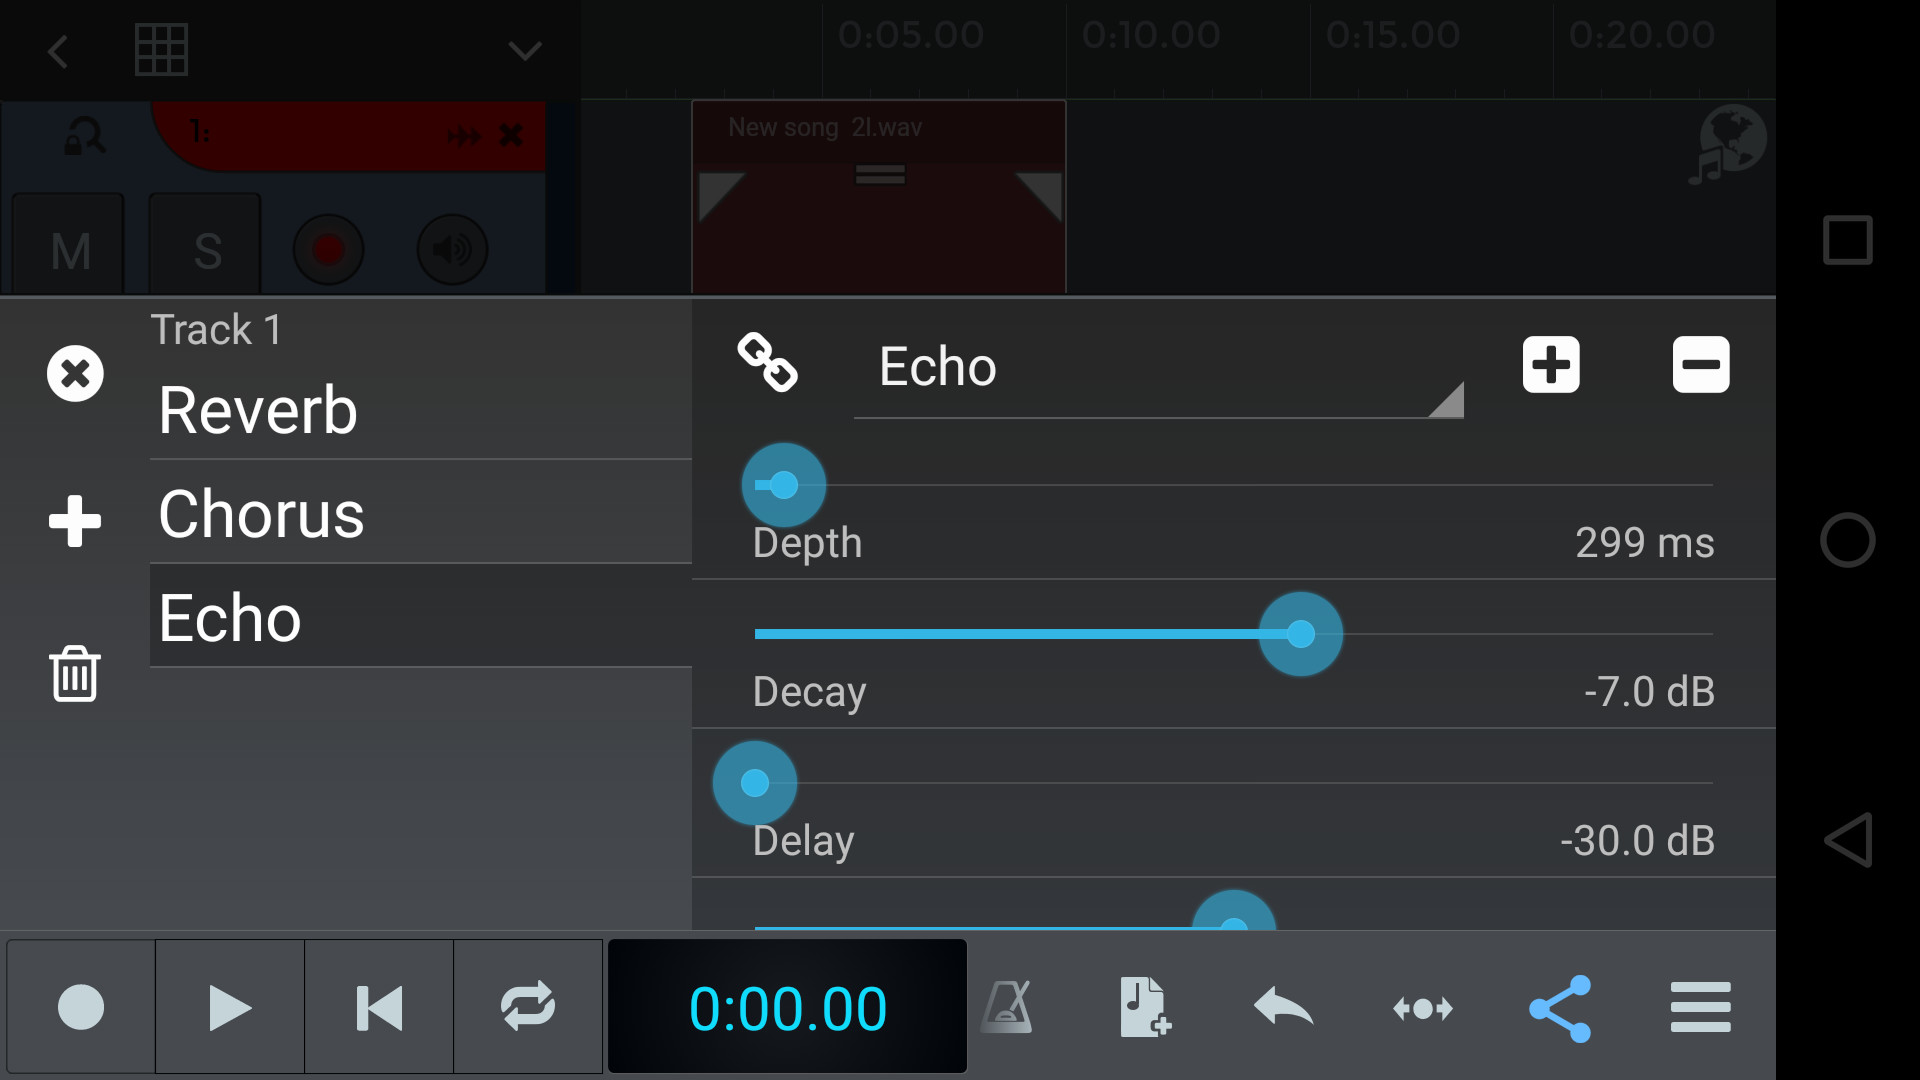

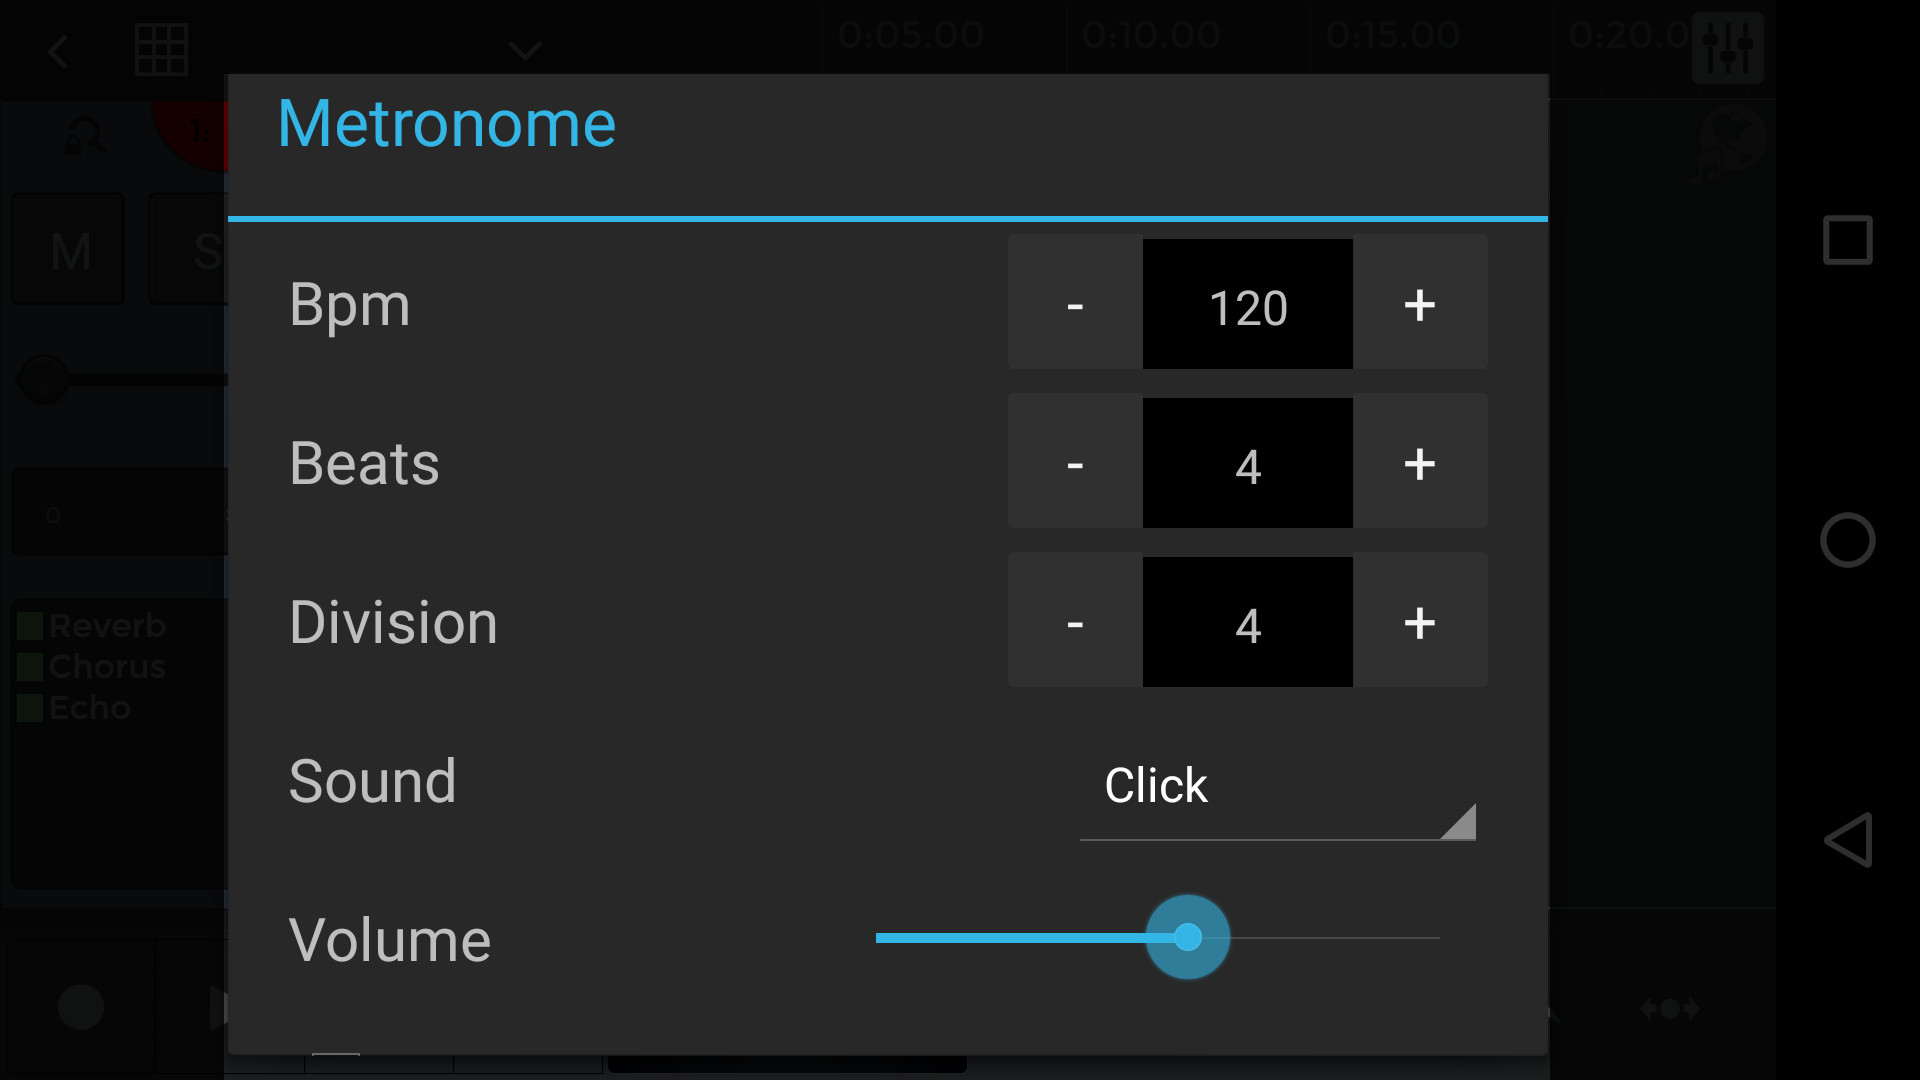

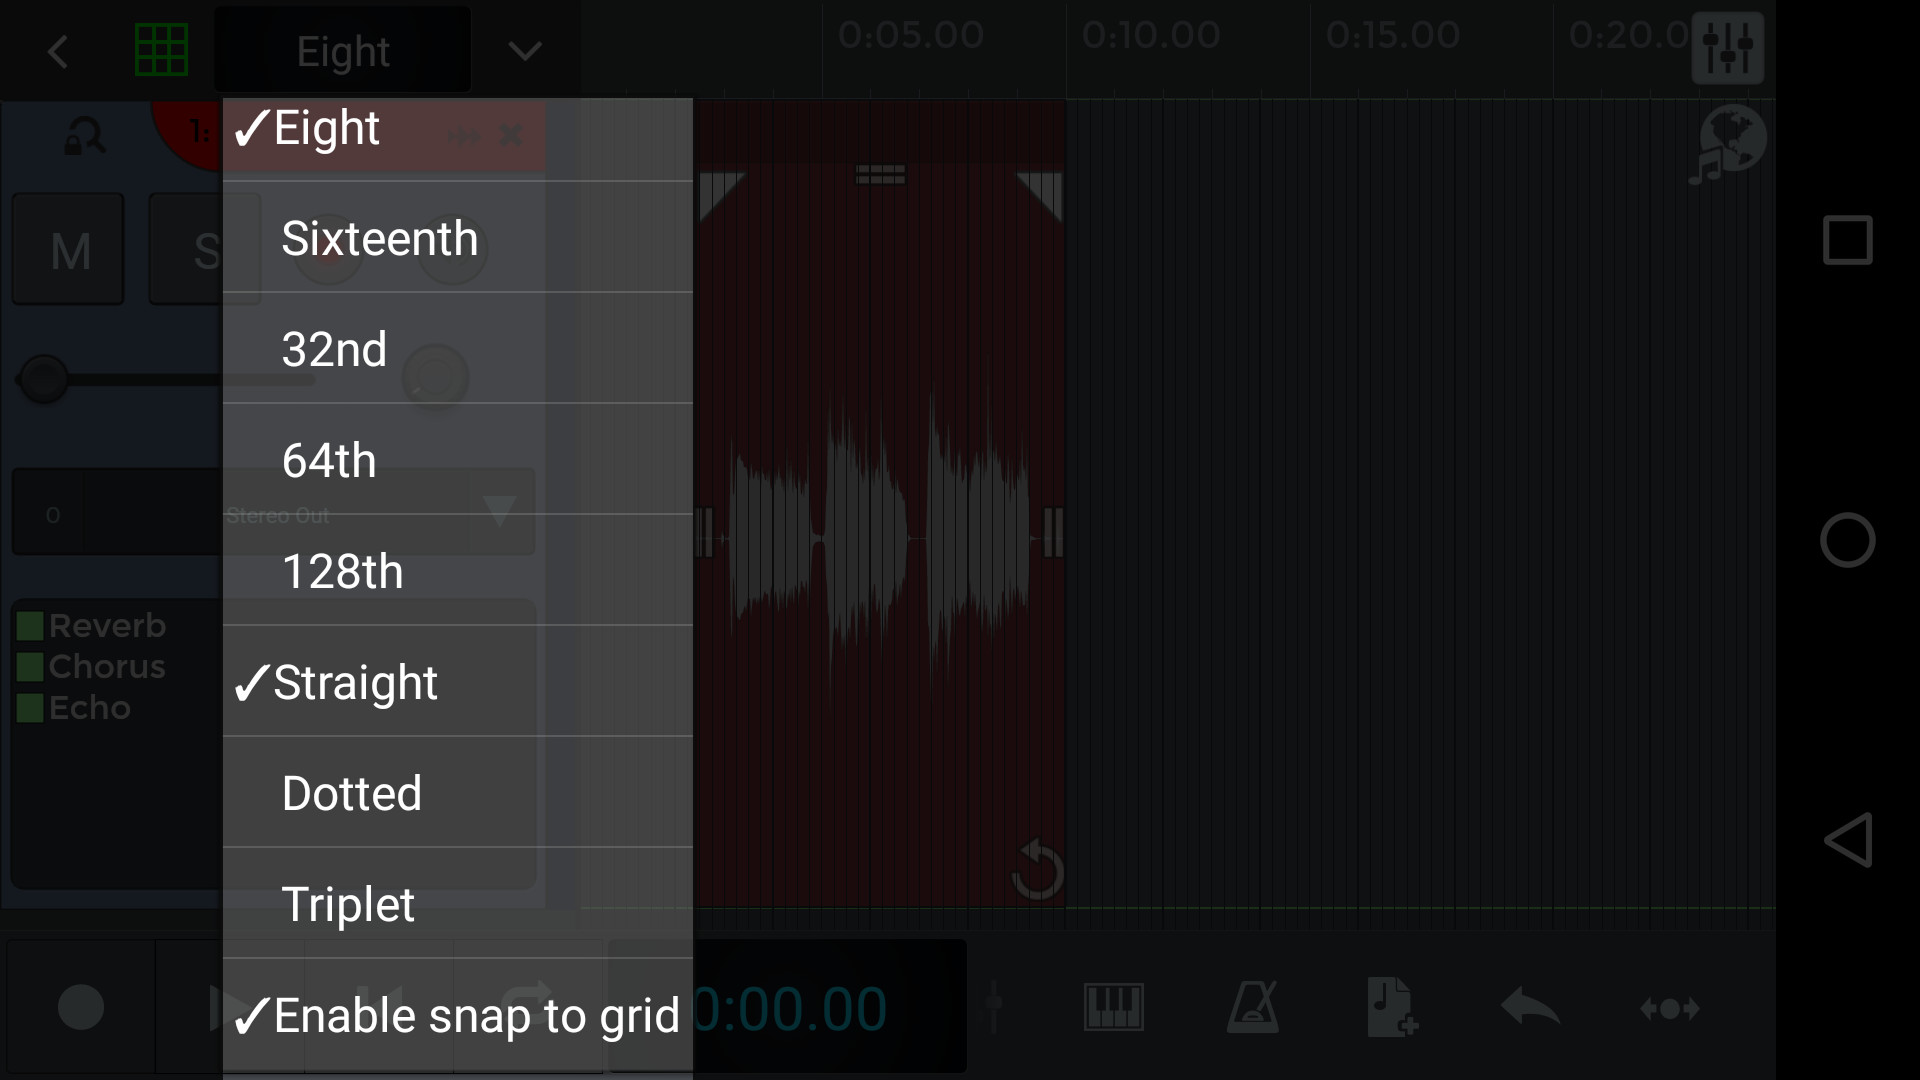
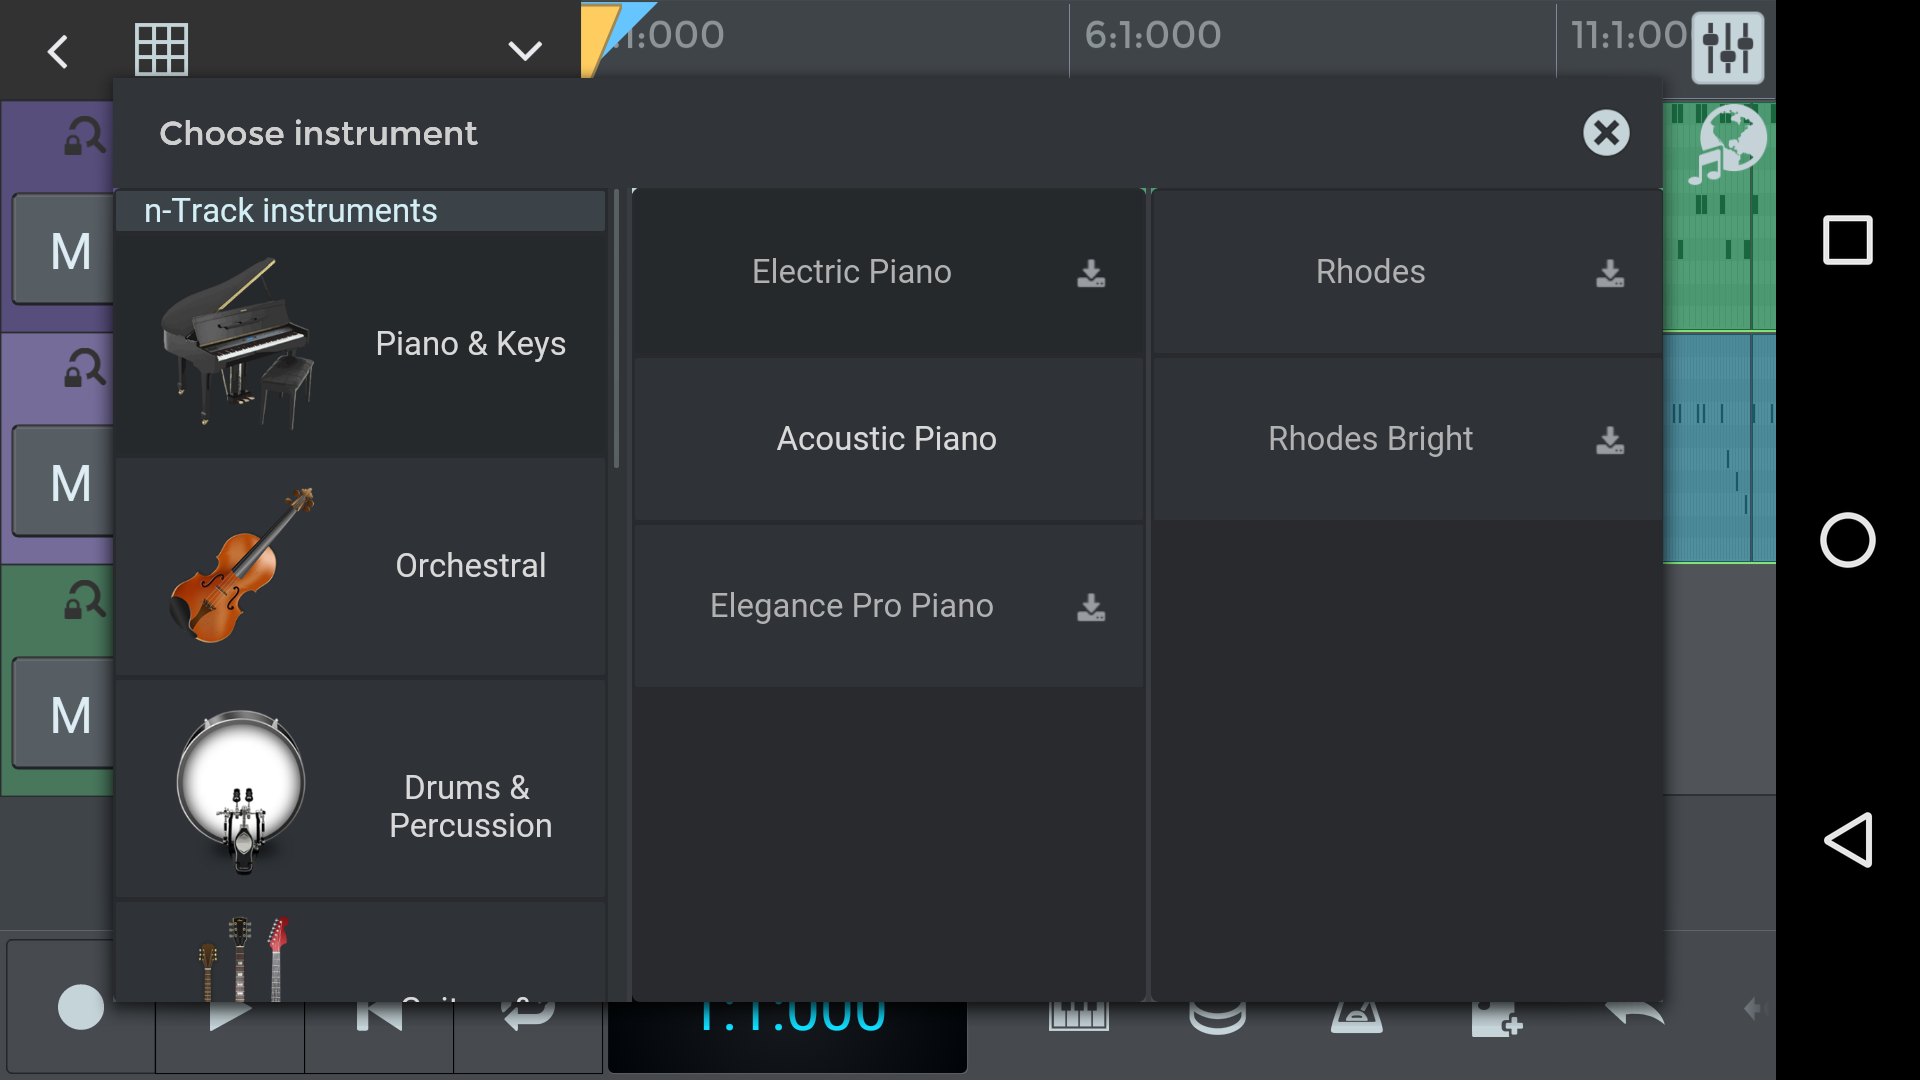
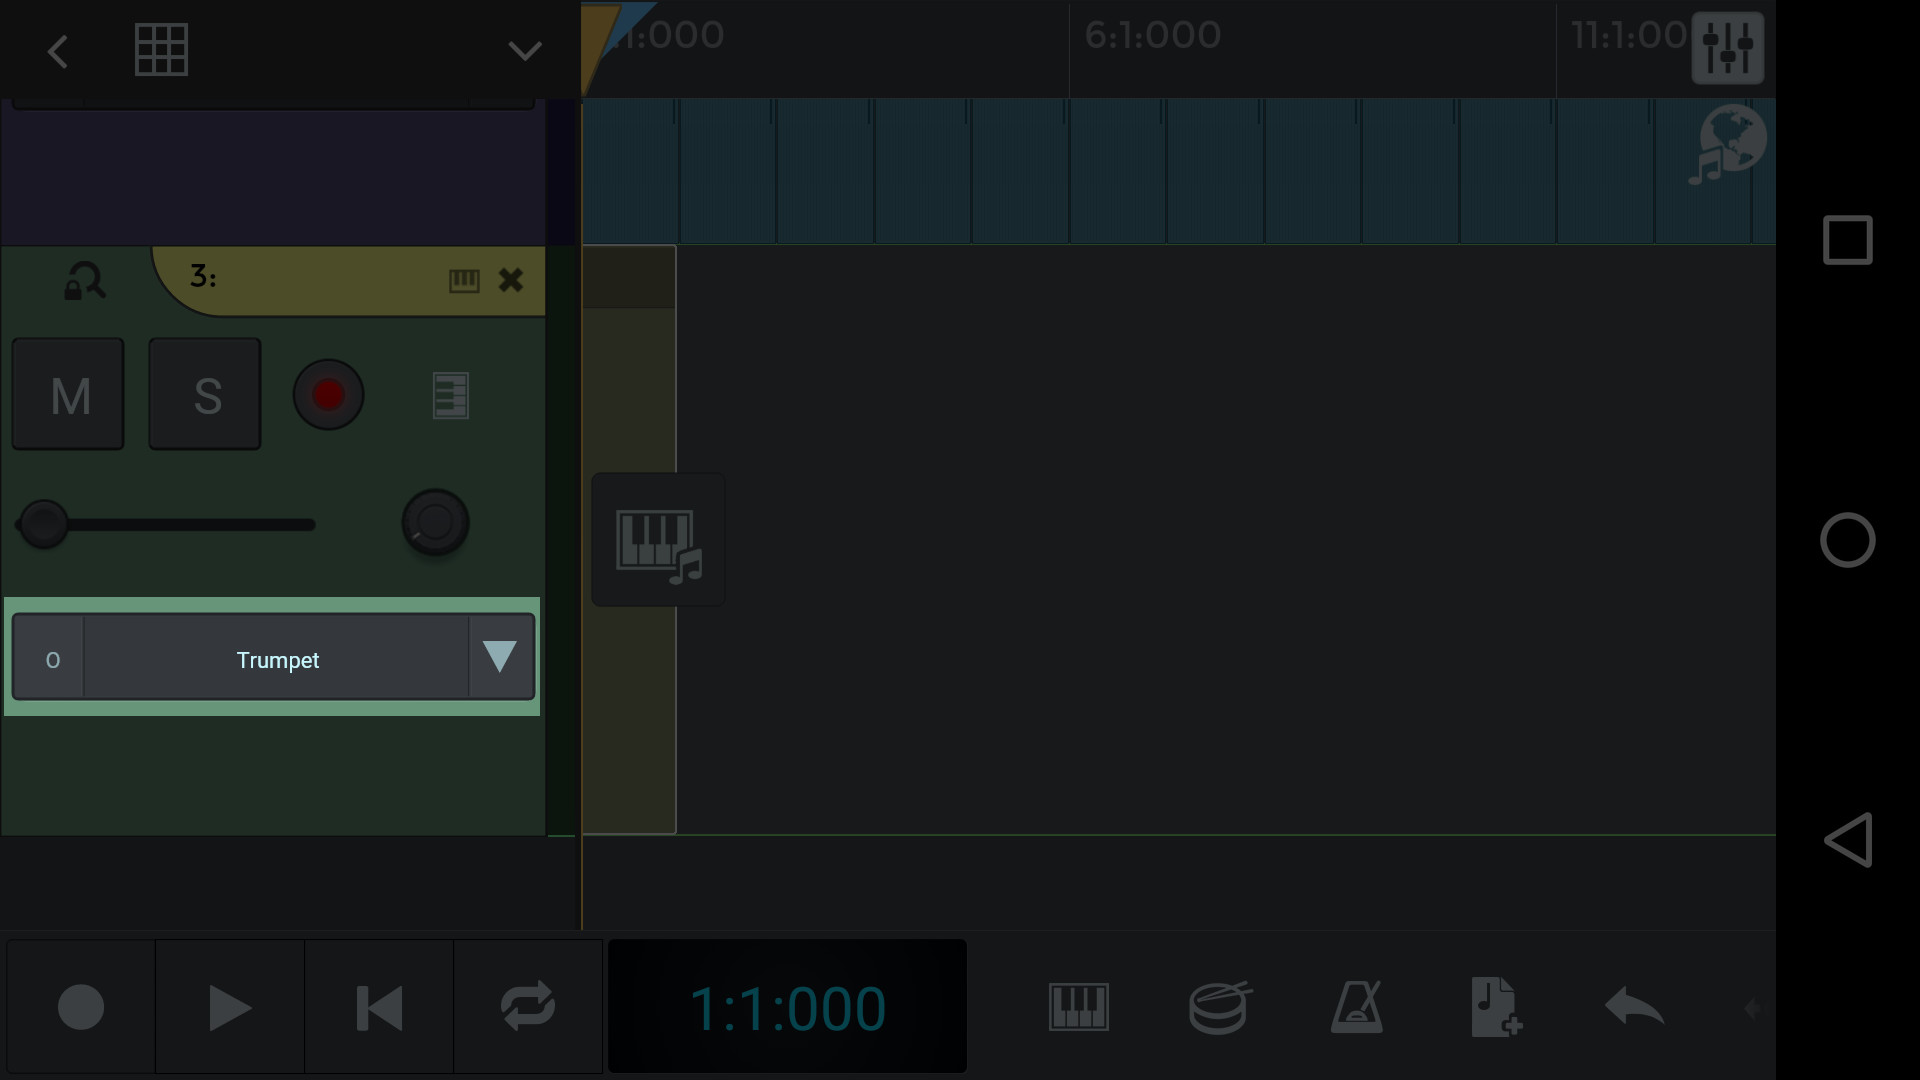
 and start playing it with your fingers, or open the piano roll by tapping the
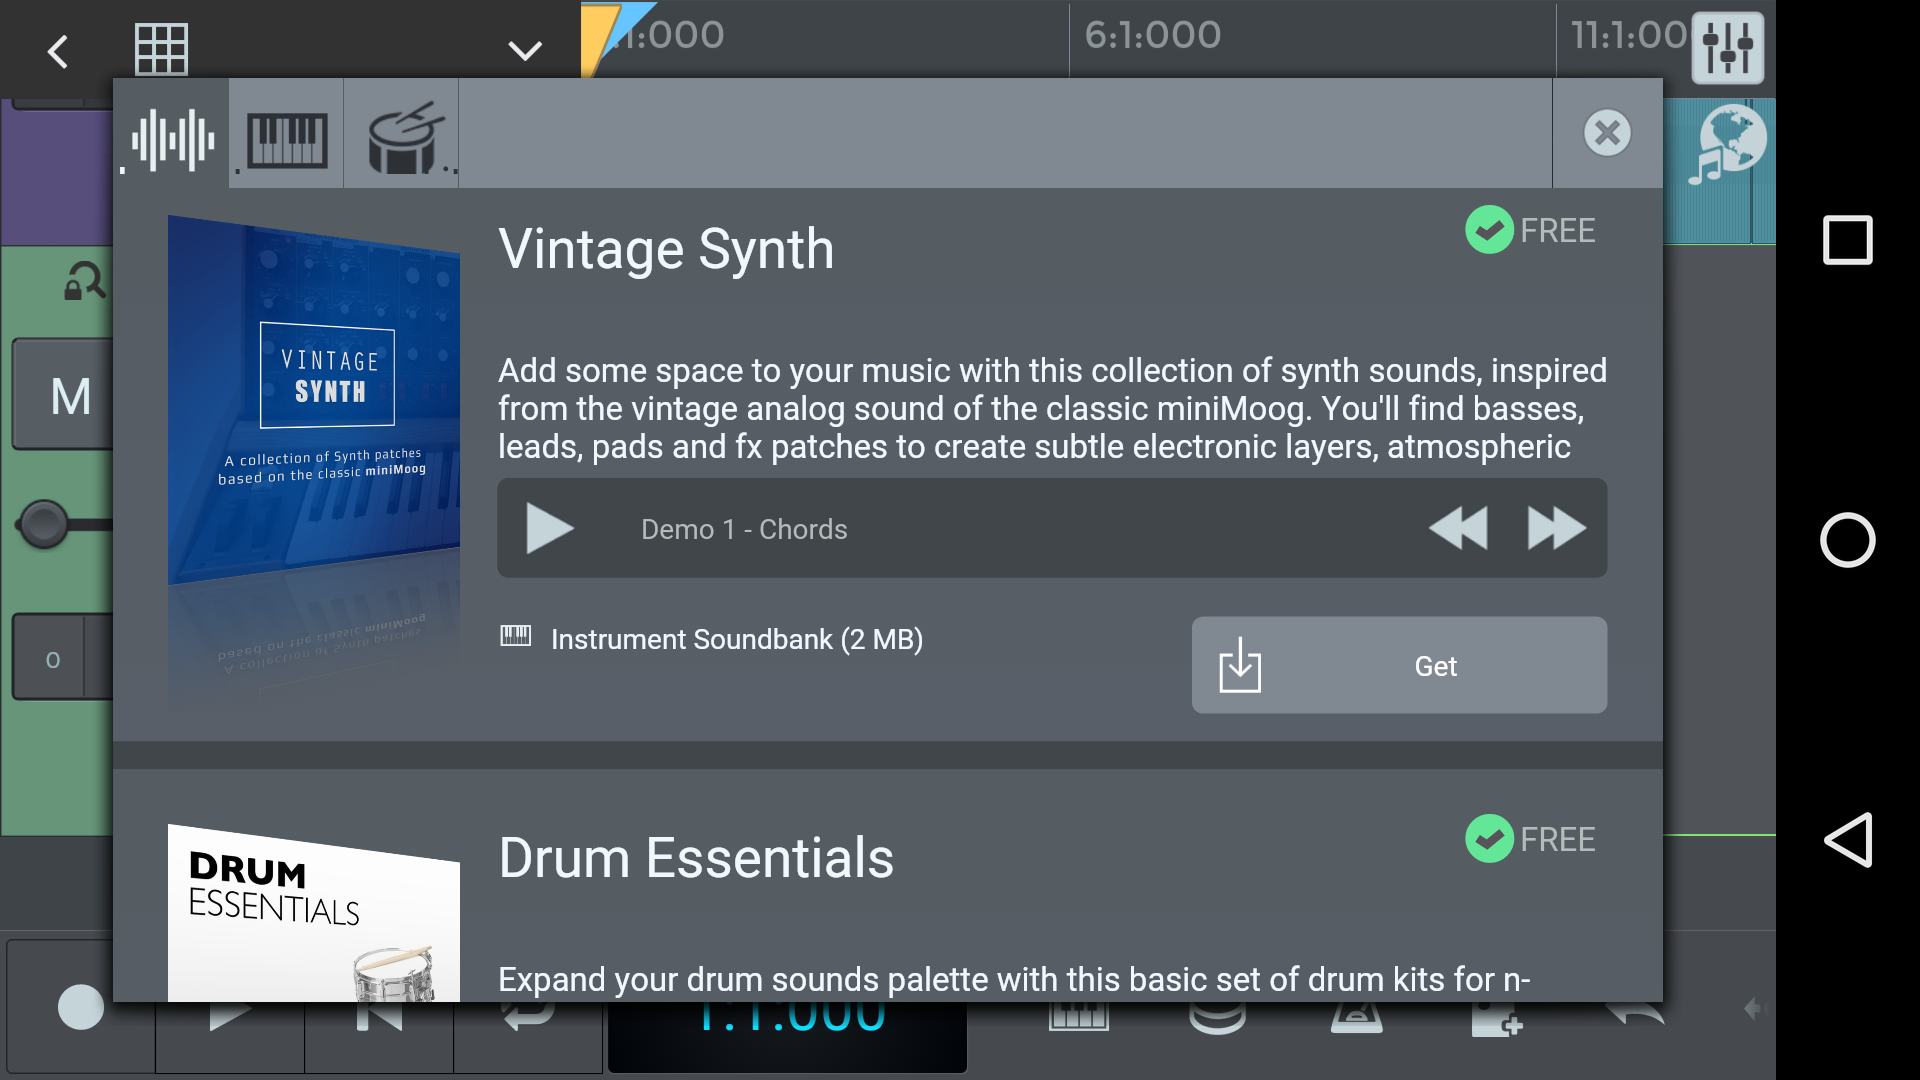

 button, which lets you import the song to n-Track for overdubbing.


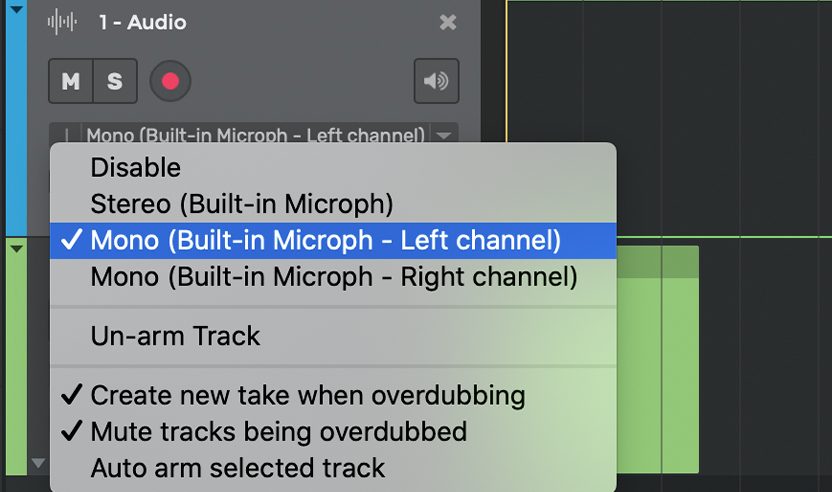


 button on the main transport bar. When count-in is active and press rec (or also play if Count-in on playback is active) the playback starts one or more measures (as set with the Set count-in measures setting) before the playback start offset in the song.


 button on the toolbar (or by rotating the mouse wheel forward while holding the Ctrl or Cmd key), at a certain point, you’ll start to see a series of dots appearing on top of the waveform, as shown in this screenshot.


 button on a track to open its EQ properties window.
 in the EQ properties window to reveal the EQ parameters:


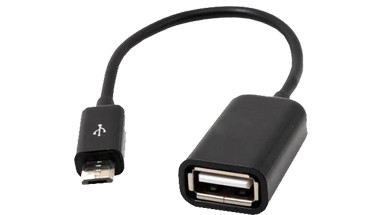
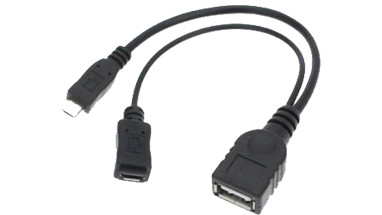
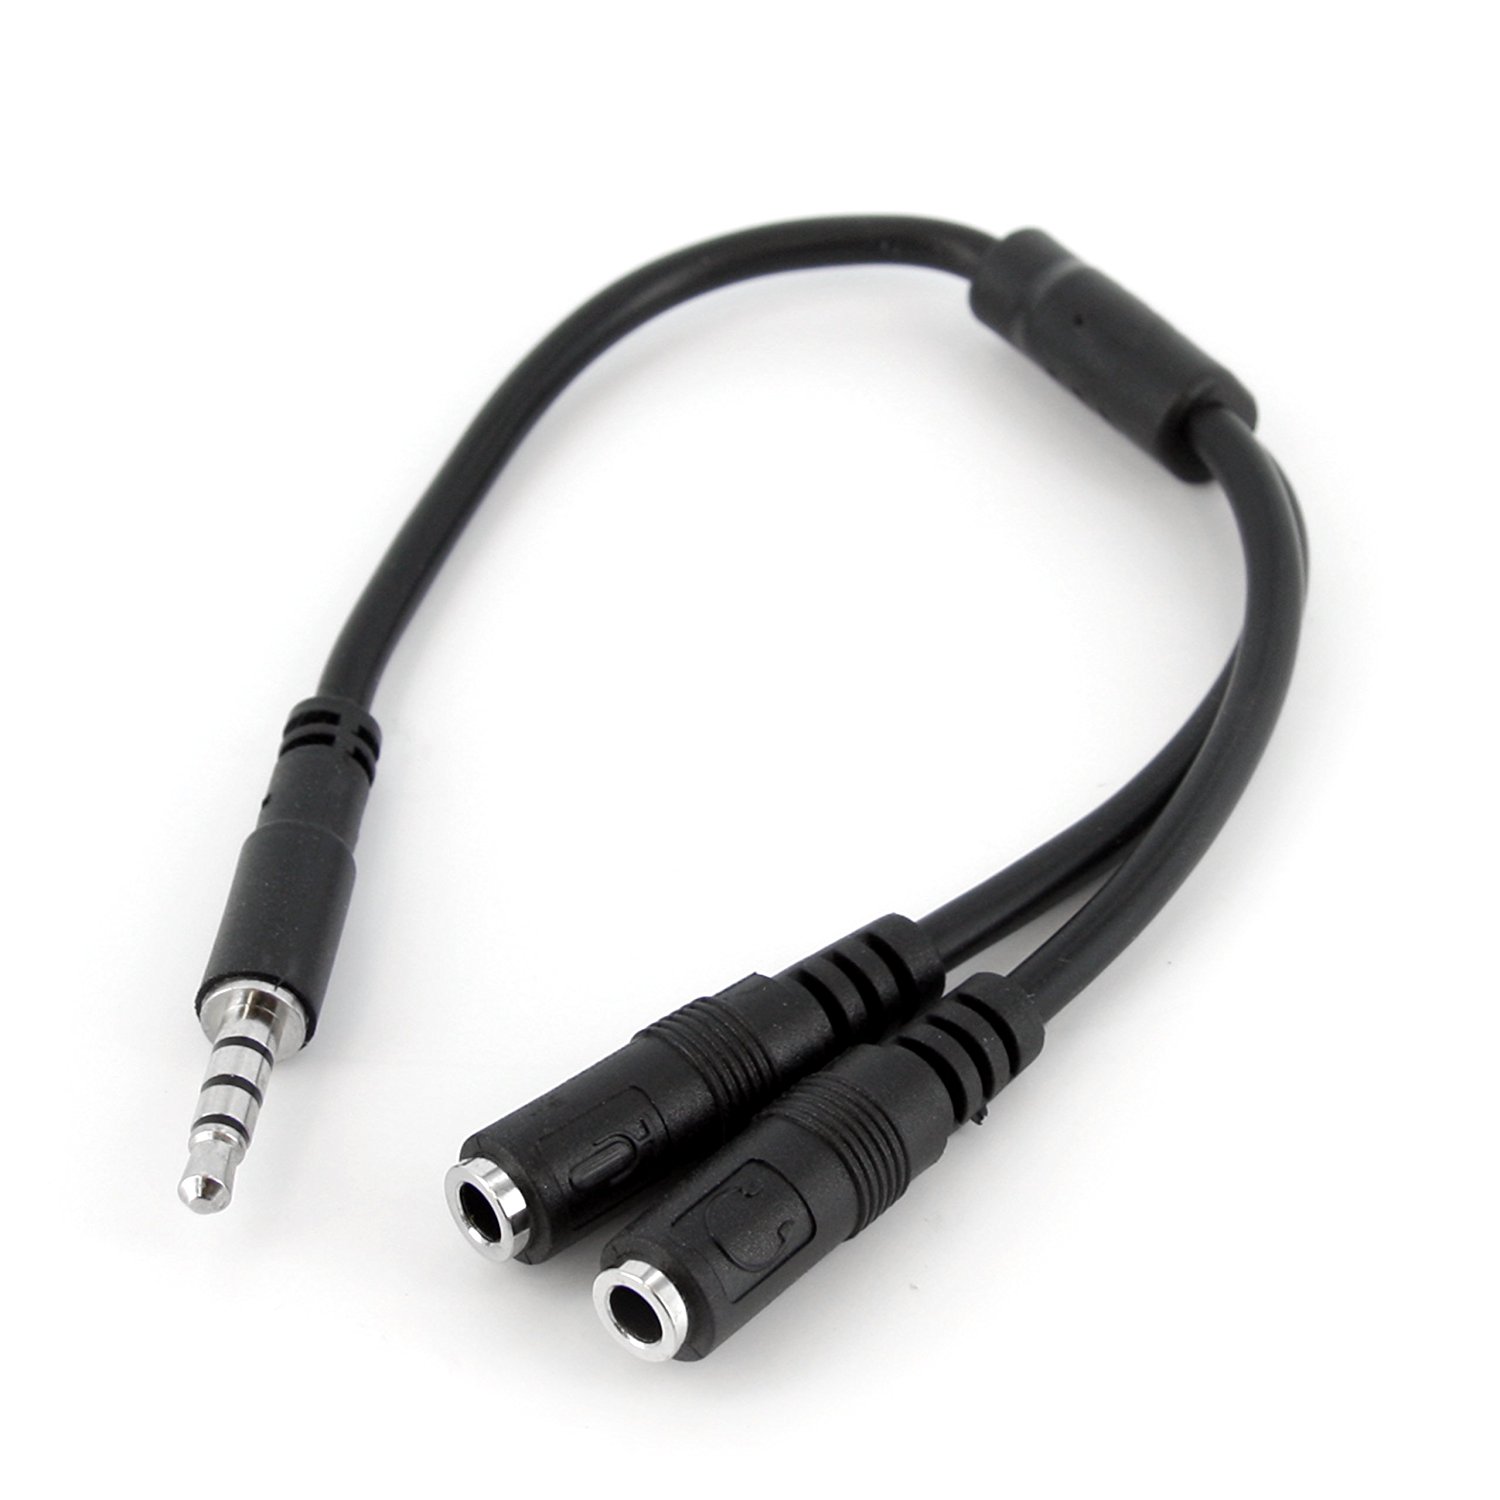
 or tap this little window
  and choose "add new send".
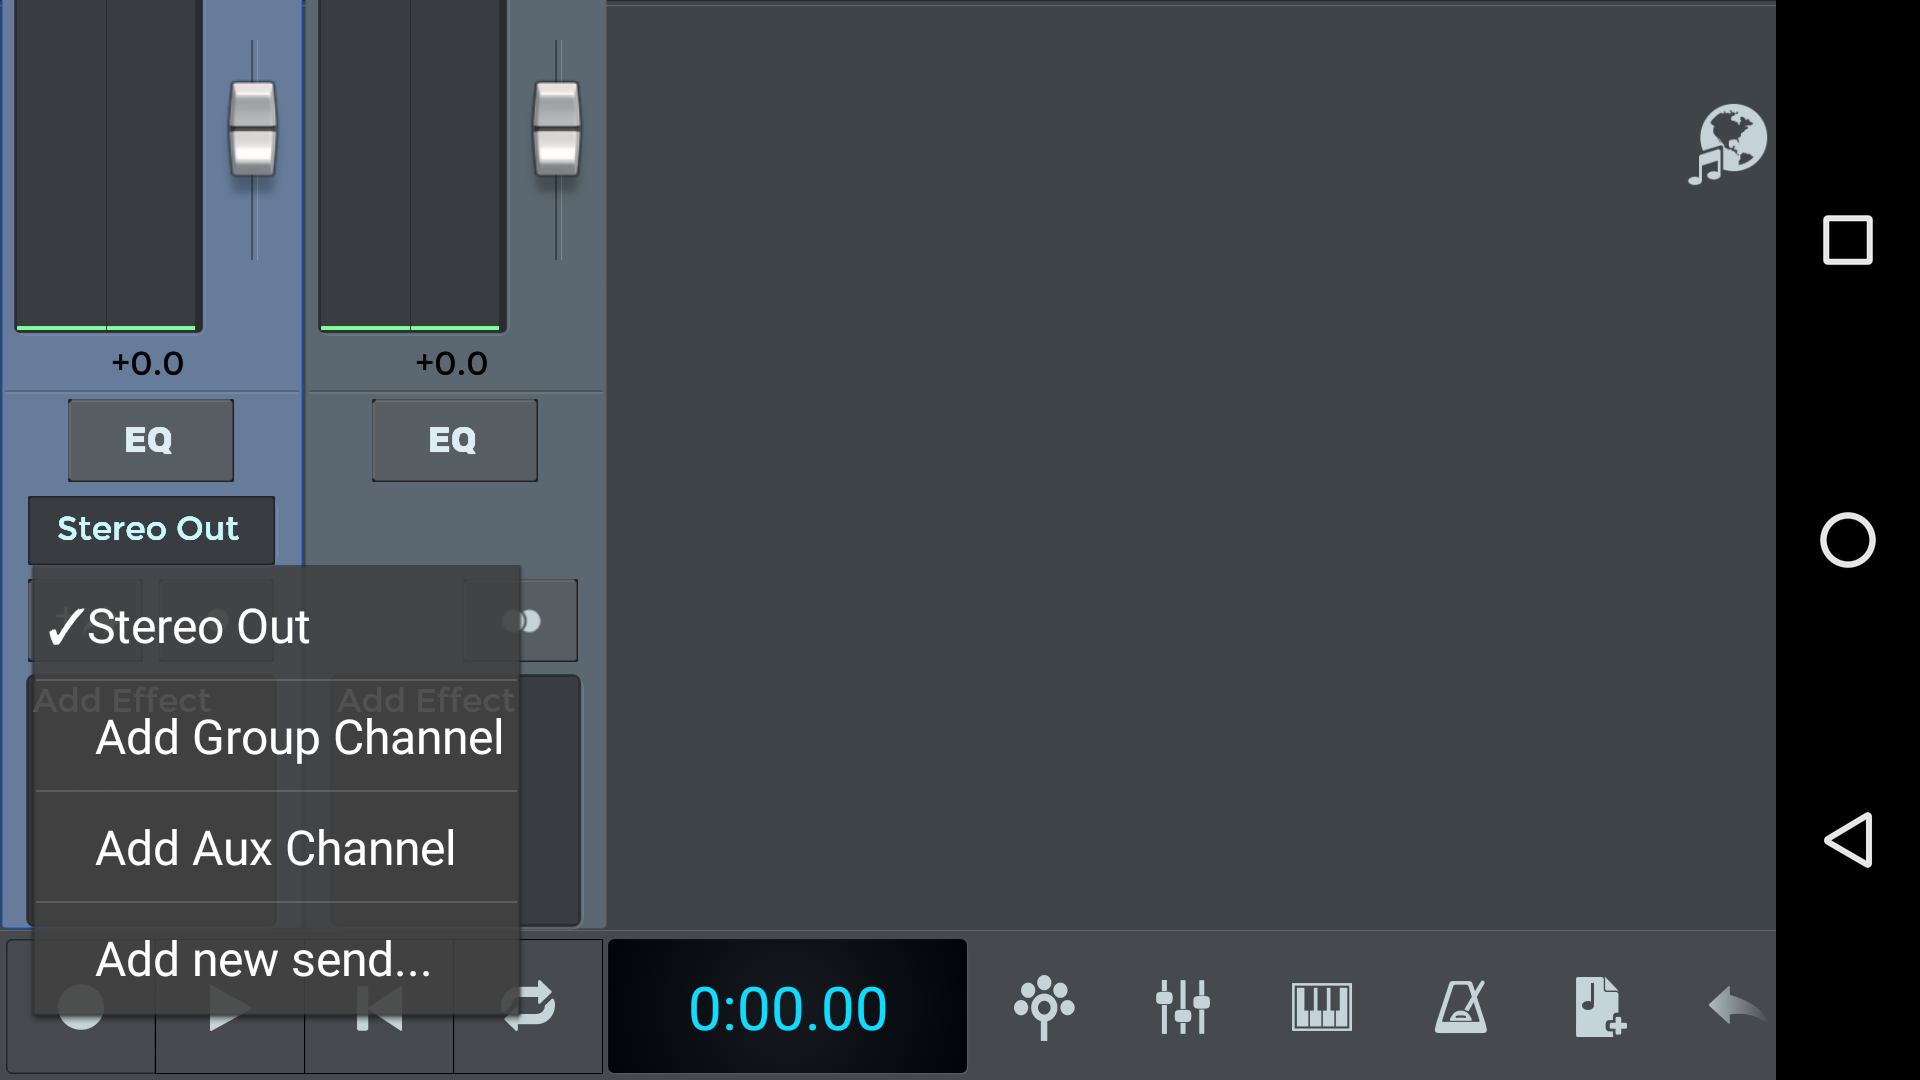
 and choose "add new send".
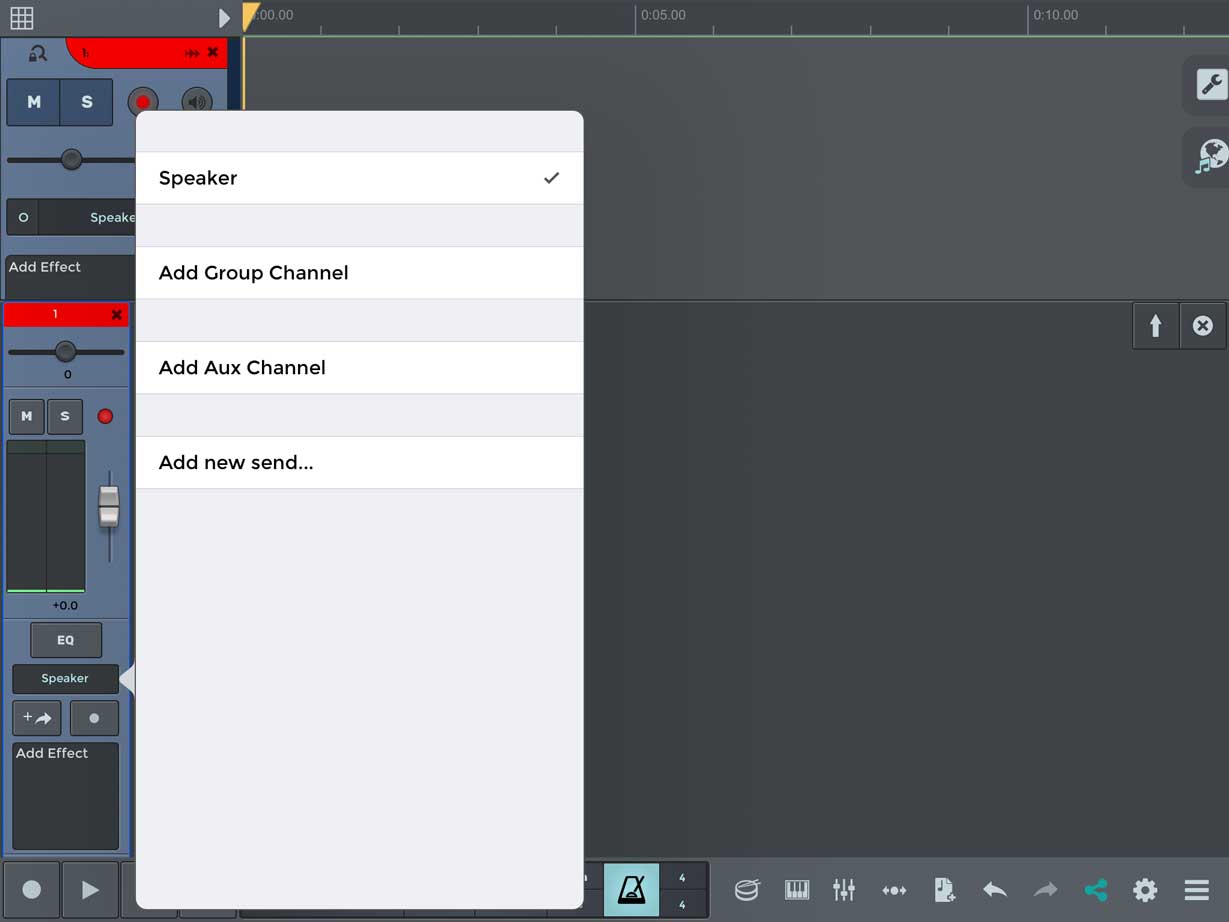
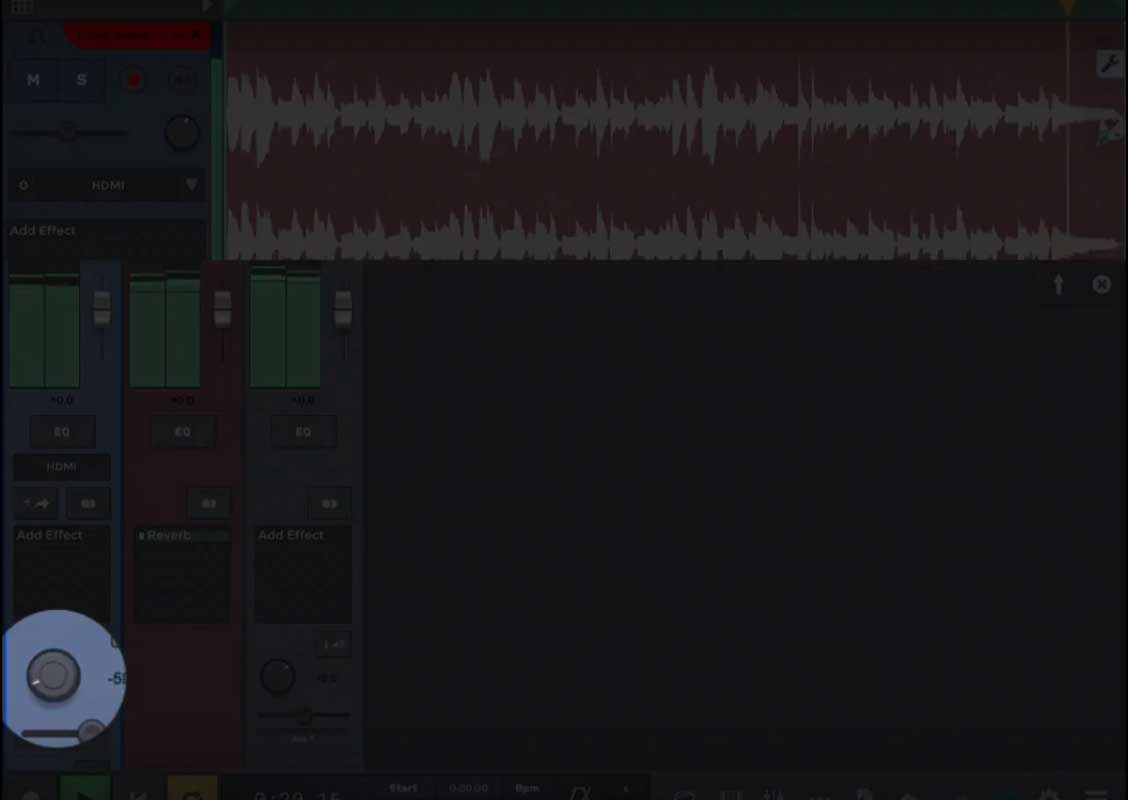
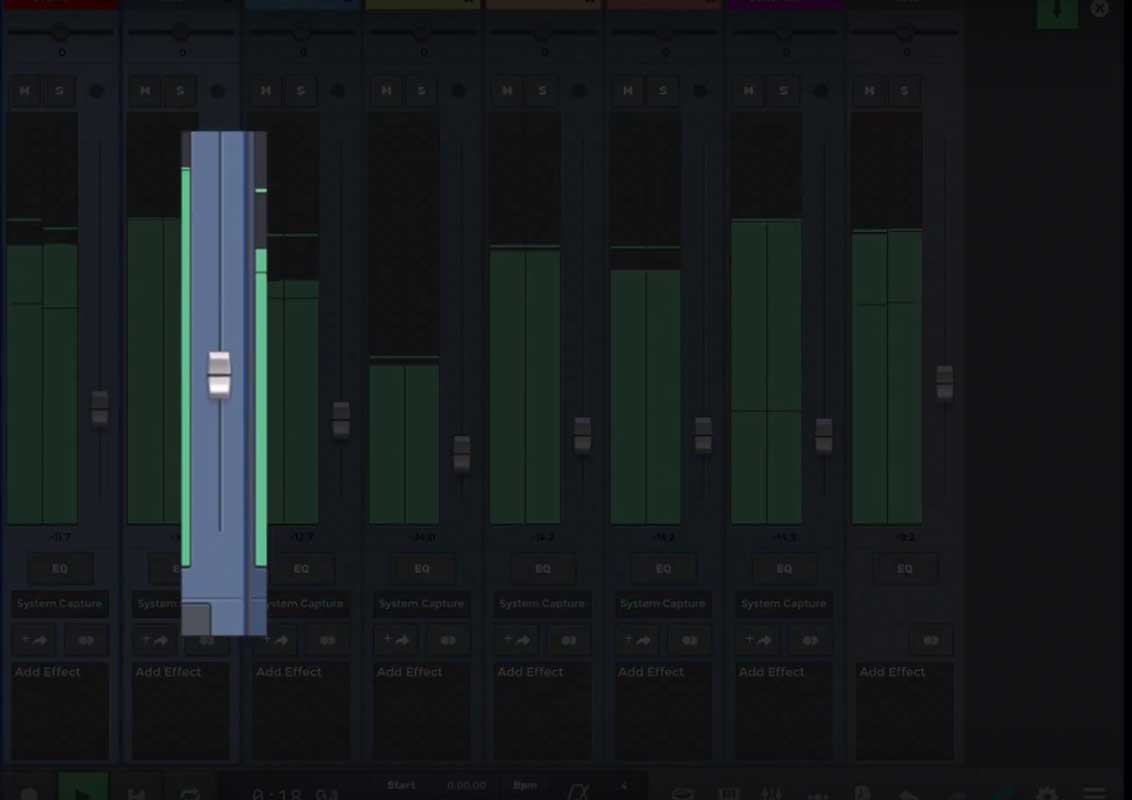
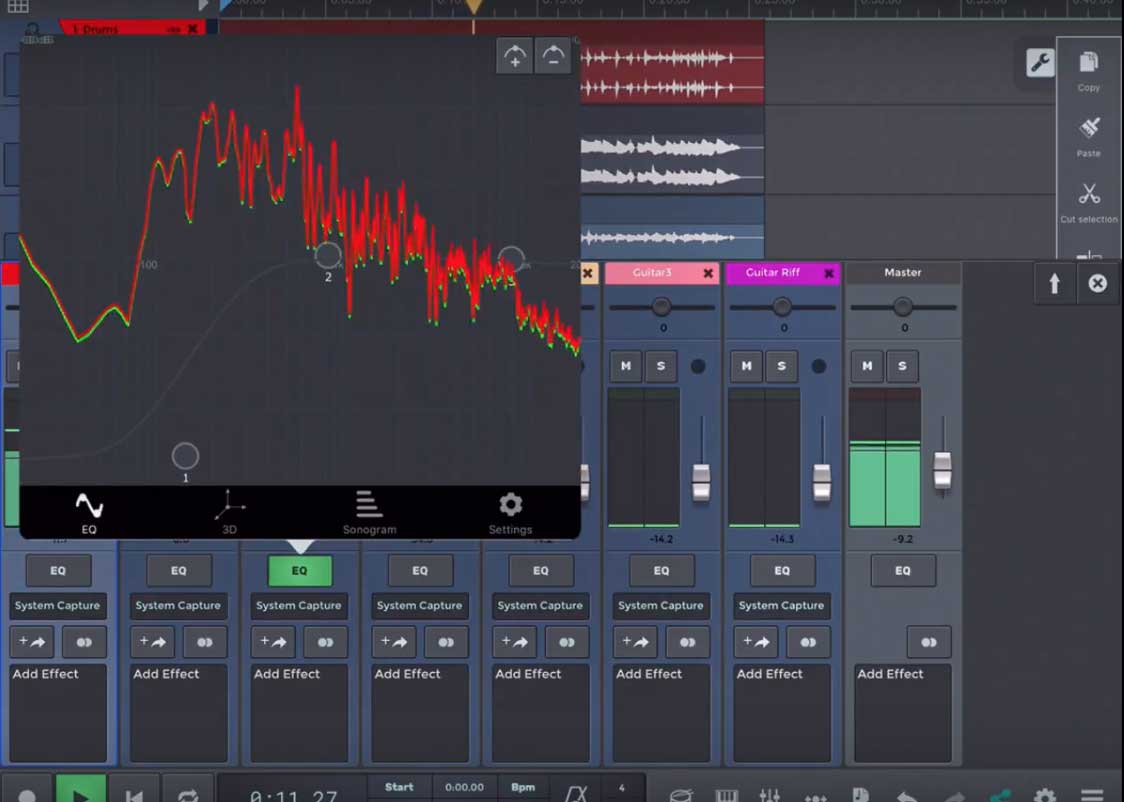
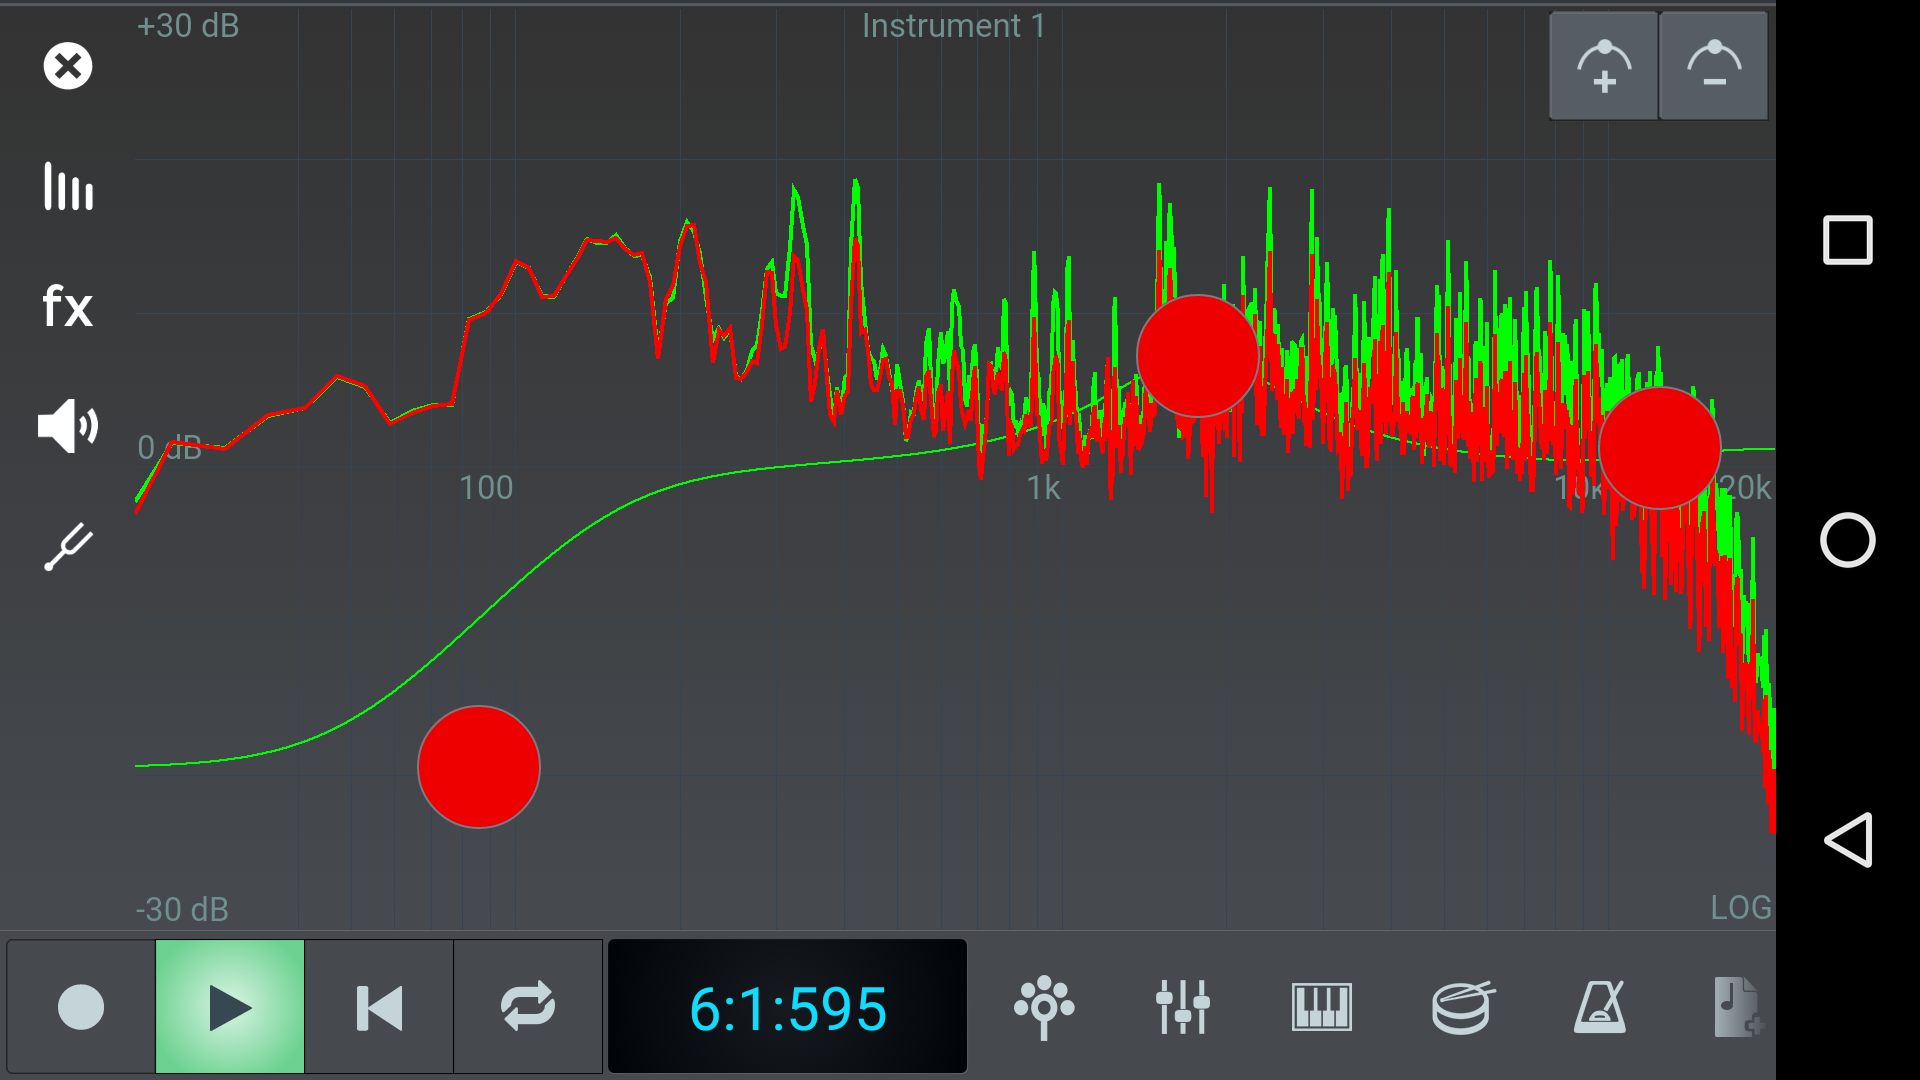


 icon require an additional download, which you can launch via the
  icon to open the piano roll window.


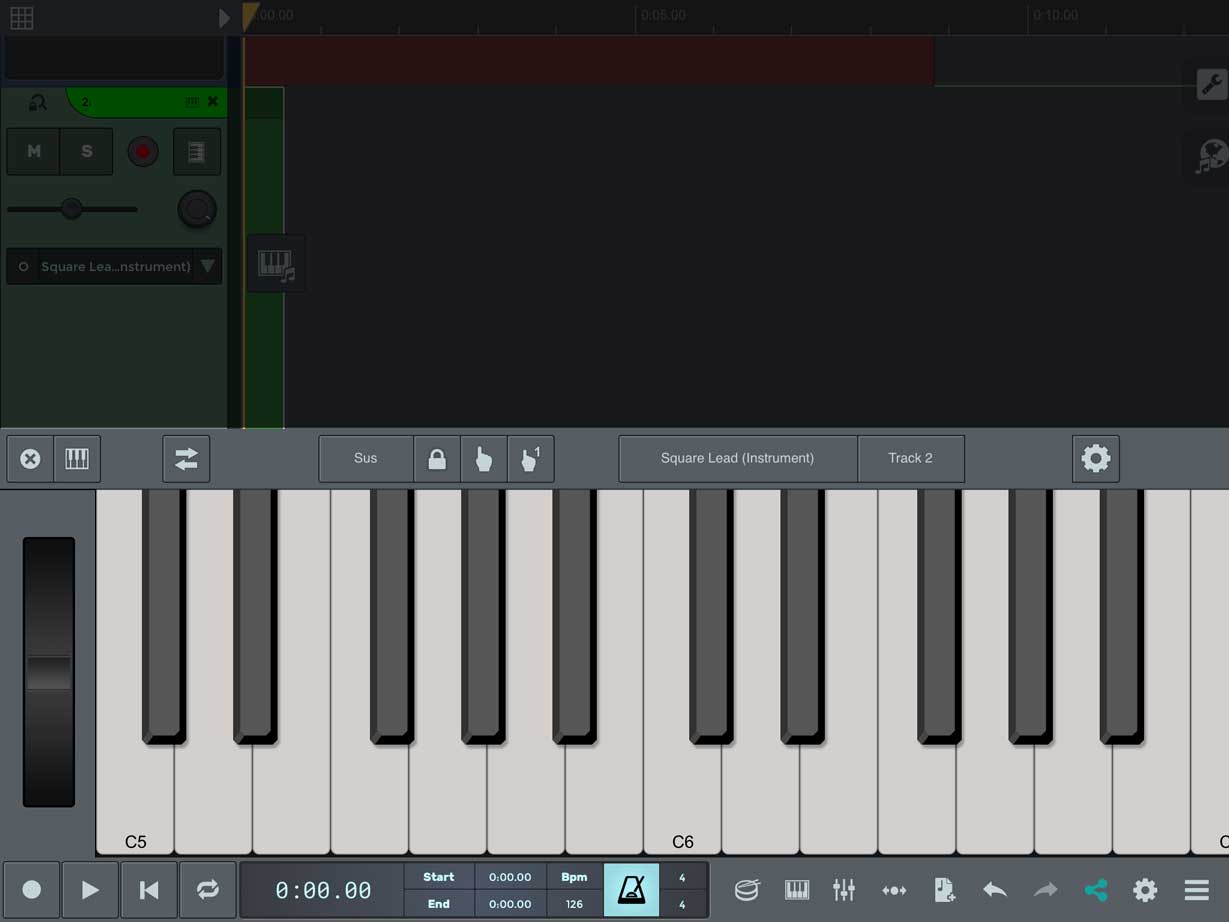


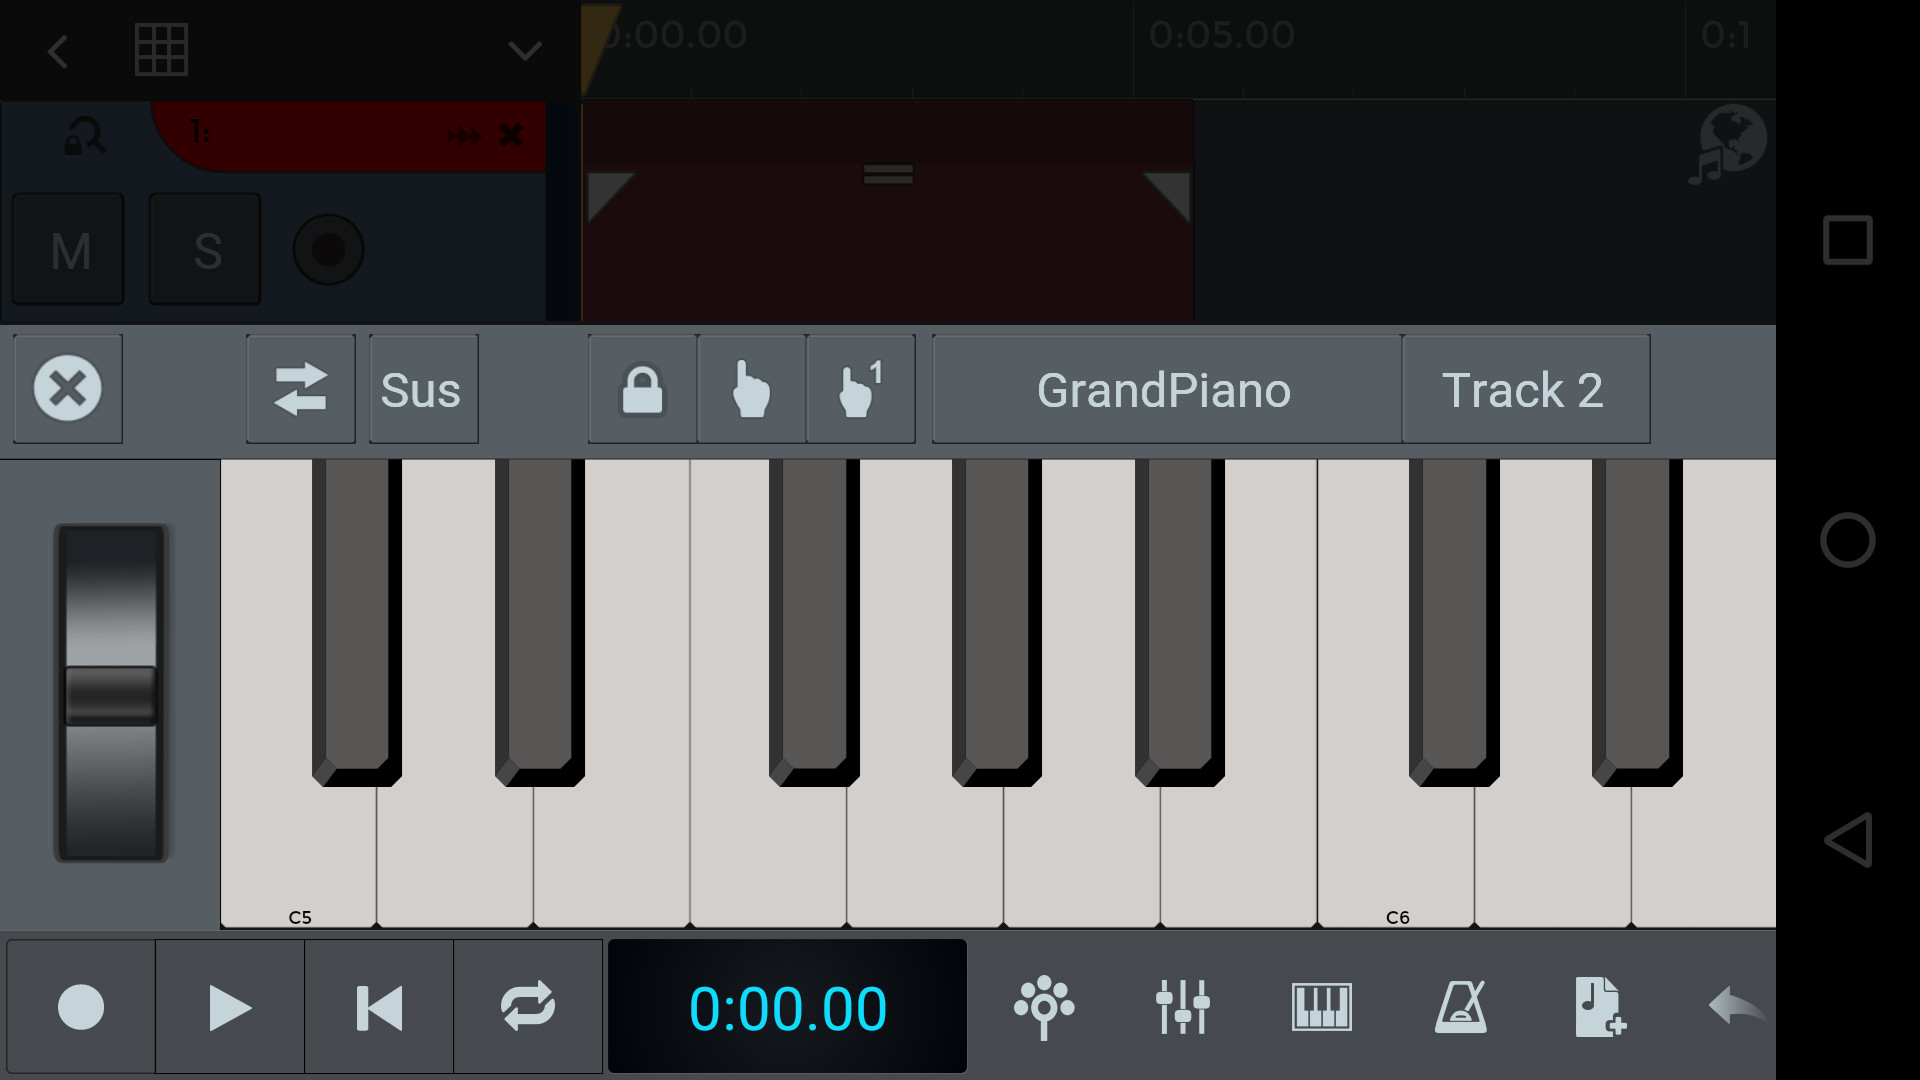


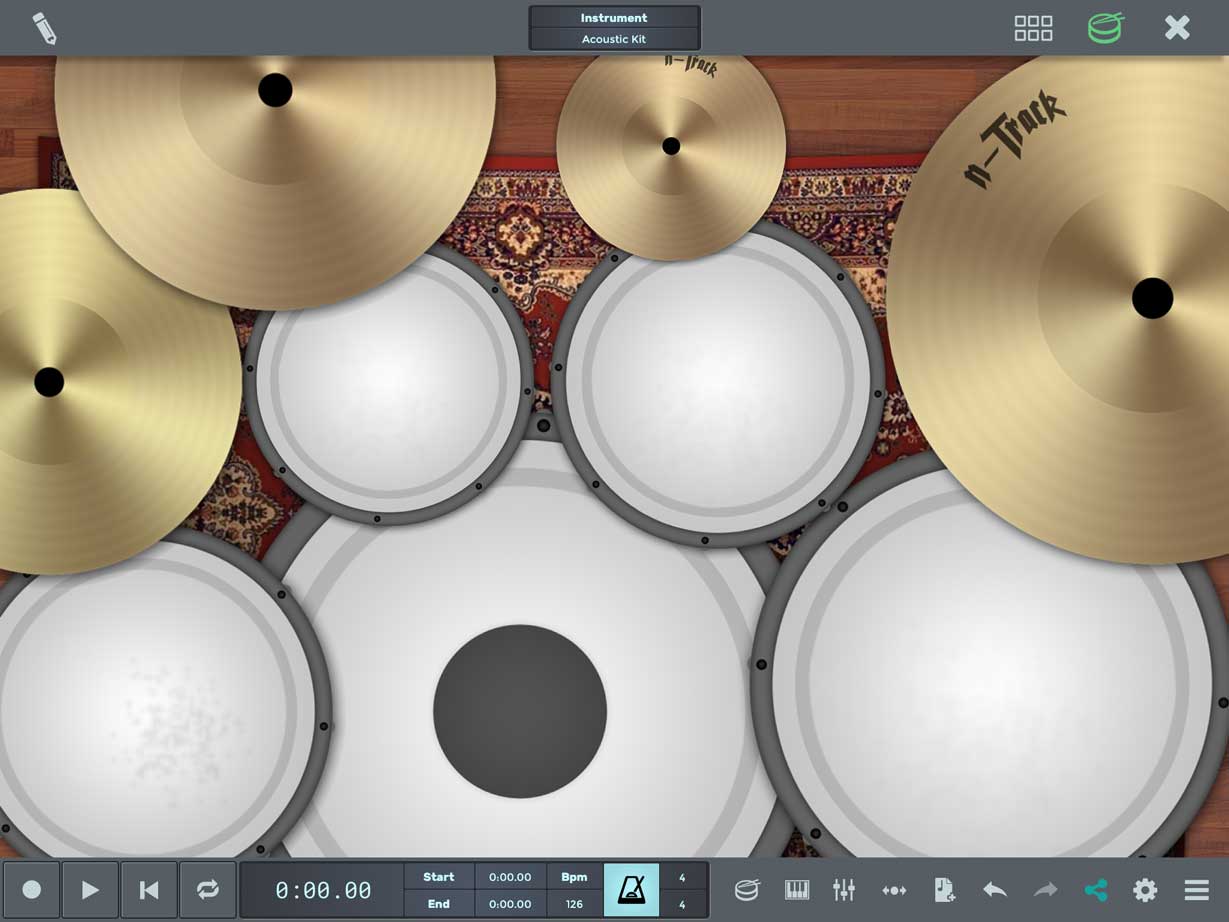
 . You can now play the kit’s elements by using your fingers. You should notice that in this "acoustic" view, some kit elements trigger different sounds depending on the area you hit.
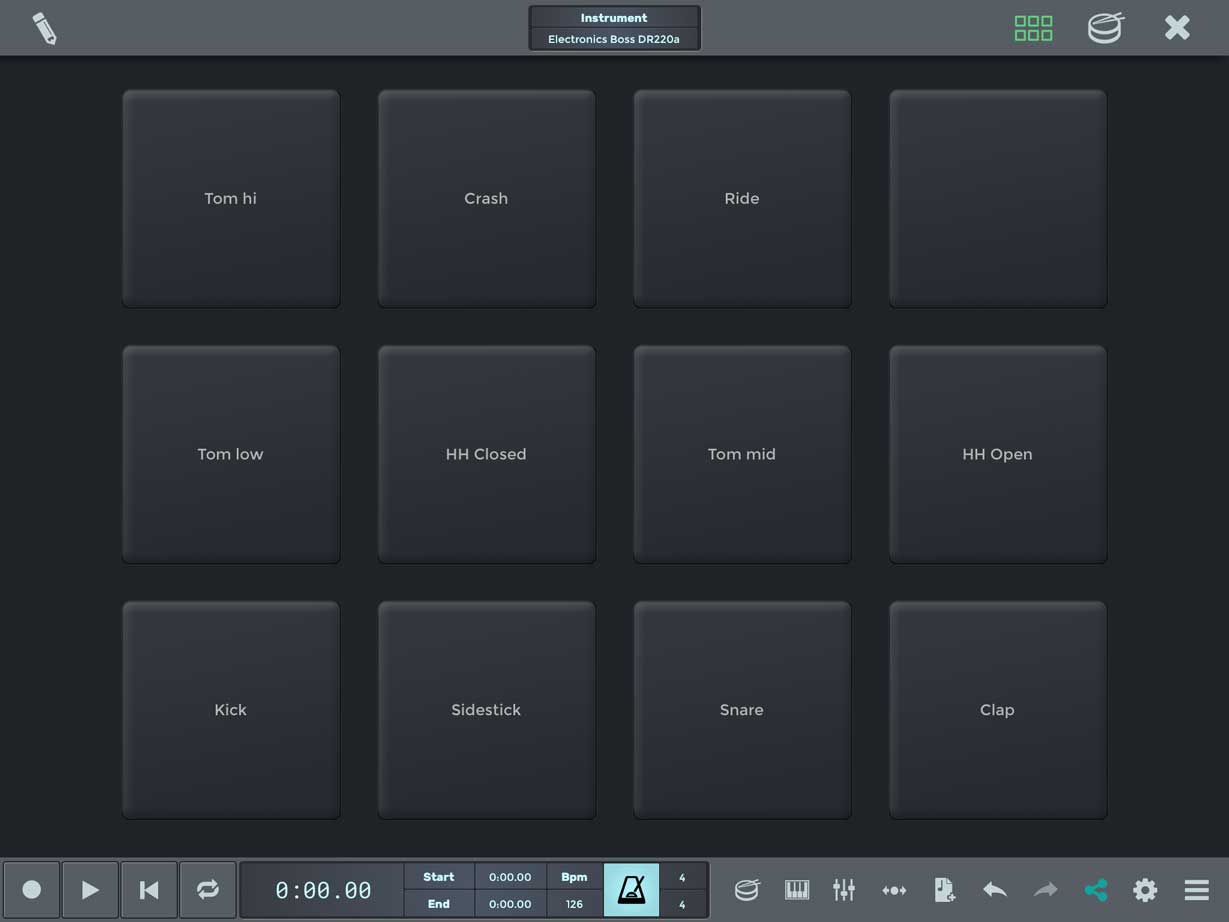
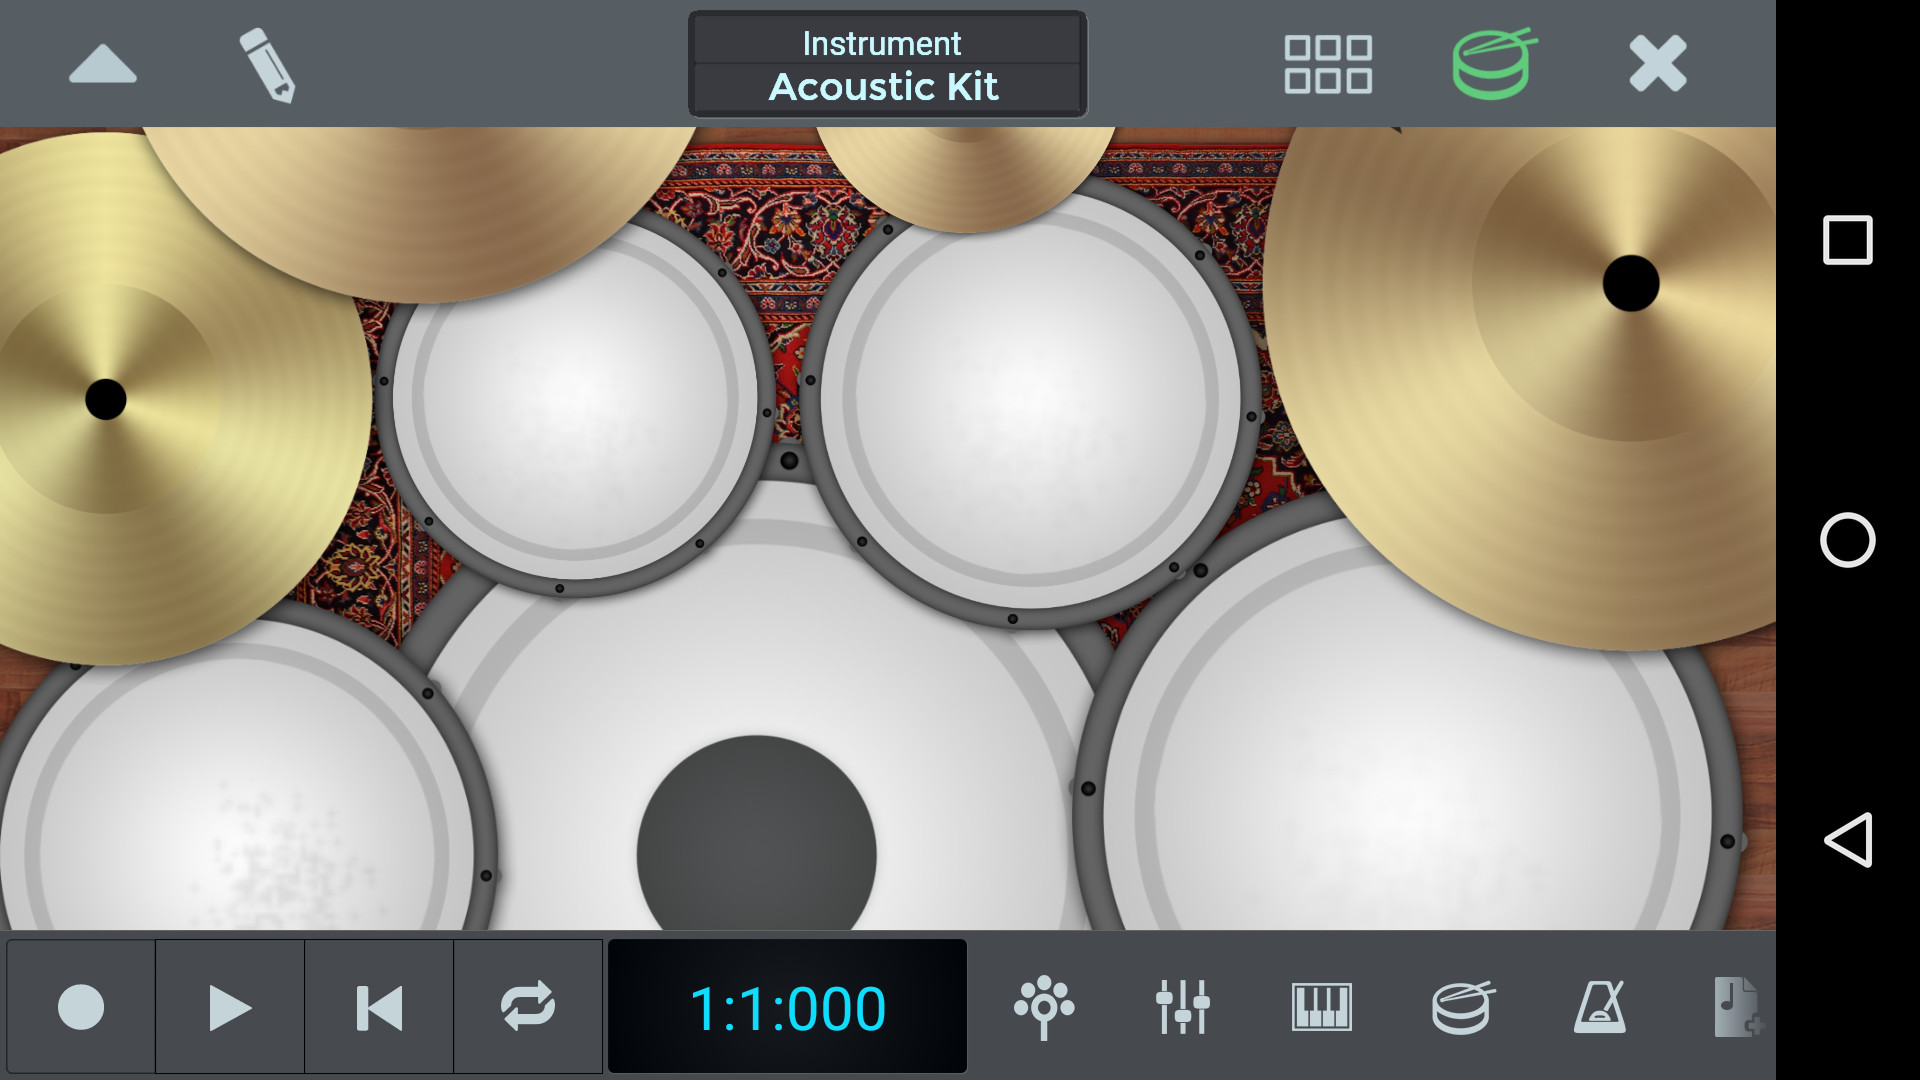
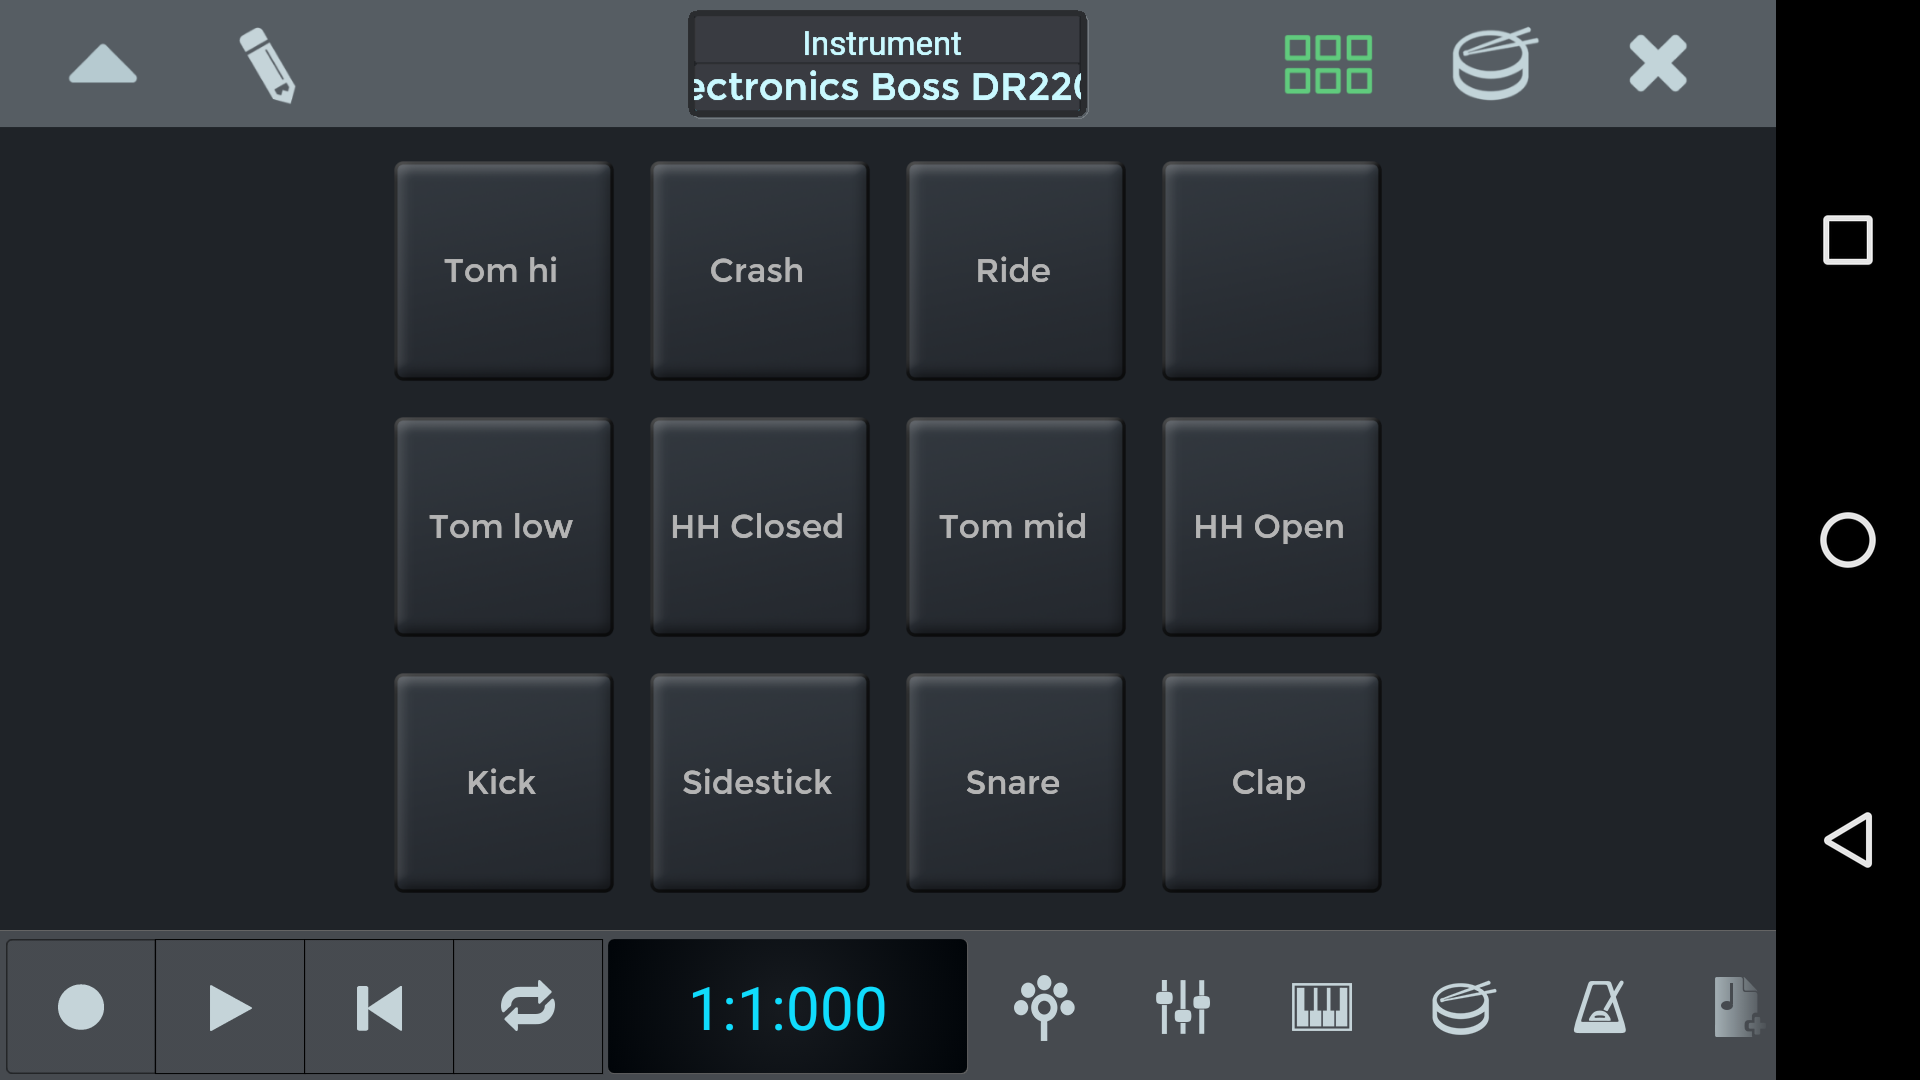

 button in n-Track’s toolbar, or double-click on a step-sequencer track in the timeline.


 button. The pattern roster contains all the available patterns for the track, you can think of it as a toolbox filled with rhythms ready to be used.


 button while the desired pattern is selected, or drag the desired pattern from the roster to the playlist.

 button. The removed pattern will still be available in the roster for reuse.
 button while the pattern is selected. When a pattern is removed from the roster, it will be permanently removed from the playlist as well, if present there.
 button, the currently selected pattern is copied and a new identical pattern is added to the roster. This is useful to start working on a new pattern that is a variation of a previous one. The modifications performed on the new pattern will not affect the original one.

 buttons.
 buttons, and you can even set a custom note for each row, clicking on the
  button and selecting the note from the resulting menu. From the same menu you can select one of the alternate namings available for the note list


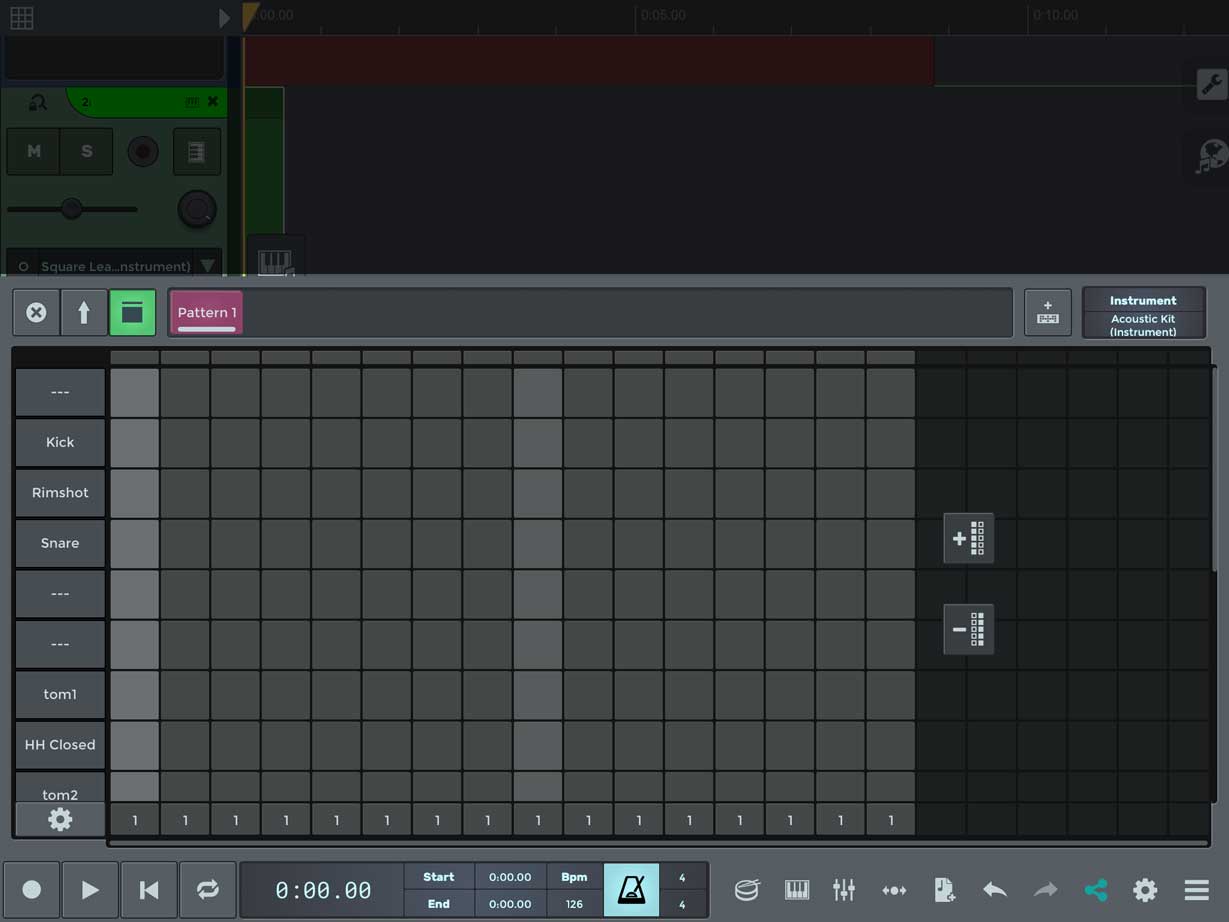
 Now, write your sequence, and then hit play.
We can add or remove steps from our sequence with the "add step" button
Now, write your sequence, and then hit play.
We can add or remove steps from our sequence with the "add step" button  or "delete step" button
  .
.


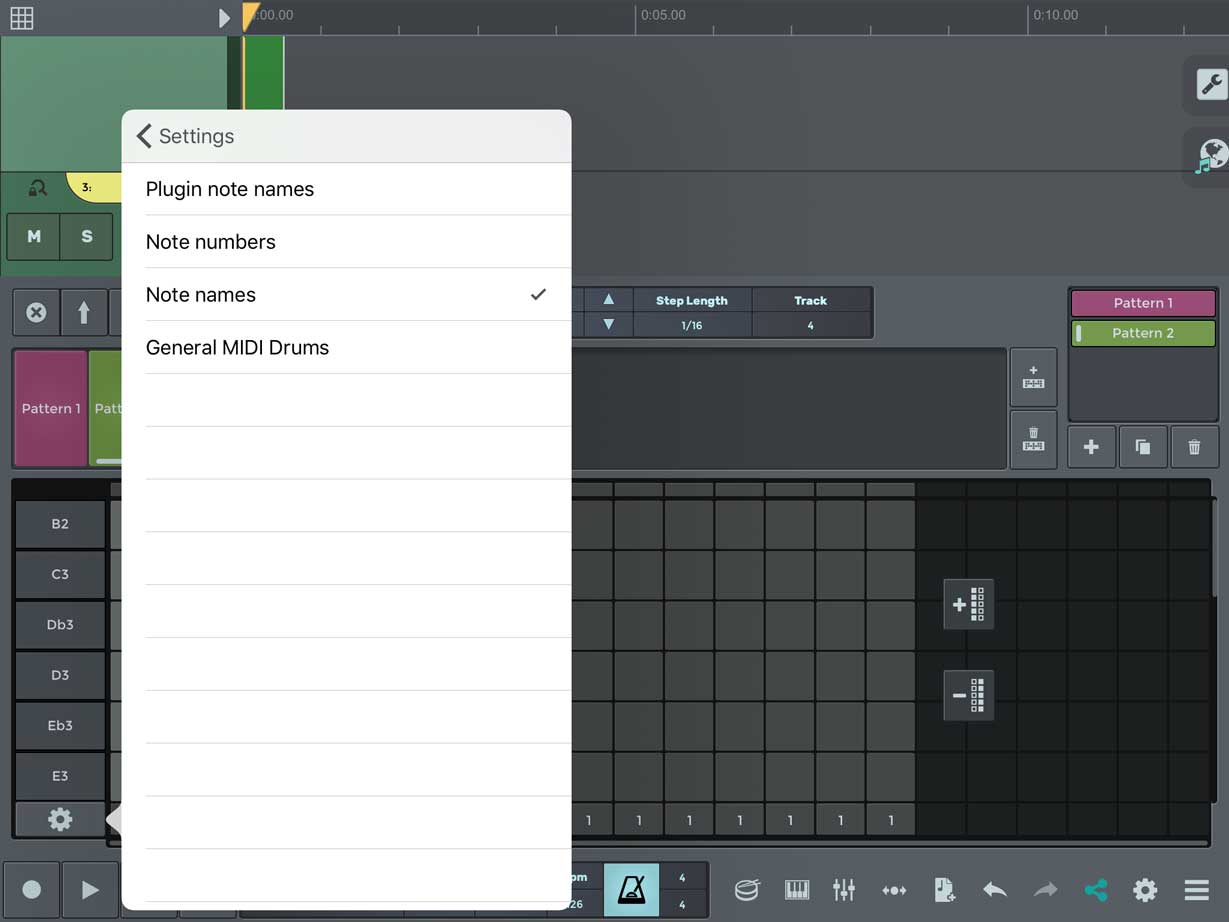
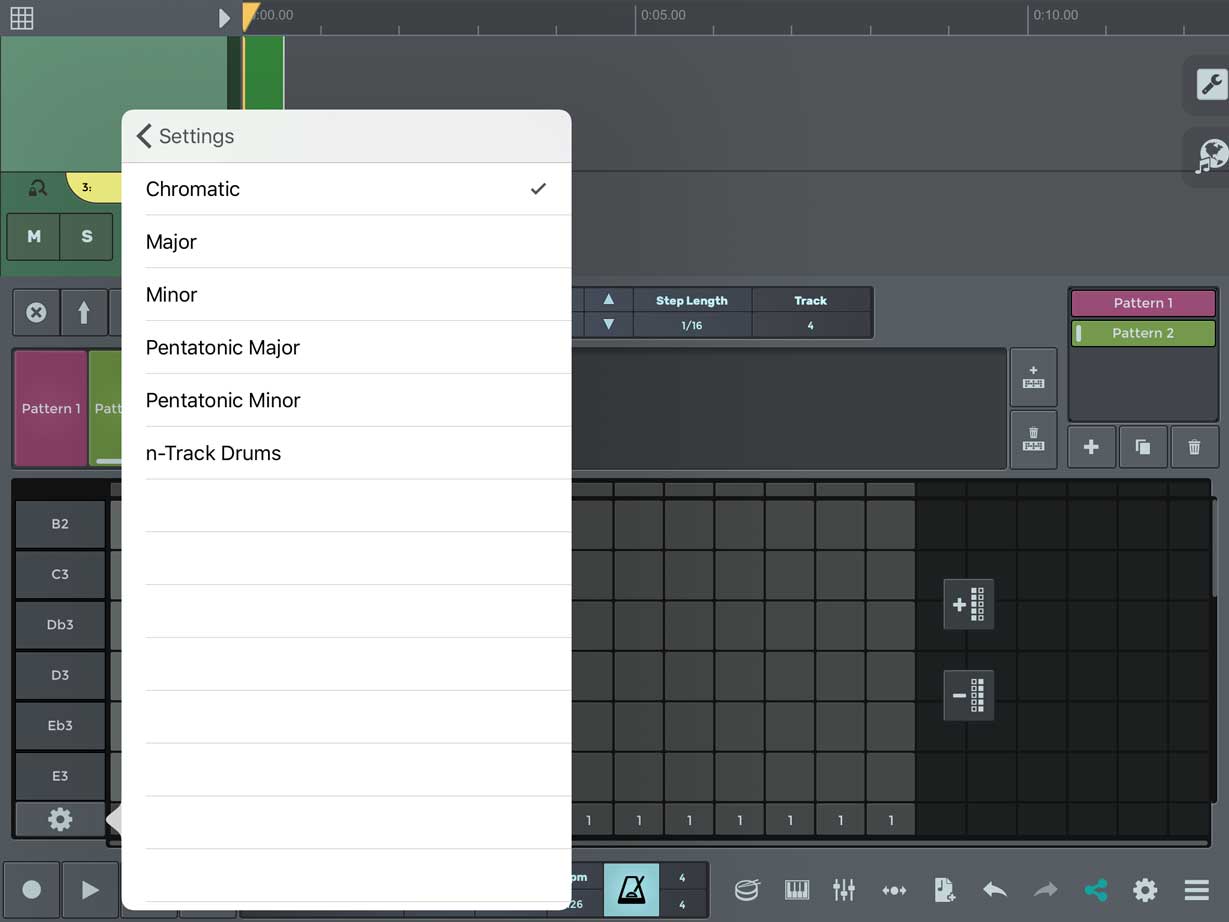
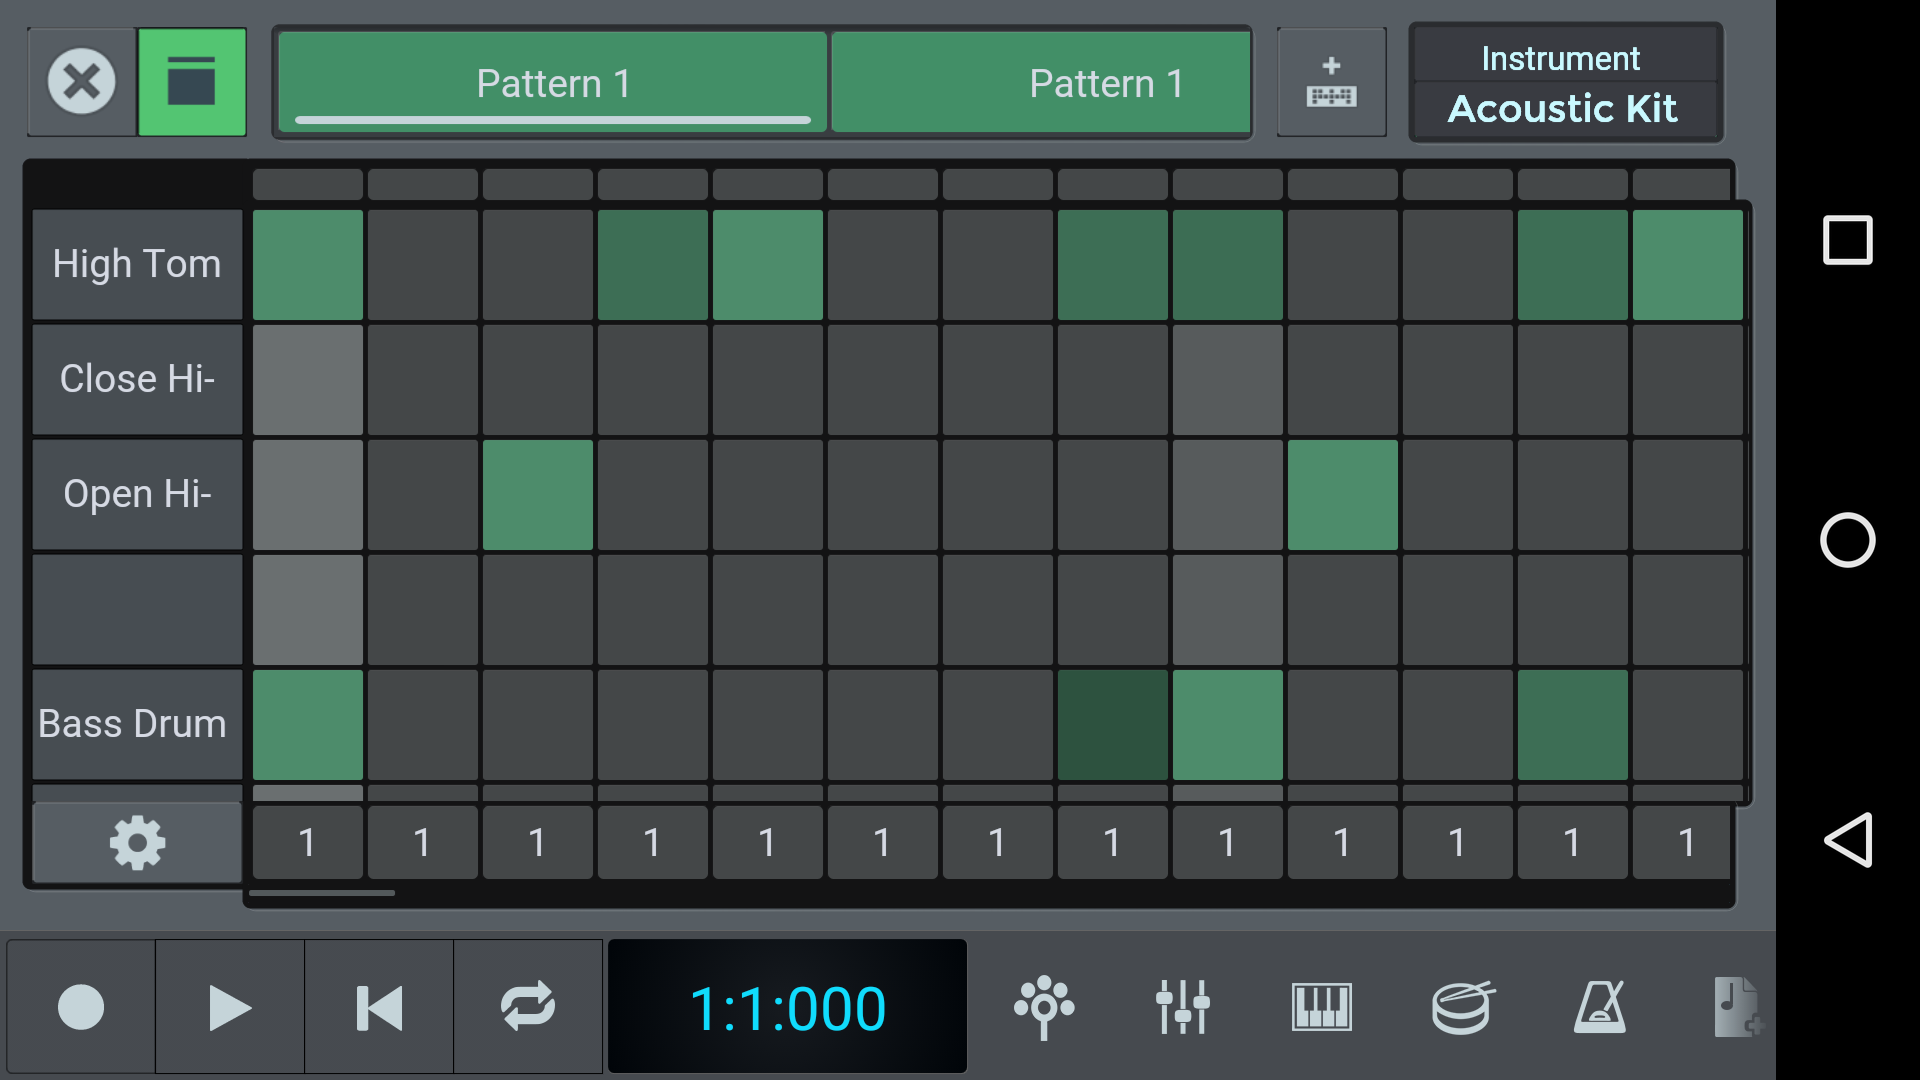
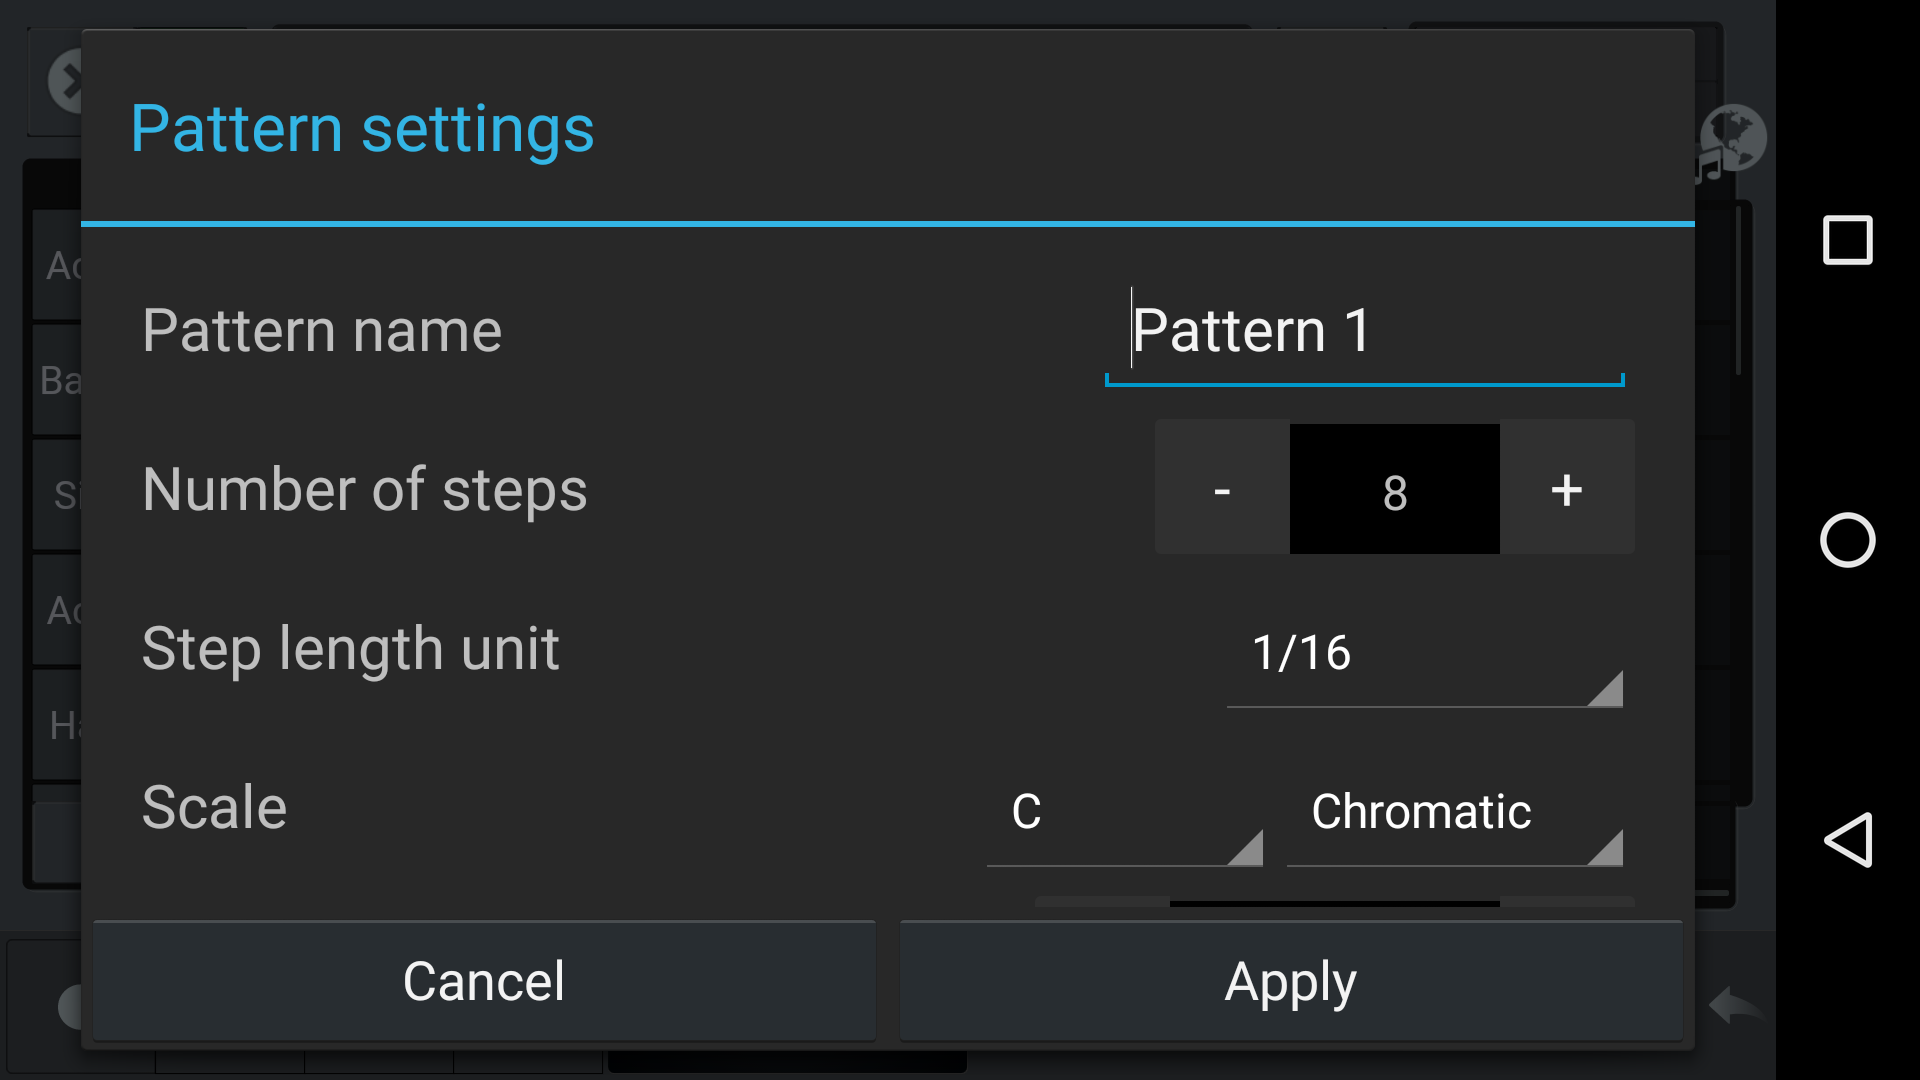
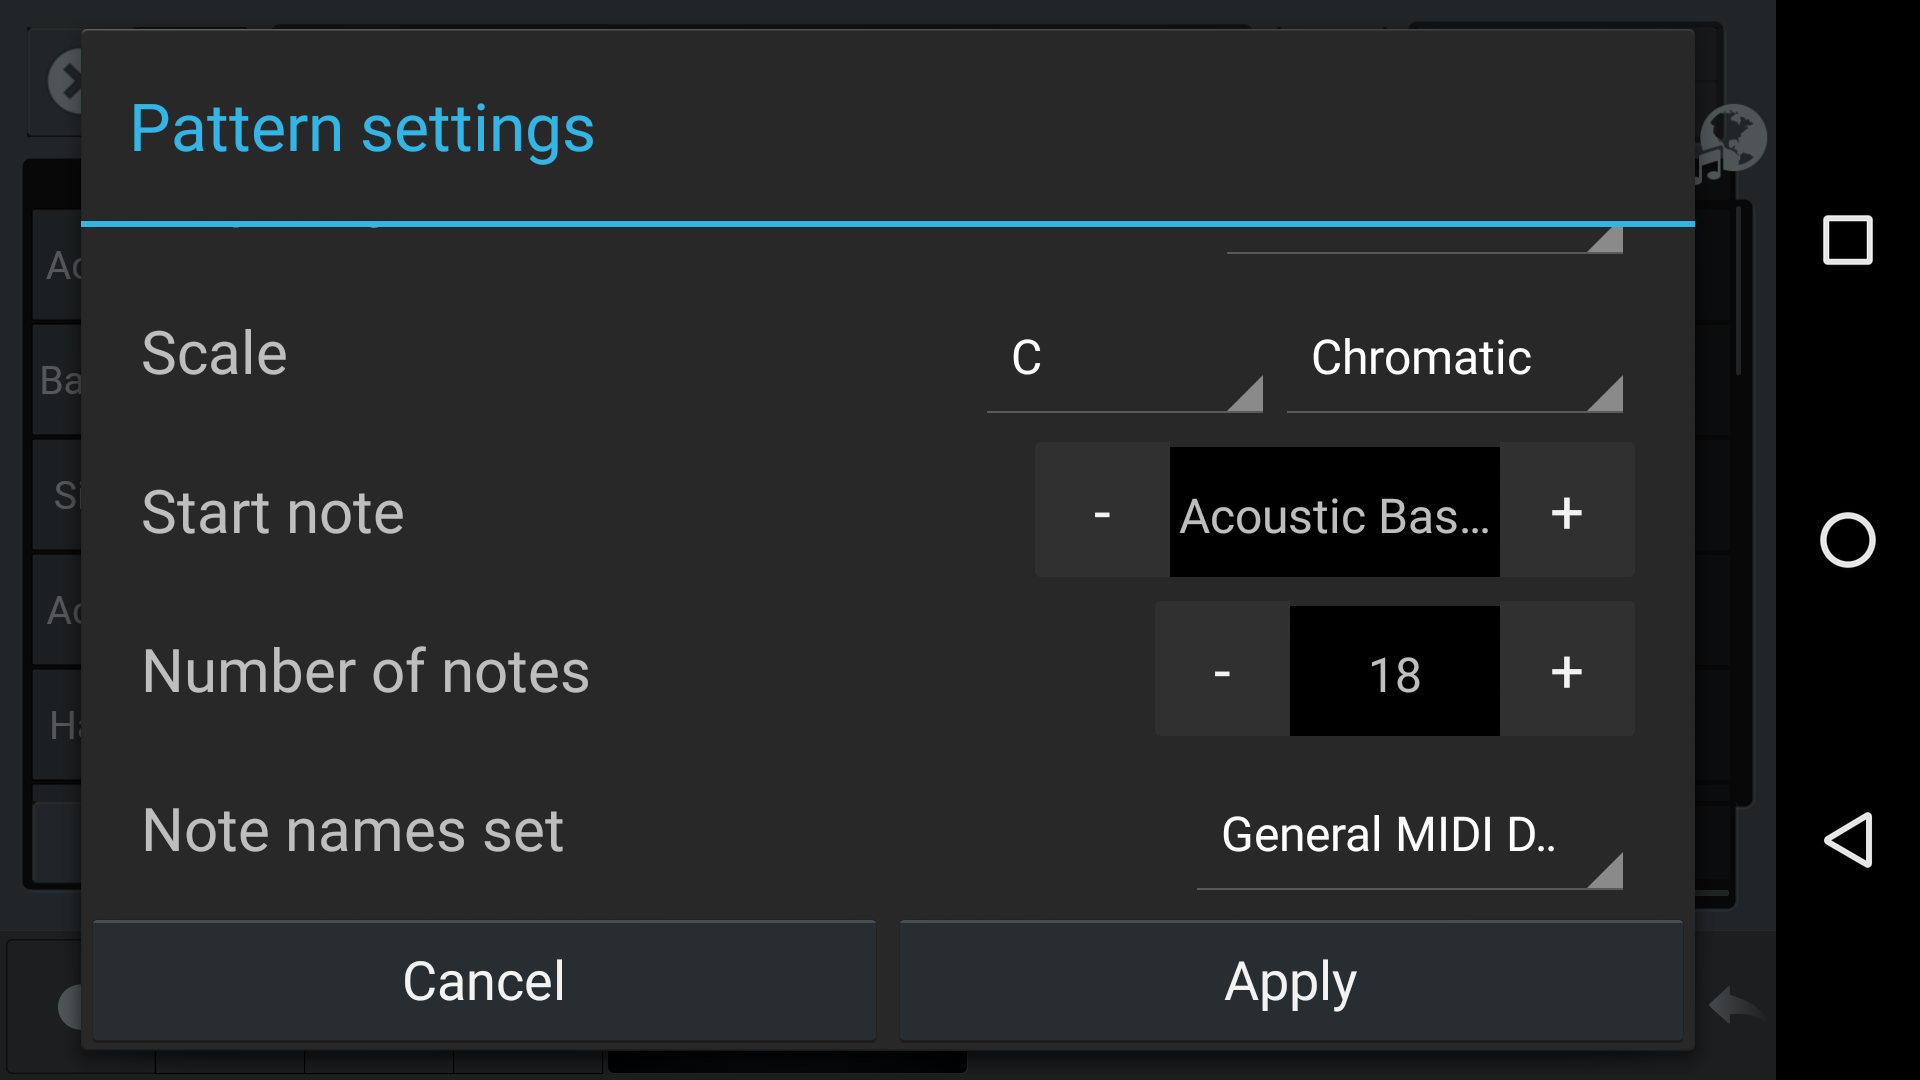

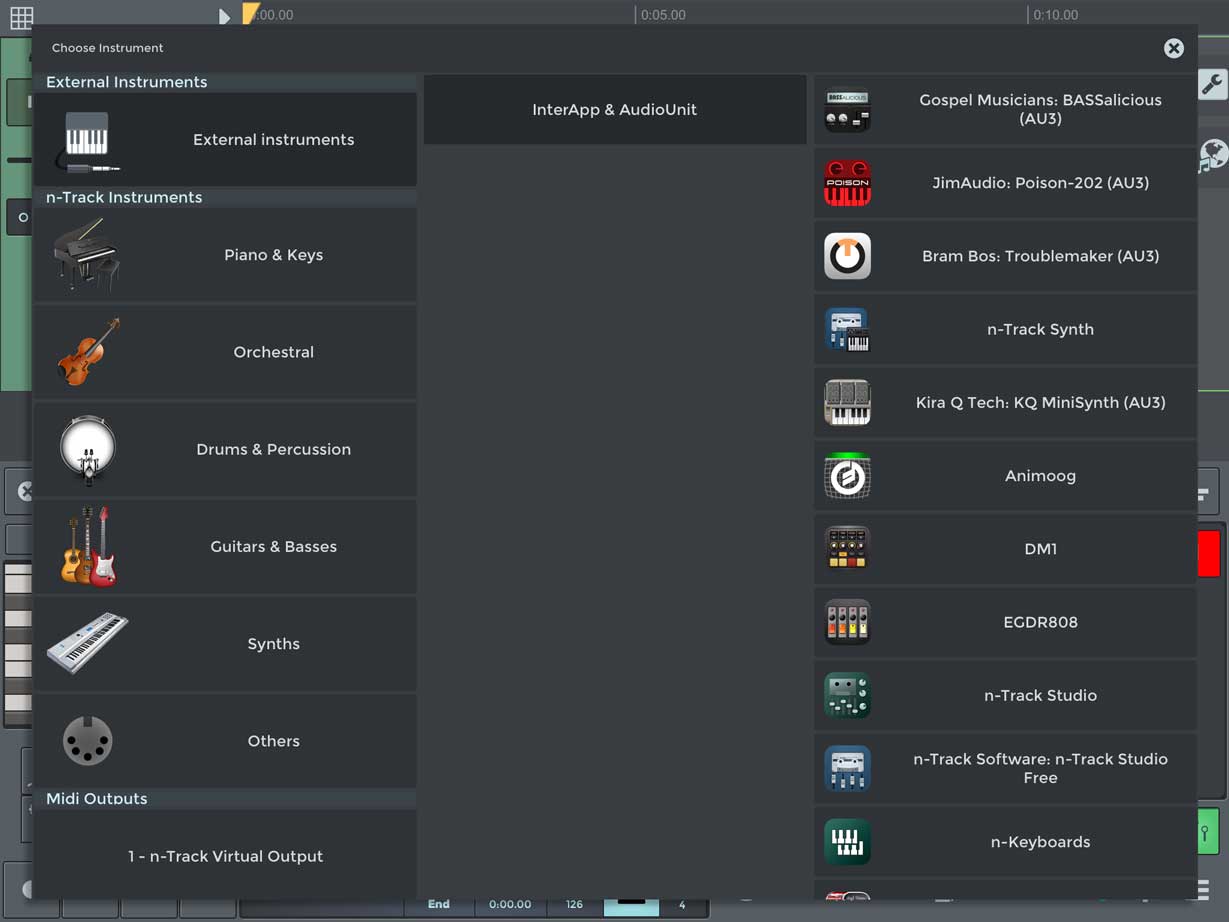
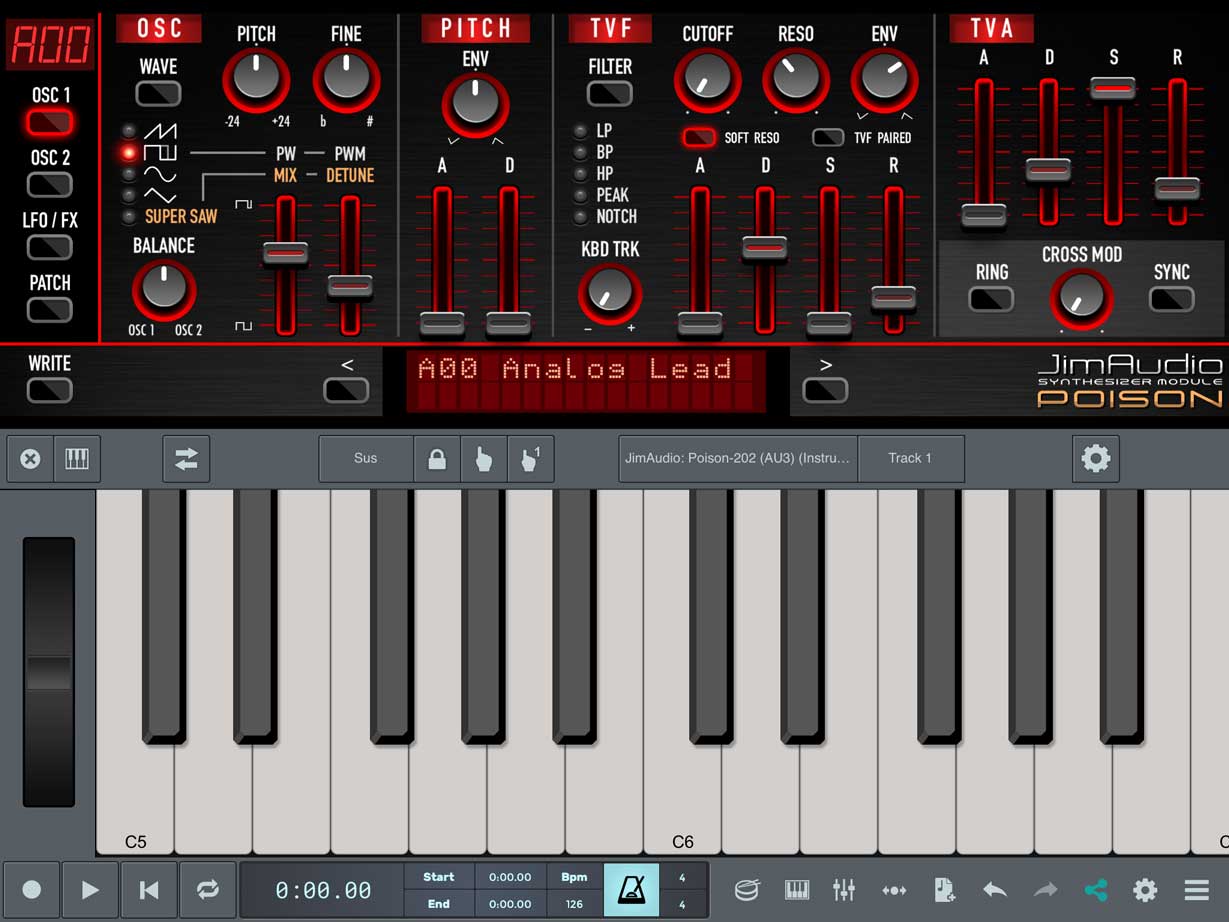

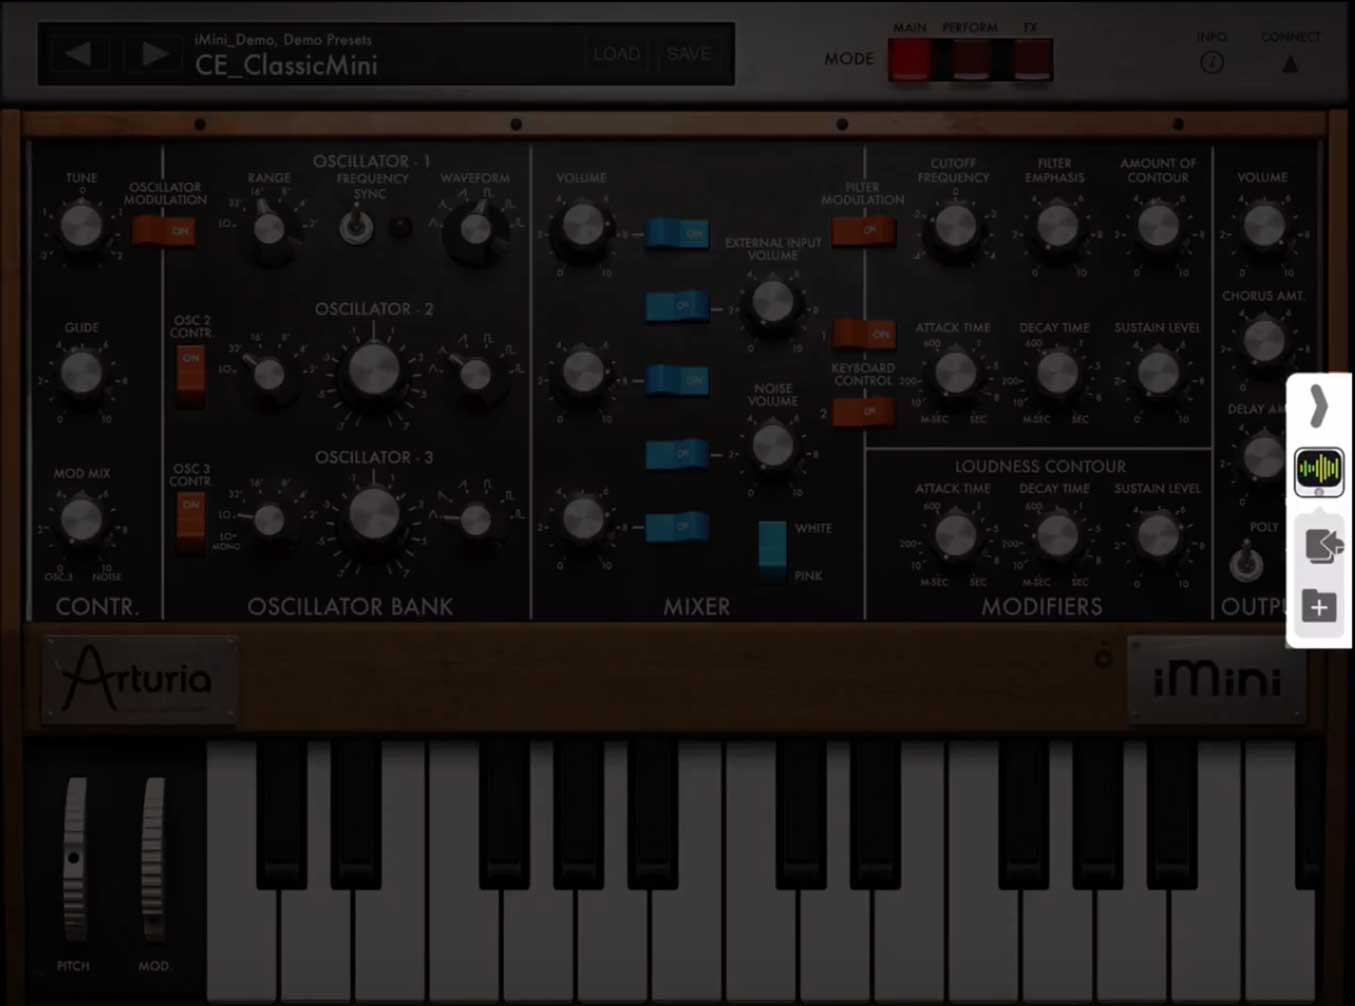
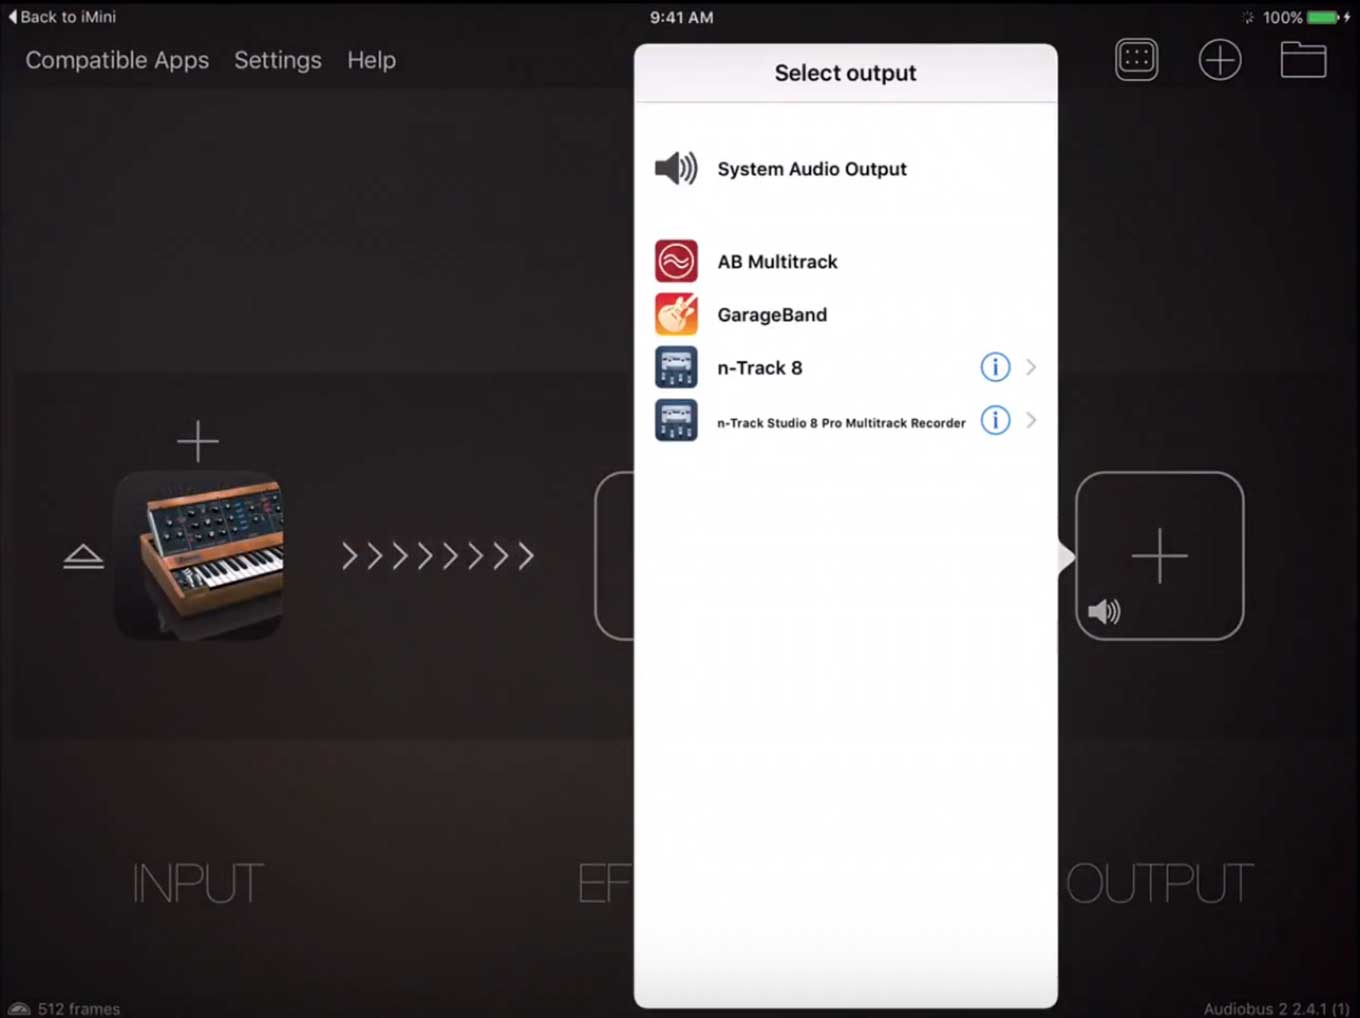
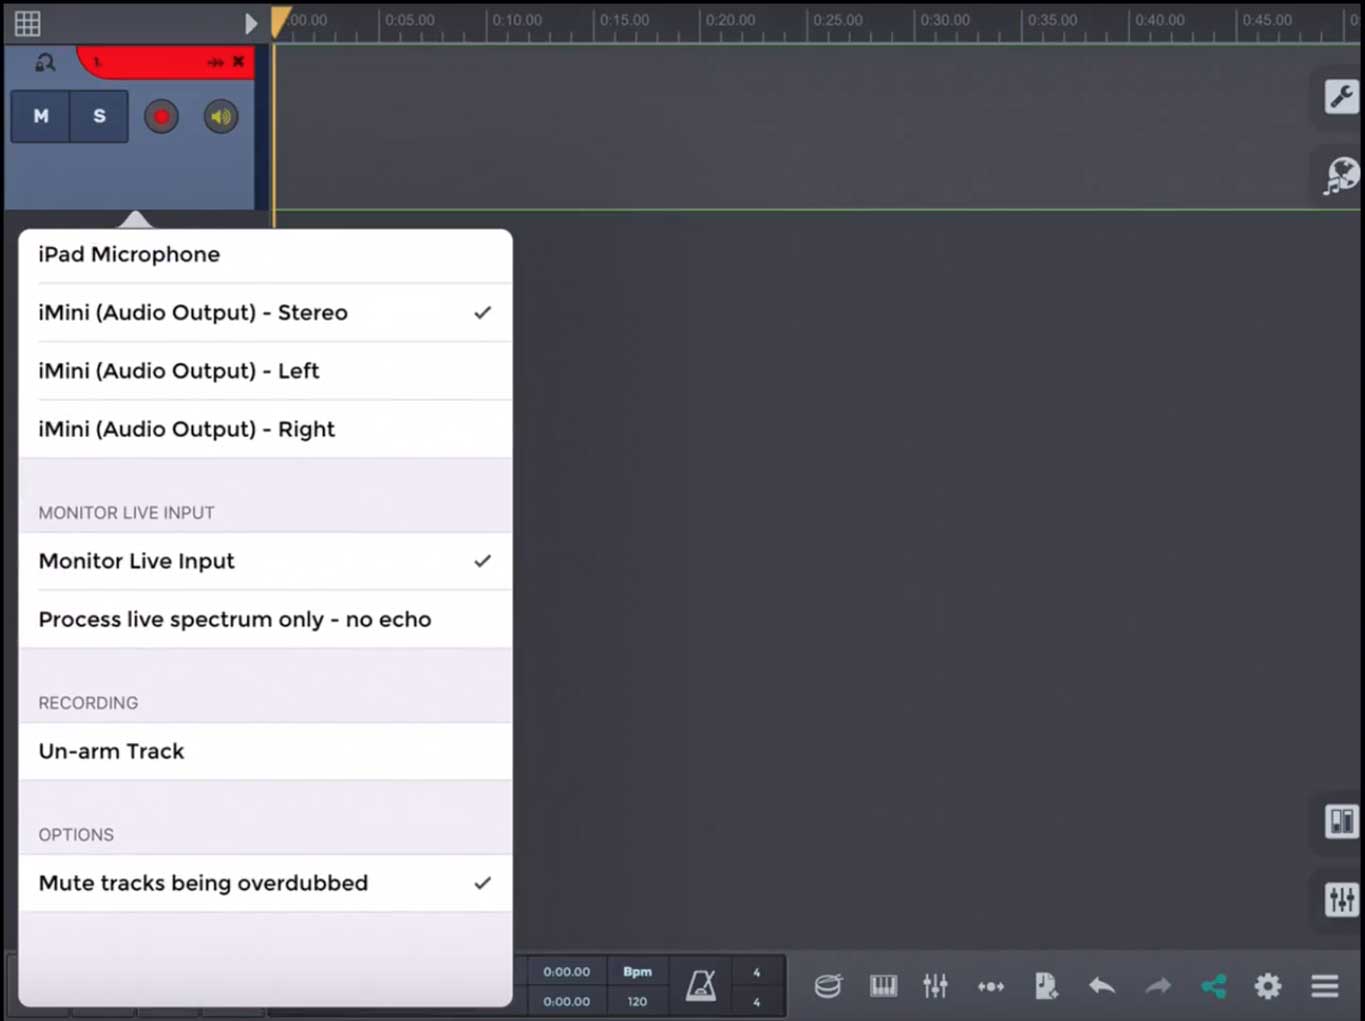


 button, and select Load patch.


 button and typing a name for the new preset.

 button, then click on the automation selector in the audio track’s panel.


 icon on the toolbar mutes the current selection, i.e. sets the volume envelope to zero. If you don't see this icon by default, it can be added by pressing the gear icon and selecting 'Customize toolbar'. Clicking the same button while holding down the Ctrl key (Cmd on a Mac) destructively silences the selection: the audio file itself is modified (you can use the
  undo button to reverse this).


 Supported USB audio devices


 button is activated. Click the
  button to open the Piano roll settings:
 button is activated.
 on the toolbar. Set the tempo, choose MIDI or PC speaker output and choose whether the metronome should be hearable during recording and/or during playback. Click on the test button to hear if the tempo is right.


